Building A Multilingual Static Site Using Next.js, Tailwind, TypeScript, AWS S3, CloudFront, And Athena
August 23, 2022
Prerequisite #
- A development environment with Node.js 12.22.0 or later.
- Visual Studio Code is installed.
- An AWS account for hosting, one of the many options. :)
Goal #
The result is a static site with support for multiple languages. The site has repeated common information across all pages along with unique information on each page. The dynamic routing function provided by Next.js is used for implementing following path structure.
/newyork-us/en
/newyork-us/zh
/auckland-nz/en
/auckland-nz/zh
The site is designed for running a serial of events in different locations.
The site is hosted in the AWS Simple Storage Service (S3) and distributed through the AWS CloudFront, a CDN service.
Building A Static Site Using Next.js #
ReactJS helps building reusable page components. This is time saving for building multilingual landing pages.
Landing Page Starter Template #
First let’s clone the Next-JS-Landing-Page-Starter-Template from GitHub. With no particular reason I would like to keep a history of the source so I do a normal clone from the starter repo.
> git clone https://github.com/ixartz/Next-JS-Landing-Page-Starter-Template.git
Alternatively, you can remove the Git history from this starter kit by adding --depth 1 when clone.
> git clone --depth 1 https://github.com/ixartz/Next-JS-Landing-Page-Starter-Template.git
Let’s install all the dependencies and prepare for the first test run.
> npm install
Once all the packages are installed please run following command to check everything runs ok.
> npm run dev

Then we can go to http://localhost:3000 and we should see the page below. If in a rare case that your port 3000 is used by other application then the Next.js dev server will try to find the next available port automatically. Please take a look the log output for more information.
Optional Then add a new origin which is your own Git repository where you want to keep tracking of your new site. This is optional but it’s often safer to keep a copy remotely. I use GitHub since it’s free for unlimited private repositories.
Plan dynamic routing #
Open the src/pages folder and create following strcuture and the new file.
src
|-pages
| |-[city]          <- New folder with name "[city]"
| | |-[locale]      <- New folder with name "[locale]"
| | | |-index.tsx   <- New file with name "index.tsx"
index.tsx
import { GetStaticPaths, GetStaticProps } from 'next';

const Index = () => <div>hello</div>;

export default Index;

export const getStaticPaths: GetStaticPaths = async () => {
  const paths = [
    { params: { city: 'newyork-us', locale: 'en' } },
    { params: { city: 'newyork-us', locale: 'zh' } },
    { params: { city: 'auckland-nz', locale: 'en' } },
    { params: { city: 'auckland-nz', locale: 'zh' } },
  ];

  return {
    paths,
    fallback: false,
  };
};

export const getStaticProps: GetStaticProps = async () => {
  const post = {};
  return { props: post };
};
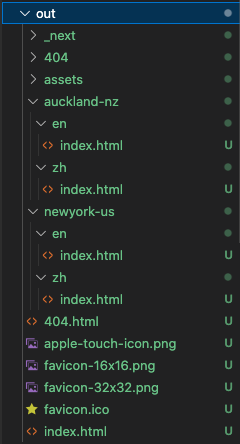
The getStaticPaths function is a handler pre-defined by the Next.js framework so that the Static Site Generation process can create all the paths specified by this function. The path parameter values (i.e. values for ‘city’ and ‘locale’) will be used in combination with the folder structure template laid out above. It will result a folder structure like this.
newyork-us
|-en
| |-index.html
newyork-us
|-zh
| |-index.html
auckland-nz
|-en
| |-index.html
auckland-nz
|-zh
| |-index.html
For more information please check Next.js reference for getStaticPaths.
The getStaticProps function is used for getting content from a separate source before render the page component. It usually reach out to a headless CMS system for getting the content. Over here we just provide an empty object as a placeholder for now. For more information please check Next.js reference for getStaticProps.
Build And Export #
Let’s update the package.json so that it combines build and export into one command.
"scripts": {
    ...
    "export": "next build && next export",
    ...
}
Now let’s run the export command and see how it goes.
> npm run export
We should see a new folder out gets created and it should look like this.
Debug Export #
The normal debug options does not work well with static page generation. Let’s use the old school console debug() function.
index.tsx
import { debug } from 'console';

...

export const getStaticProps: GetStaticProps = async (
  context: GetStaticPropsContext
) => {
  debug(`---- Start Get Static Props <Context> ----`);
  debug(context);
  debug(`---- End Get Static Props <Context> ----`);
  const post = {};
  return { props: post };
};
NOTE: The starter kit has Visual Studio Code launch configurations setup for both browser and server side debugging. Please use the debug instructions on Next.js documentation as a reference guide if feel curious to try.
Now let’s run the export command again and see the debug output in terminal.
> npm run export
The output will show multiple outputs for the context object. Each has different values for city and locale. One example looks like this.
{
  params: { city: 'newyork-us', locale: 'en' },
  locales: undefined,
  locale: undefined,
  defaultLocale: undefined
}
Let’s use these two parameters to load content from a local JSON file.
Prepare Multilingual Content #
Let’s create a new folder .content in root of this project and 2 JSON files for both the English and Chinese content we are going to display.
<project-root>
|-.content
| |-en.json
| |-zh.json
en.json
{
  "tagLine": "Rainbow appears after storms",
  "cities": {
    "newyork-us": {
      "name": "New York, United States"
    },
    "auckland-nz": {
      "name": "Auckland, New Zealand"
    }
  }
}
zh.json
{
  "tagLine": "宇過天晴",
  "cities": {
    "newyork-us": {
      "name": "美國,紐約"
    },
    "auckland-nz": {
      "name": "新西蘭,奧克蘭"
    }
  }
}
Then we need to add a class for loading the content in a type-safe way. Let’s add a folder under the src folder and name it as localization. Then please add a TypeScript file PageContent.ts
<project-root>
|-src
| |-localization
| | |-PageContent.ts
PageContent.ts
import en from '../../.content/en.json';
import zh from '../../.content/zh.json';

export type City = {
  name: string;
};

export type LocalizedContent = {
  tagLine: string;
  cities: { [name: string]: City };
};

const allContent: { [name: string]: LocalizedContent } = {
  en: <LocalizedContent>en,
  zh: <LocalizedContent>zh,
};

export type PageContent = {
  tagLine: string;
  city: City;
};

export type GetPageContent = (
  city: string,
  locale: string
) => PageContent | undefined;

const getPageContent: GetPageContent = (cityCode: string, locale: string) => {
  const localizedContent = allContent[locale];
  if (localizedContent == null) {
    return undefined;
  }
  const city = localizedContent.cities[cityCode];
  if (city == null) {
    return undefined;
  }
  const pageContent: PageContent = {
    tagLine: localizedContent.tagLine,
    city,
  };
  return pageContent;
};

export default getPageContent;
The first two lines load the JSON content as a generic object which are then casted into the LocalizedContent type. If the structure of the JSON differs from the casting type Visual Studio Code will provide a warning.
Then we have two types defined. The PageContent is a type for an object that carries data for rendering the page. This object will be passed into the React components that constructs the page. The GetPageContent is a type for a function that’s responsible for returning the right content. The returning type of this function is either a PageConent object or undefined.
Then we have the first version of the getPageContent function defined. This function takes two parameters (i.e. cityCode and locale). These will be values get from the context object in the getStaticProps function in the index.tsx.
Rendering Content #
Let’s update the index.tsx for displaying the content we defined in the JSON file. We can assume the right content will be provided by a high level function and inside of the index.tsx we just need to figure out the layout.
<project-root>
|-src
| |-pages
| | |-[city]
| | | |-[locale]
| | | | |-index.tsx
index.tsx
type Props = {
  pageContent: PageContent;
};

const Index: NextPage<Props> = (props) => {
  const { pageContent } = props;
  return (
    <>
      <div>{pageContent.tagLine}</div>
      <div>{pageContent.city.name}</div>
    </>
  );
};

export default Index;
First we defined a property type that this React component uses. This enables the component to receive content in a type-safe way and the Visual Studio Code can help coding with intellisence.
Then we use object destructing to get the content object from the props and use it for rendering HTML.
👍 CREDIT: How to set types for functional component props in Nextjs with TypeScript? (By Melvin George, April 28, 2021) For me to find a solution for typing the
Indexfunction.
Get Localized Content #
Then we also need to update the getStaticProps function in the index.tsx.
index.tsx
interface Params extends ParsedUrlQuery {
  city: string;
  locale: string;
}

export const getStaticProps: GetStaticProps<Props, Params> = async (
  context
) => {
  const params = context.params!;
  const { city, locale } = params;
  const pageContent = getPageContent(city, locale)!;
  debug(`\n---- Start Get Static Props <pageContent> ----`);
  debug(pageContent);
  debug(`---- End Get Static Props <pageContent> ----`);
  return { props: { pageContent } };
};
A non-null assertion operator is used to ensure the params is a defined object. Then we get the city’s code and locale using a destructing statement. Then through the pageContent object is fetched using the function we defined earlier. Finally the content object is returned through an object that has a props property that is conformed with the Props type that we defined for the Index component.
👍 CREDIT: GitHub Comment (By Gianluca Gippetto, November 15, 2020) For me to find a solution for typing the
getStaticPropsfunction.
DEV Run And Test #
Next.js has a dev server that you can get live change reloaded without refresh the browser manually. Let’s run the following command.
> npm run dev
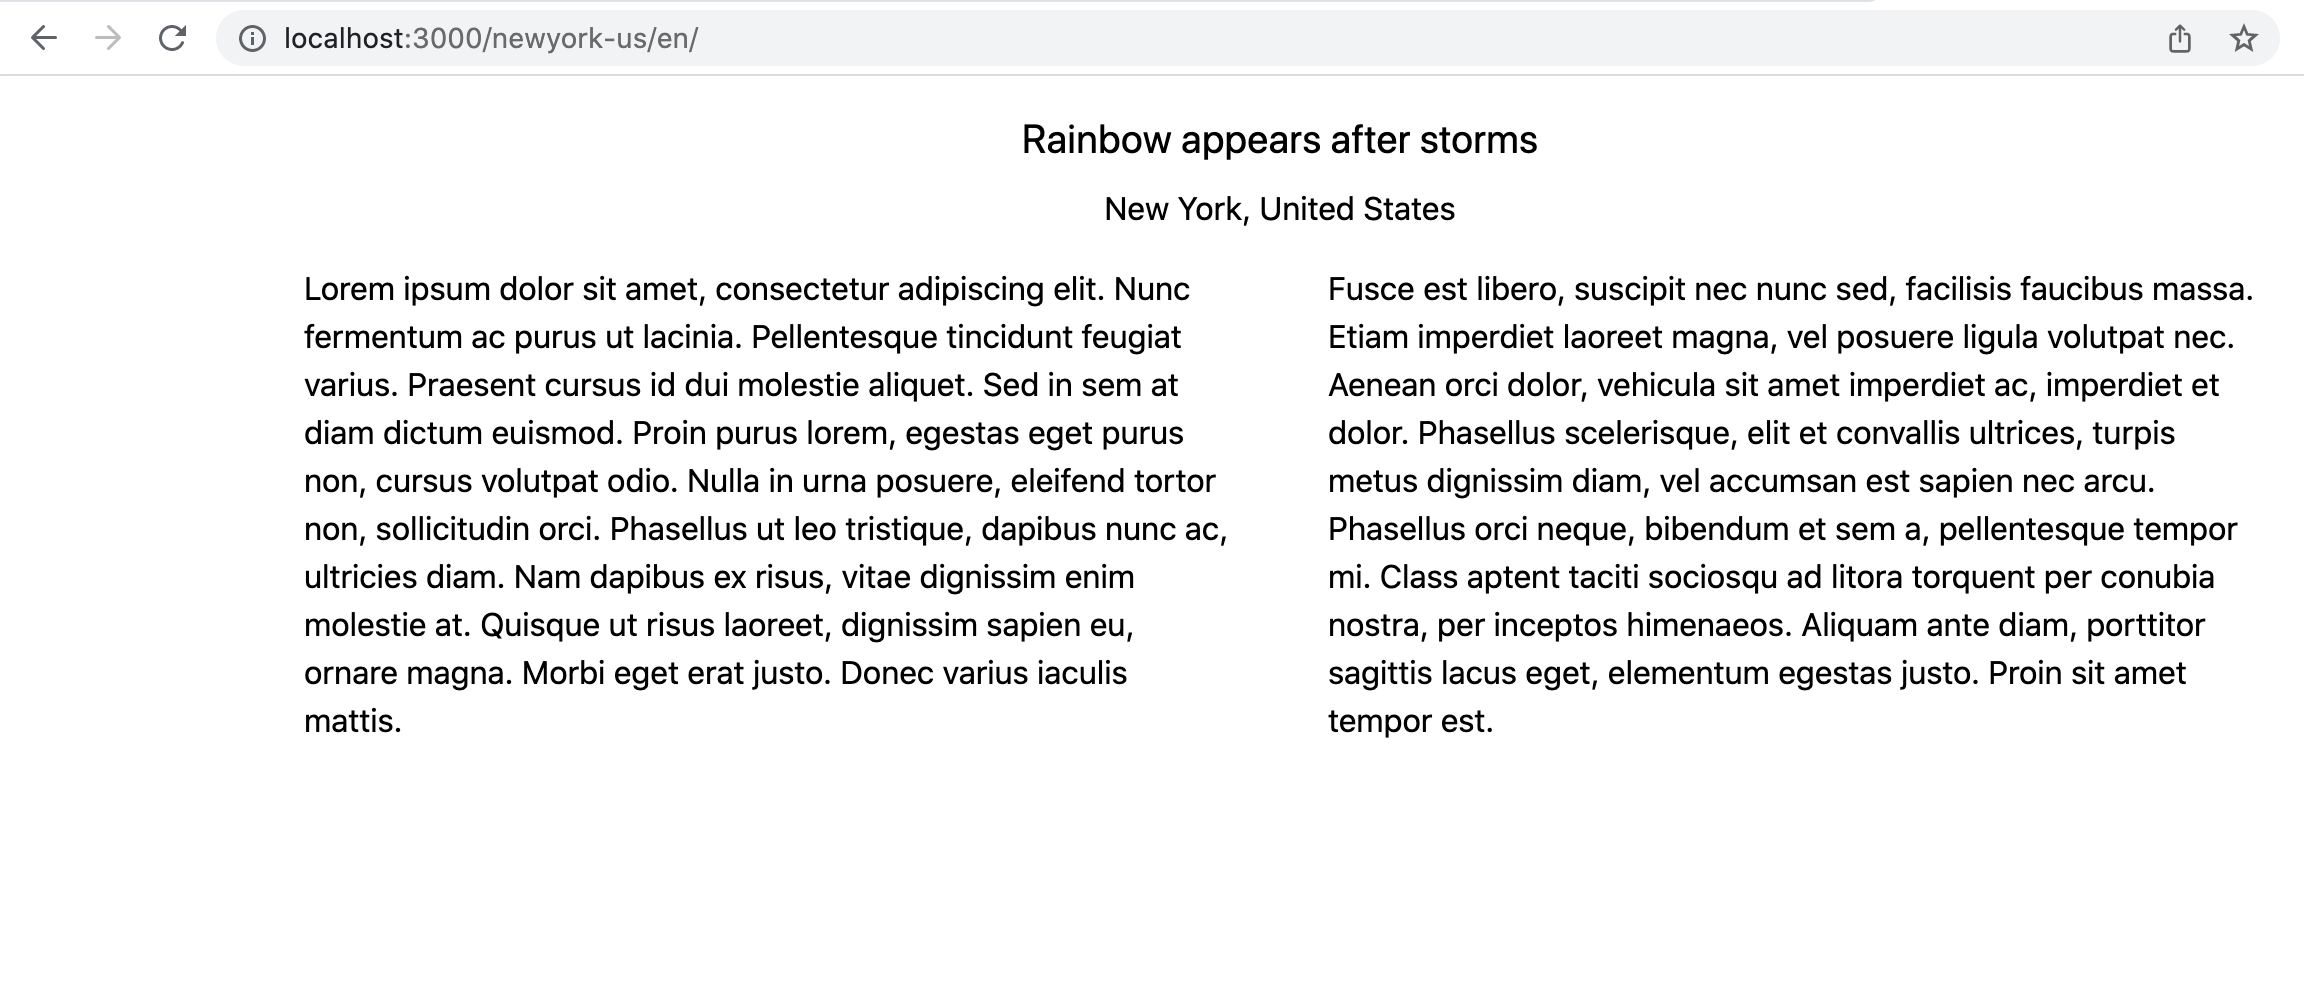
Open the http://localhost:3000/newyork-us/en should display this.

Go to http://localhost:3000/newyork-us/zh should display this.

Improve Code Quality #
The getPageContent function looks ok but returning undefined is never a good idea in programming. This is like an air bubble in the blood flowing in our veins. So I’m going to default content to English. Meantime it’s also fine to throw an exception to let the higher level logic to handle situation that lower level has no idea how to deal. The balancing of who handles what requires many try and fail.
The second version of the getPageContent function looks like this.
PageContent.ts
export type GetPageContent = (city: string, locale: string) => PageContent;

const getPageContent: GetPageContent = (cityCode: string, locale: string) => {
  let localizedContent = allContent[locale];
  if (localizedContent == null) {
    // Protected by compile time type checking that 'en' has value
    localizedContent = allContent.en!;
  }
  let city = localizedContent.cities[cityCode];
  if (city == null) {
    const cityCodes = Object.keys(localizedContent.cities);
    // Compile time type checking does not guarantee existence of a value.
    const defaultCityCode = cityCodes[0]!;
    city = localizedContent.cities[defaultCityCode]!;
  }
  const pageContent: PageContent = {
    tagLine: localizedContent.tagLine,
    city,
  };
  return pageContent;
};
The non-null assertion operator (i.e. !) tells the type checking to ignore the possibility of a nullness situation. It does not raise error when the value is null or undefined. In fact it seems swallows the index out of range error from this line below … not good! :(
const defaultCityCode = cityCodes[0]!;
At this point we need to decide if need to add more logic to make sure we will get a default city code or throw an error. My choice is to let the error thrown so the testers can easily tell something seriously wrong with the site’s configuration setup.
const getPageContent: GetPageContent = (cityCode: string, locale: string) => {
  let localizedContent = allContent[locale];
  if (localizedContent == null) {
    // Protected by compile time type checking that 'en' has value
    localizedContent = allContent.en!;
  }
  const city = localizedContent.cities[cityCode];
  if (city == null) {
    throw new Error(
      `City code '${cityCode}' does not have corresponding data found in localized content for '${locale}'`
    );
  }
  const pageContent: PageContent = {
    tagLine: localizedContent.tagLine,
    city,
  };
  return pageContent;
};
Style Using Tailwind #
Let’s improve the styling of the page by making the content more responsive. Tailwind is a big topic and will prepare separate post to introduce it. Over here just want to extend the content model and demonstrate using Tailwind CSS classes without writing a single line of CSS.
First let’s add some new content into en.json and zh.json. I used Lorem ipsum text generator.
en.json
{
  ...

  "features": {
    "us": "Lorem ipsum dolor ...",
    "nz": "Fusce est libero, ..."
  }
}
zh.json
{
  ...

  "features": {
    "us": "Lorem Ipsum,也稱亂數假文或者啞元文本...",
    "nz": "它不僅延續了五個世紀,還通過了電子排版的挑戰..."
  }
}
Then let’s update the LocalizedContent class and introducing a new class Features.
PageContent.ts
export type Features = {
  us: string;
  nz: string;
};

export type LocalizedContent = {
  tagLine: string;
  cities: { [name: string]: City };
  features: Features;
};
Then we need to update the PageConent class and the getPageContent function.
index.tsx
export type PageContent = {
  tagLine: string;
  city: City;
  features: Features;
};

...

const getPageContent: GetPageContent = (cityCode: string, locale: string) => {
  const localizedContent = allContent[locale];
  if (localizedContent == null) {
    return undefined;
  }
  const city = localizedContent.cities[cityCode];
  if (city == null) {
    return undefined;
  }
  const pageContent: PageContent = {
    tagLine: localizedContent.tagLine,
    city,
    features: localizedContent.features,
  };
  return pageContent;
};
Now let’s add these content into the component.
index.tsx
  return (
    <div className="max-w-screen-lg mx-auto">
      <div className="flex flex-col text-center">
        <div className="mt-4 text-xl">{pageContent.tagLine}</div>
        <div className="mt-2">{pageContent.city.name}</div>
      </div>
      <div className="flex flex-wrap">
        <div className="w-full mt-4 md:w-1/2 px-6">
          {pageContent.features.us}
        </div>
        <div className="w-full mt-4 md:w-1/2 px-6">
          {pageContent.features.nz}
        </div>
      </div>
    </div>
  );
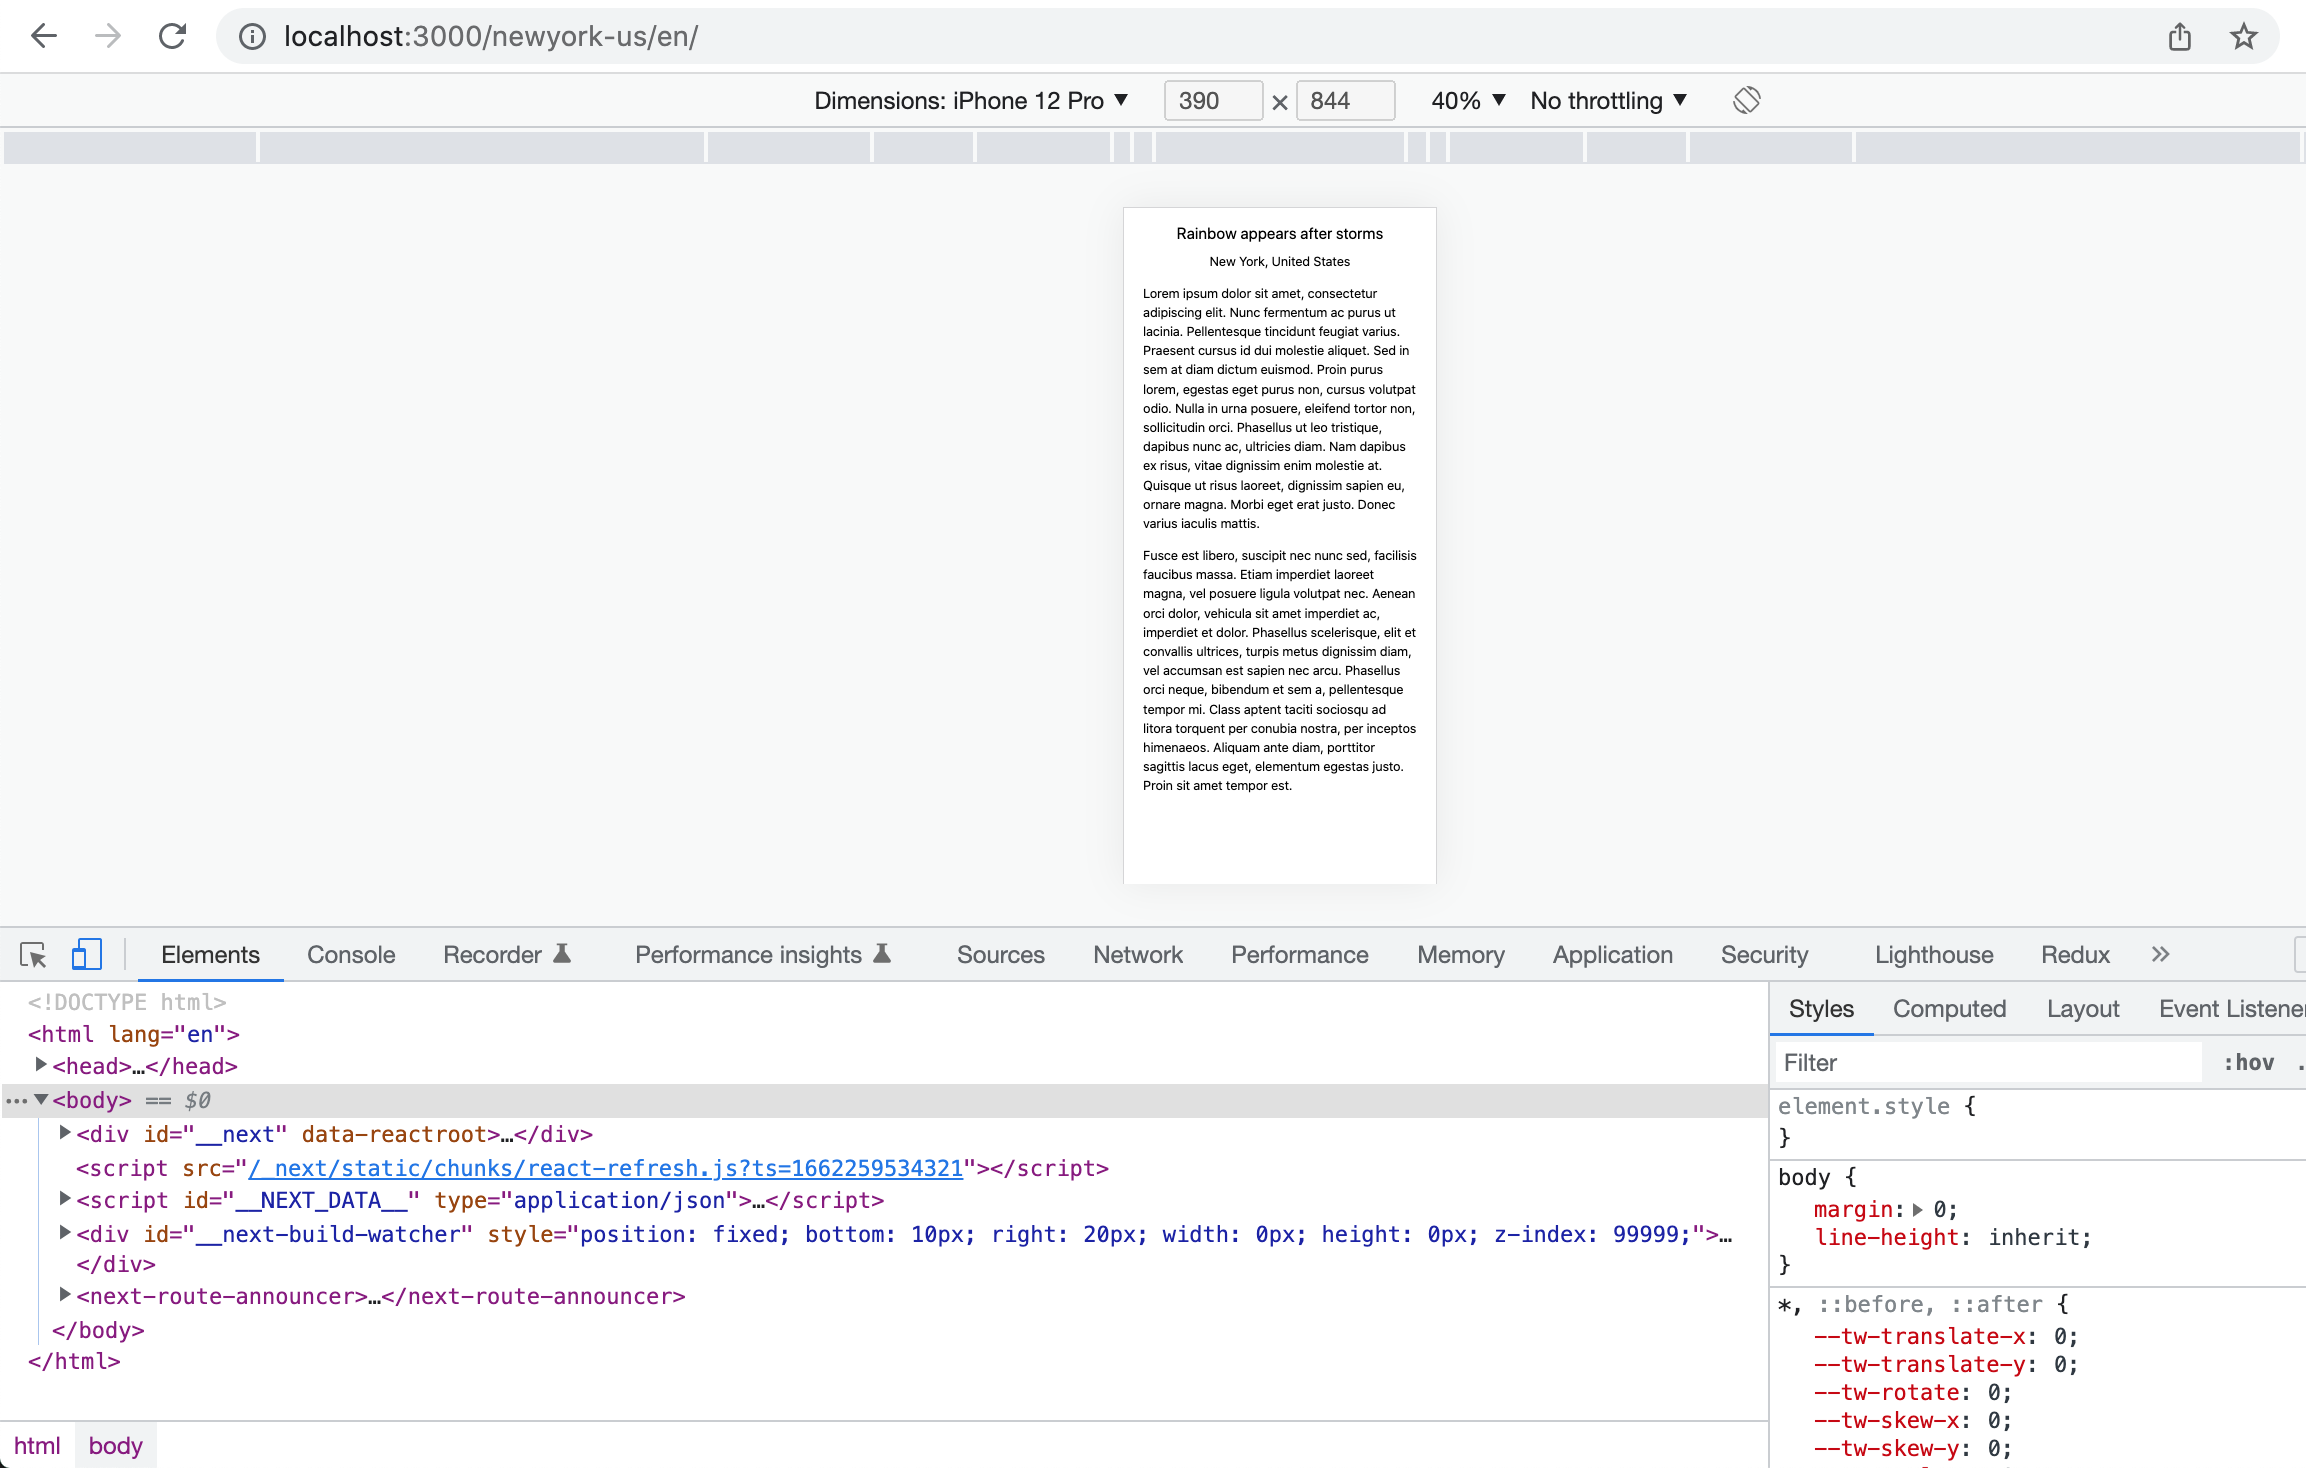
Hope the dev server is still running and then you should see the following outcome in desktop view and mobile view.
Desktop View
Mobile View
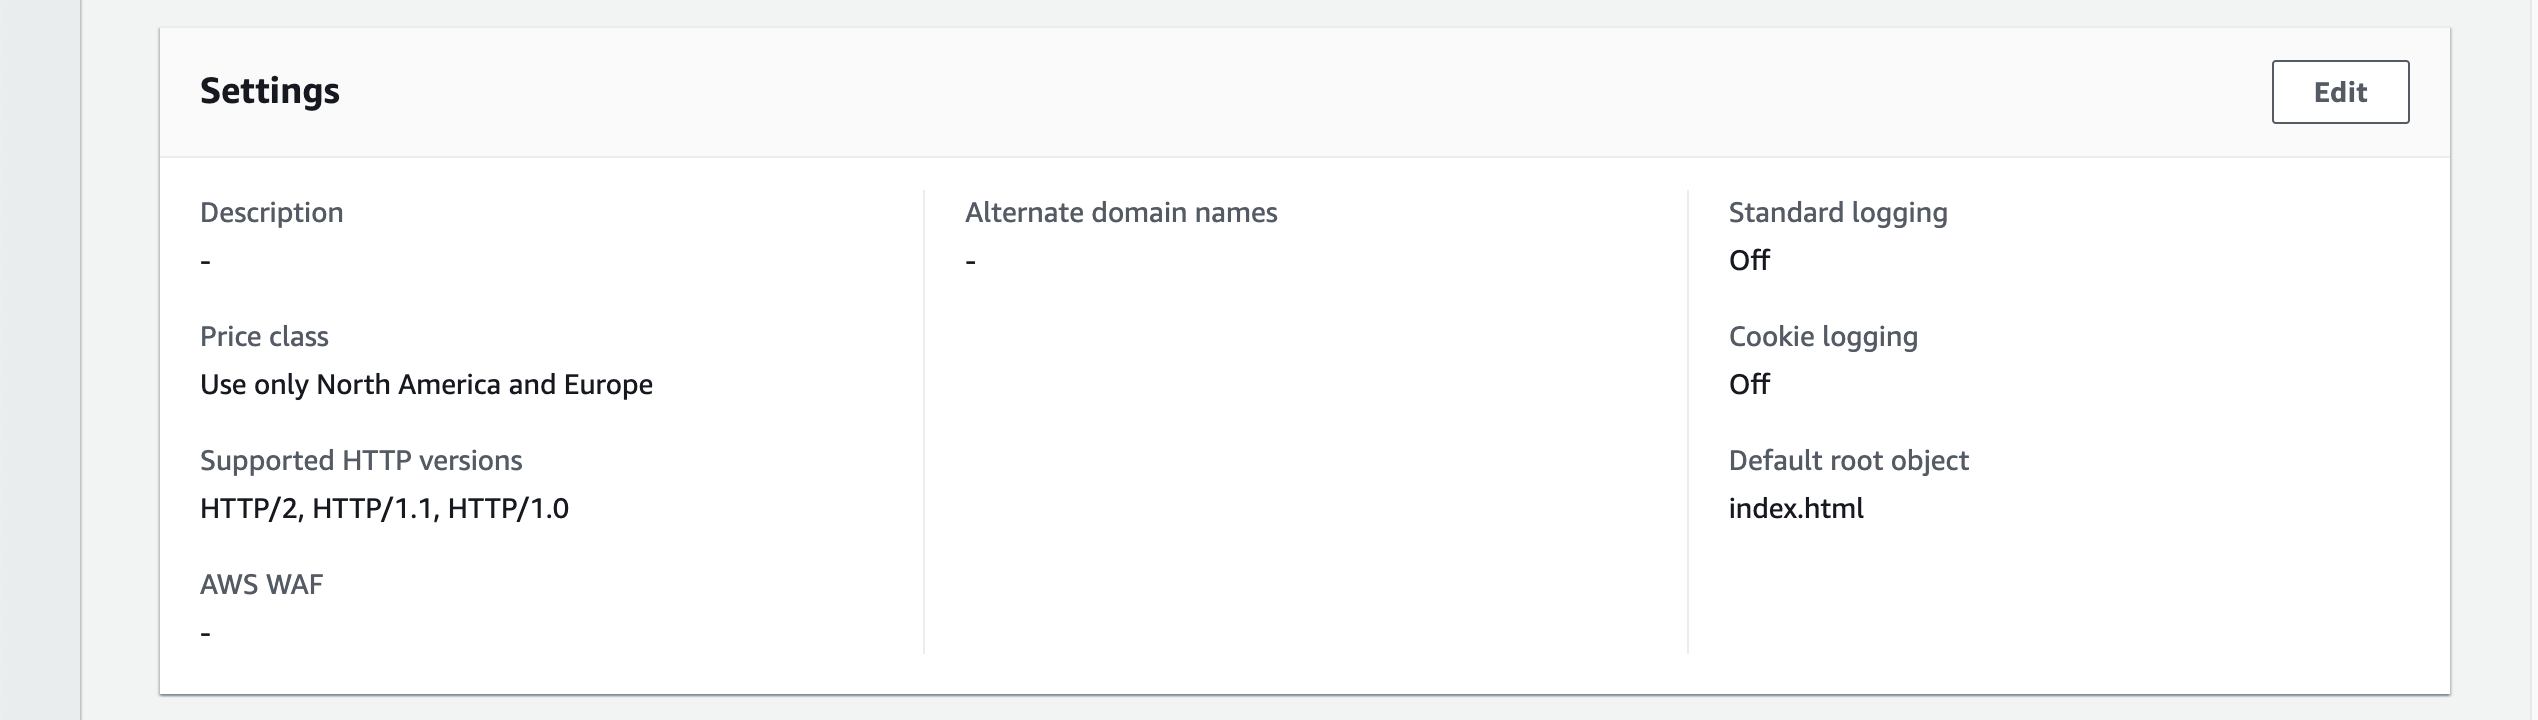
Hosting On S3 And CloudFront #
AWS S3 can be used for hosting static website by itself. By using a CDN it can boost the page loading performance significantly. We also want to do some rate limiting so that each IP address can only do certain amount of requests within a timeframe. We will use a CloudFront function to set the default document to URI when it’s not provided. Last but not least we want to keep our CloudFront access log in a separate S3 bucket and use plain SQL query to analyze the traffic through AWS Athena.
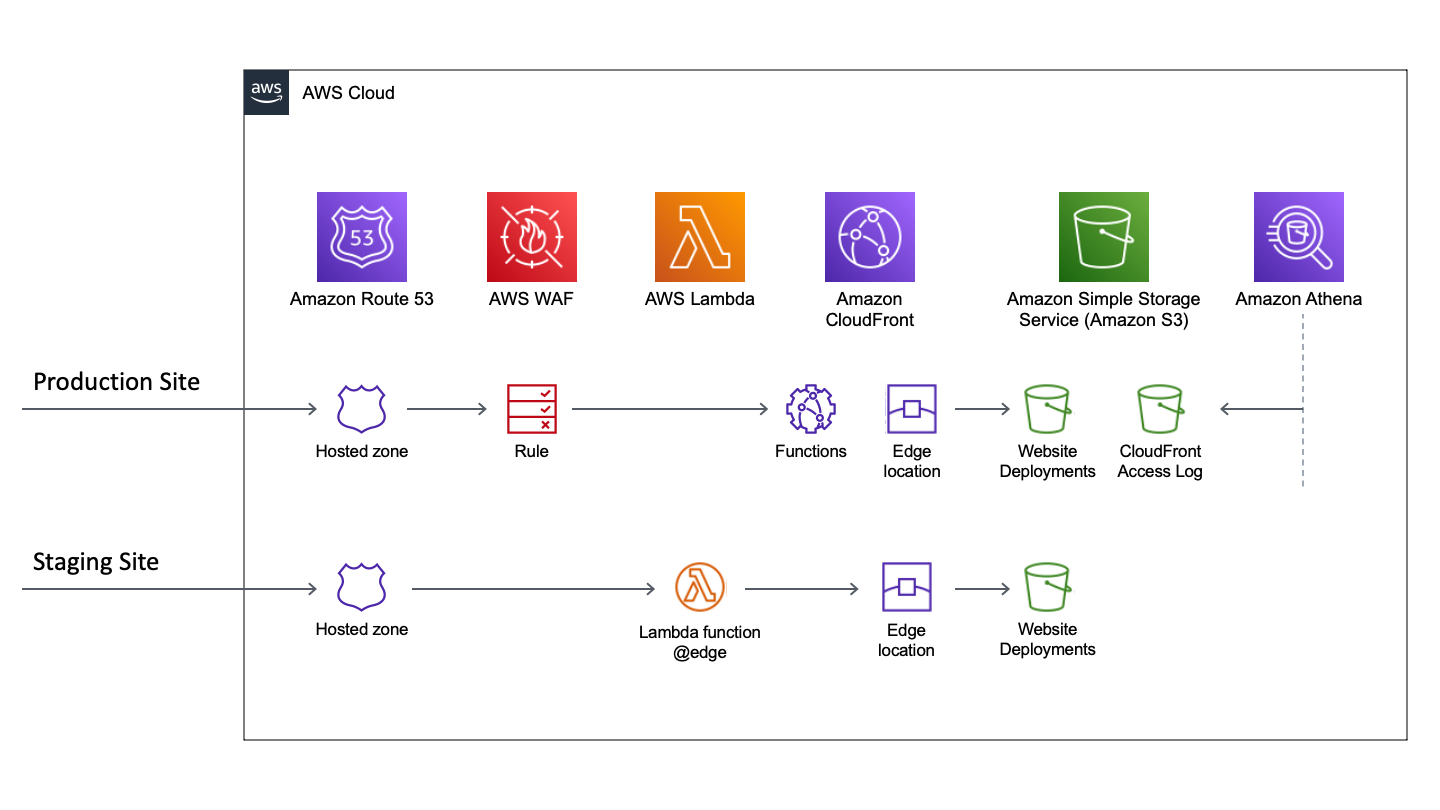
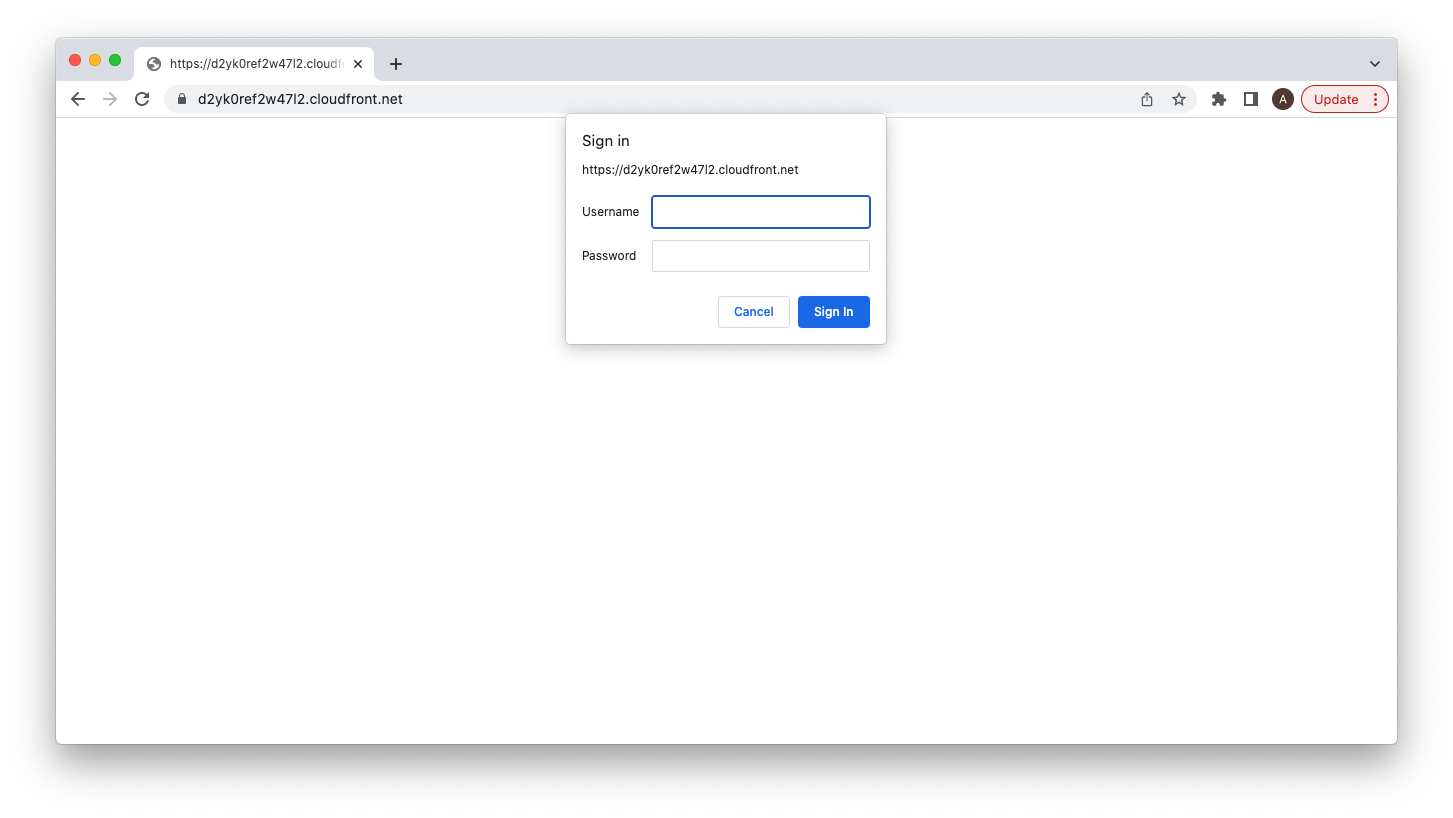
We are going to setup 2 environment. One production and one staging for internal review. The staging site is protected by a basic authentication that implemented through a Lambda@Edge function.
Use Route53 As Primary DNS #
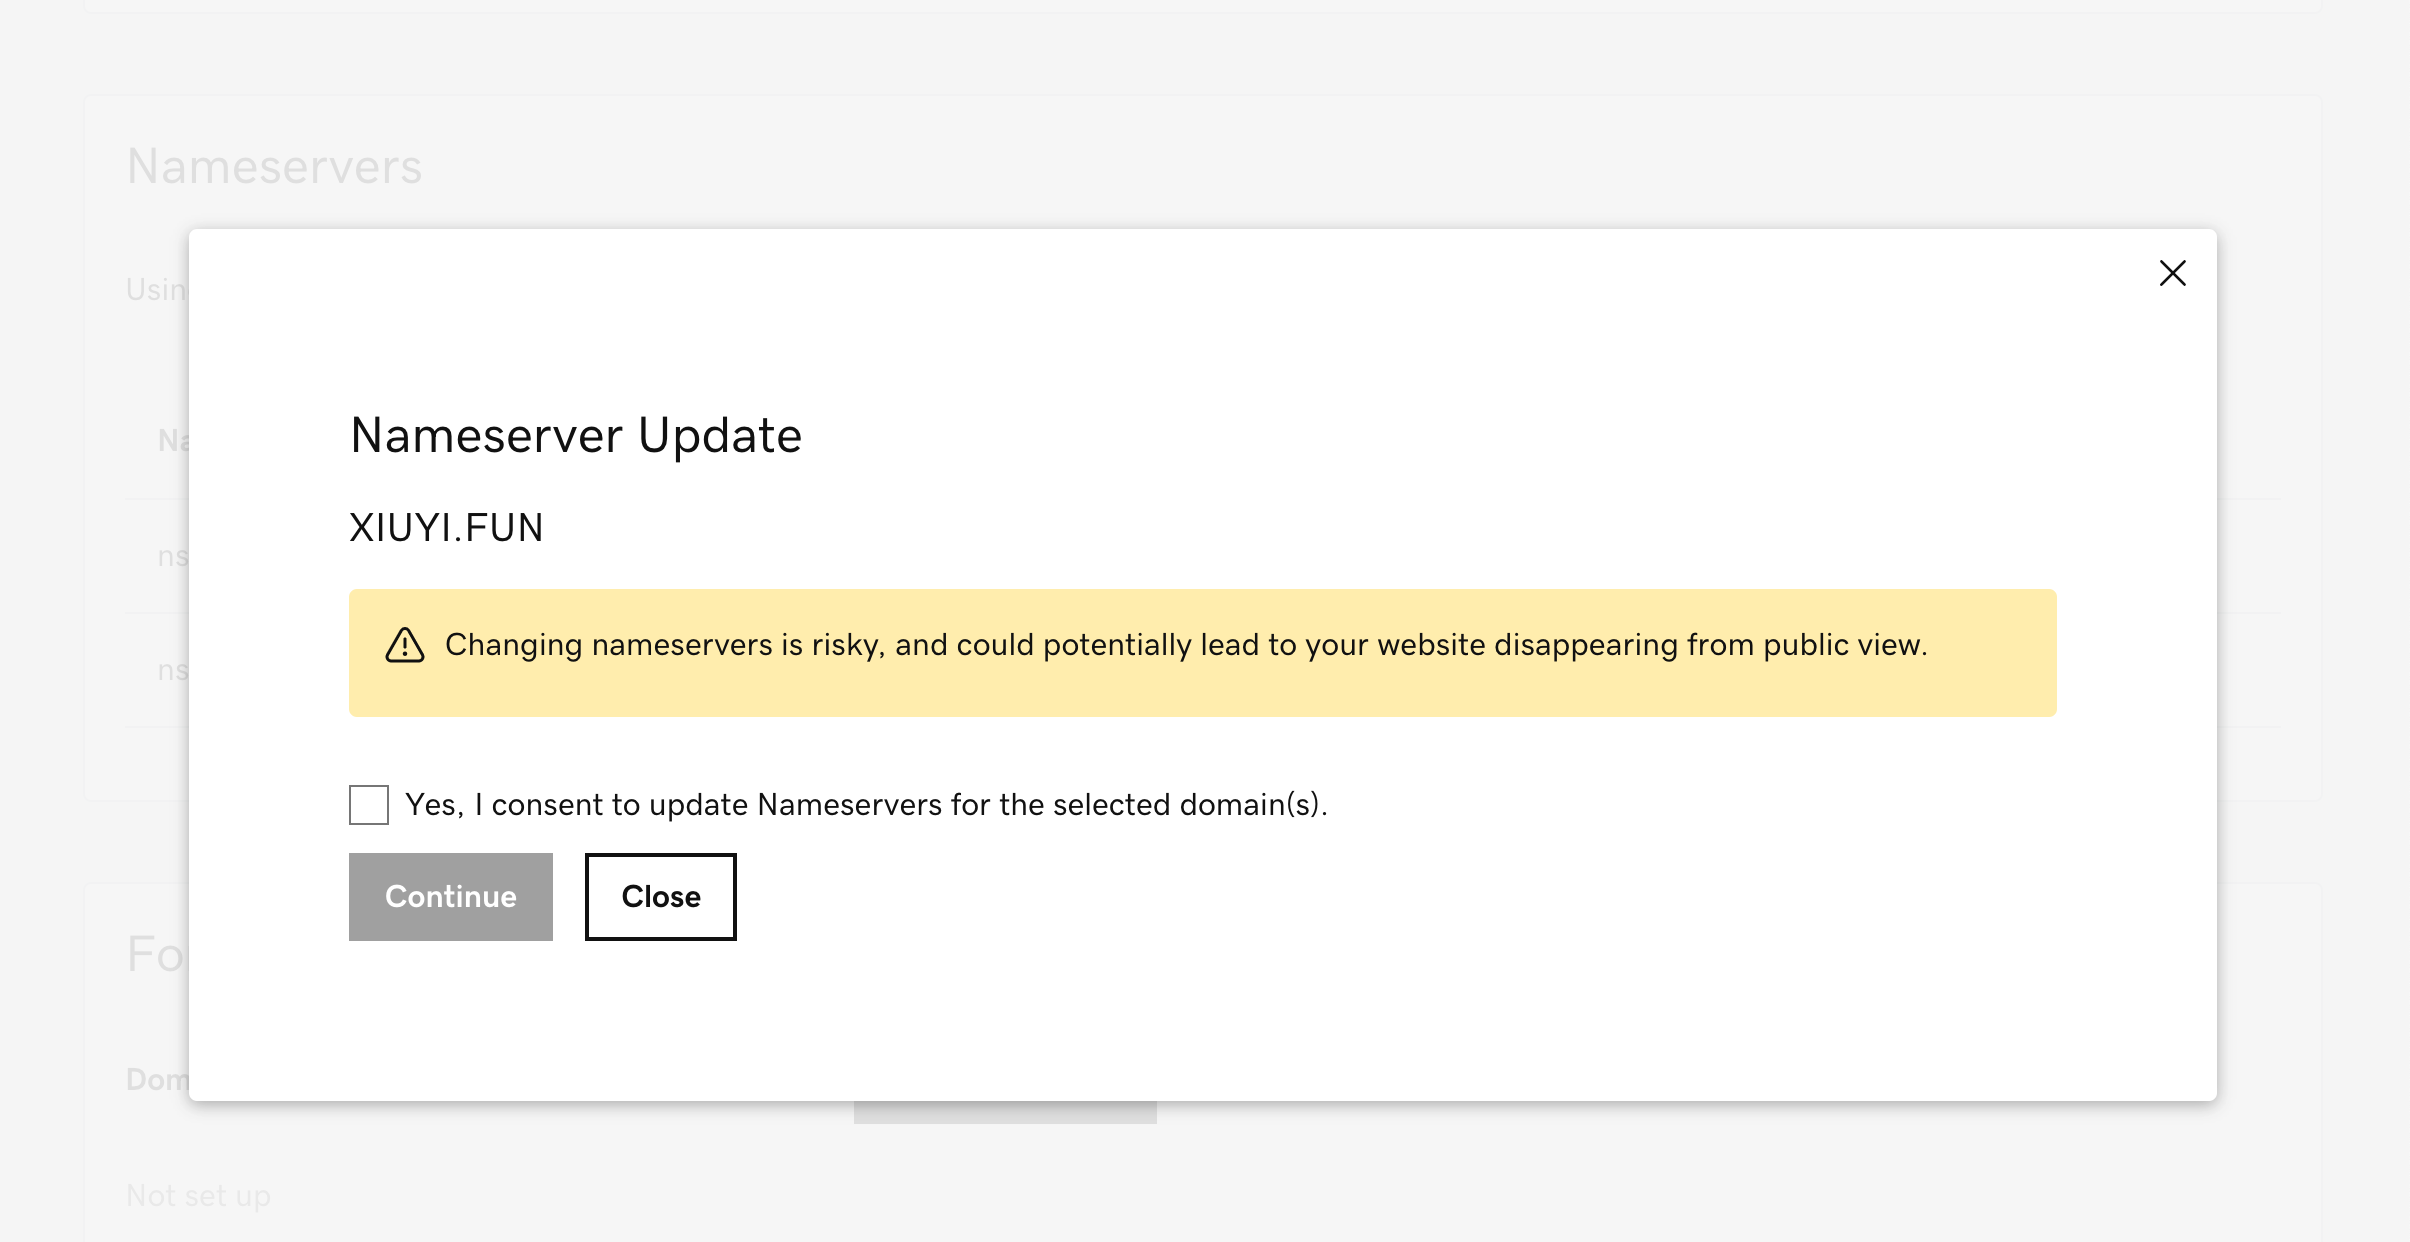
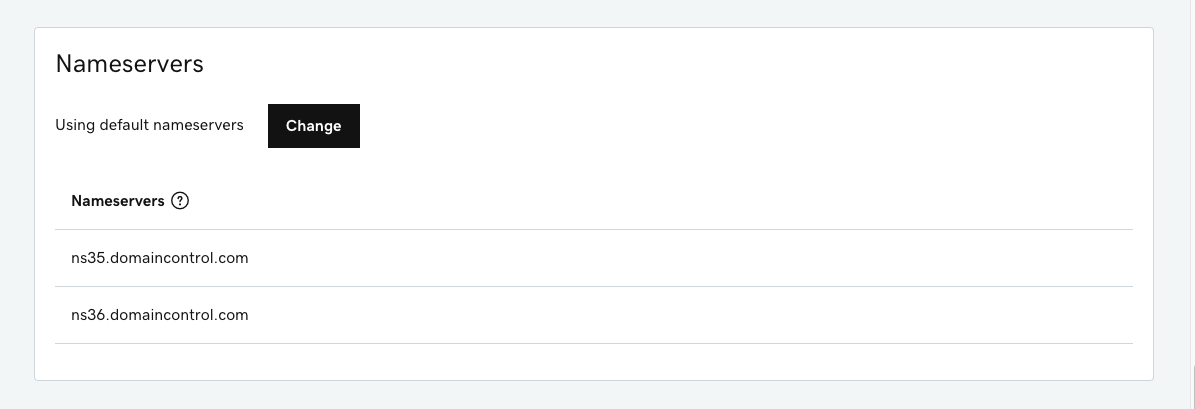
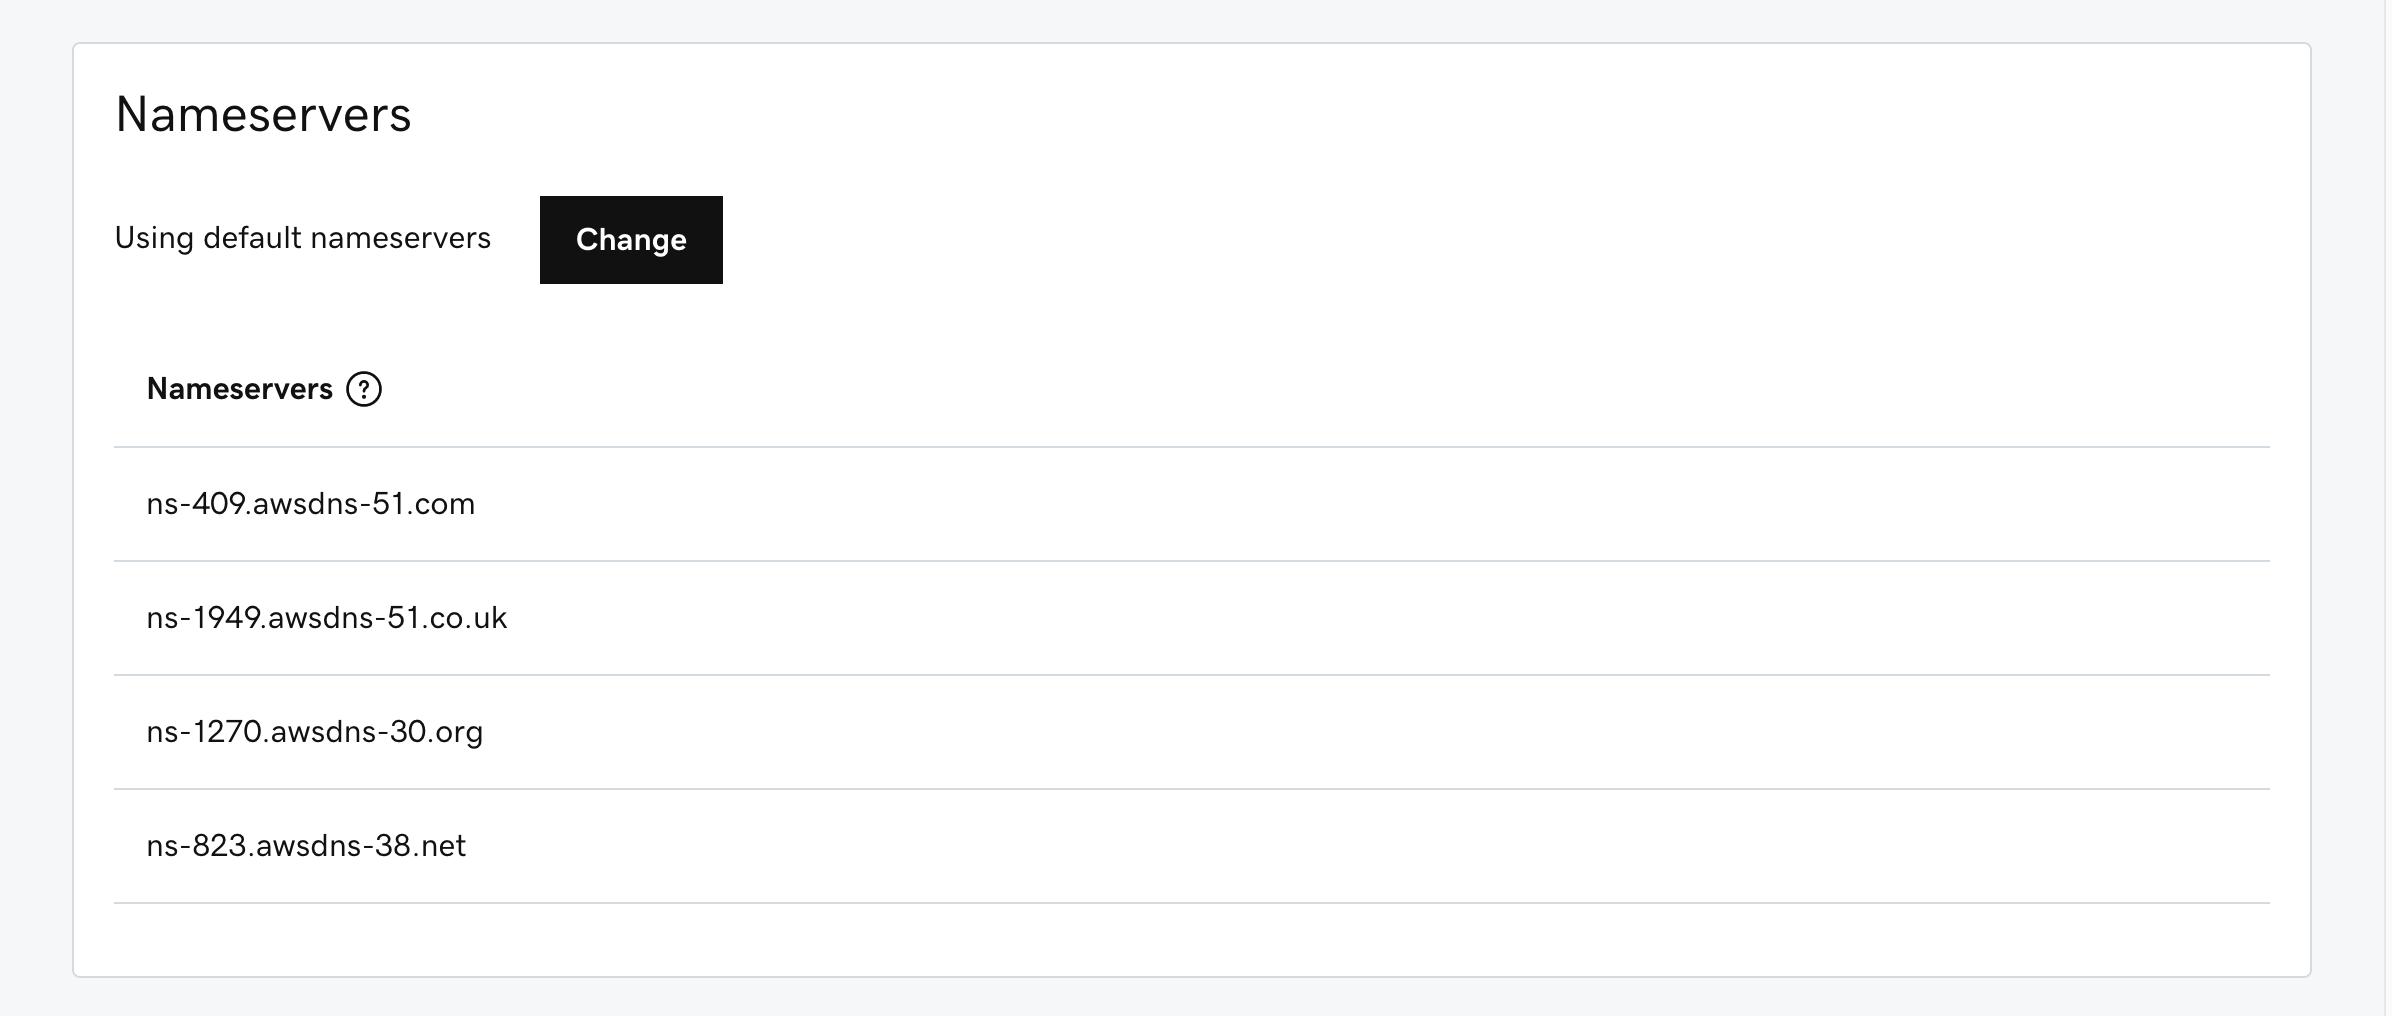
Suppose we bought a domain through Godaddy where it’s more affordable. We can update the domain’s “Nameservers” setting for migrating the free DNS service Godaddy provided to AWS Route 53 so that we can use custom domain for the CloudFront distribution.
First we need to follow the instructions in Creating a public hosted zone to create a hosted zone with the same name as the doamin you are using for hosting this website. Once it’s created a list of nameservers can be found in the hosted zone. They are the NS record for this hosted zone and sometimes appears similar to this ns-998.awsdns-60.net. It starts with ‘ns’ and then has ‘awsdns’ as part of the value. Copy all of them (usually 4) into the GoDaddy’s Nameservers setting.
Use the domain you want to be hosted by the Route53.
Add the name server (NS) records to replace the default nameservers in Godaddy.
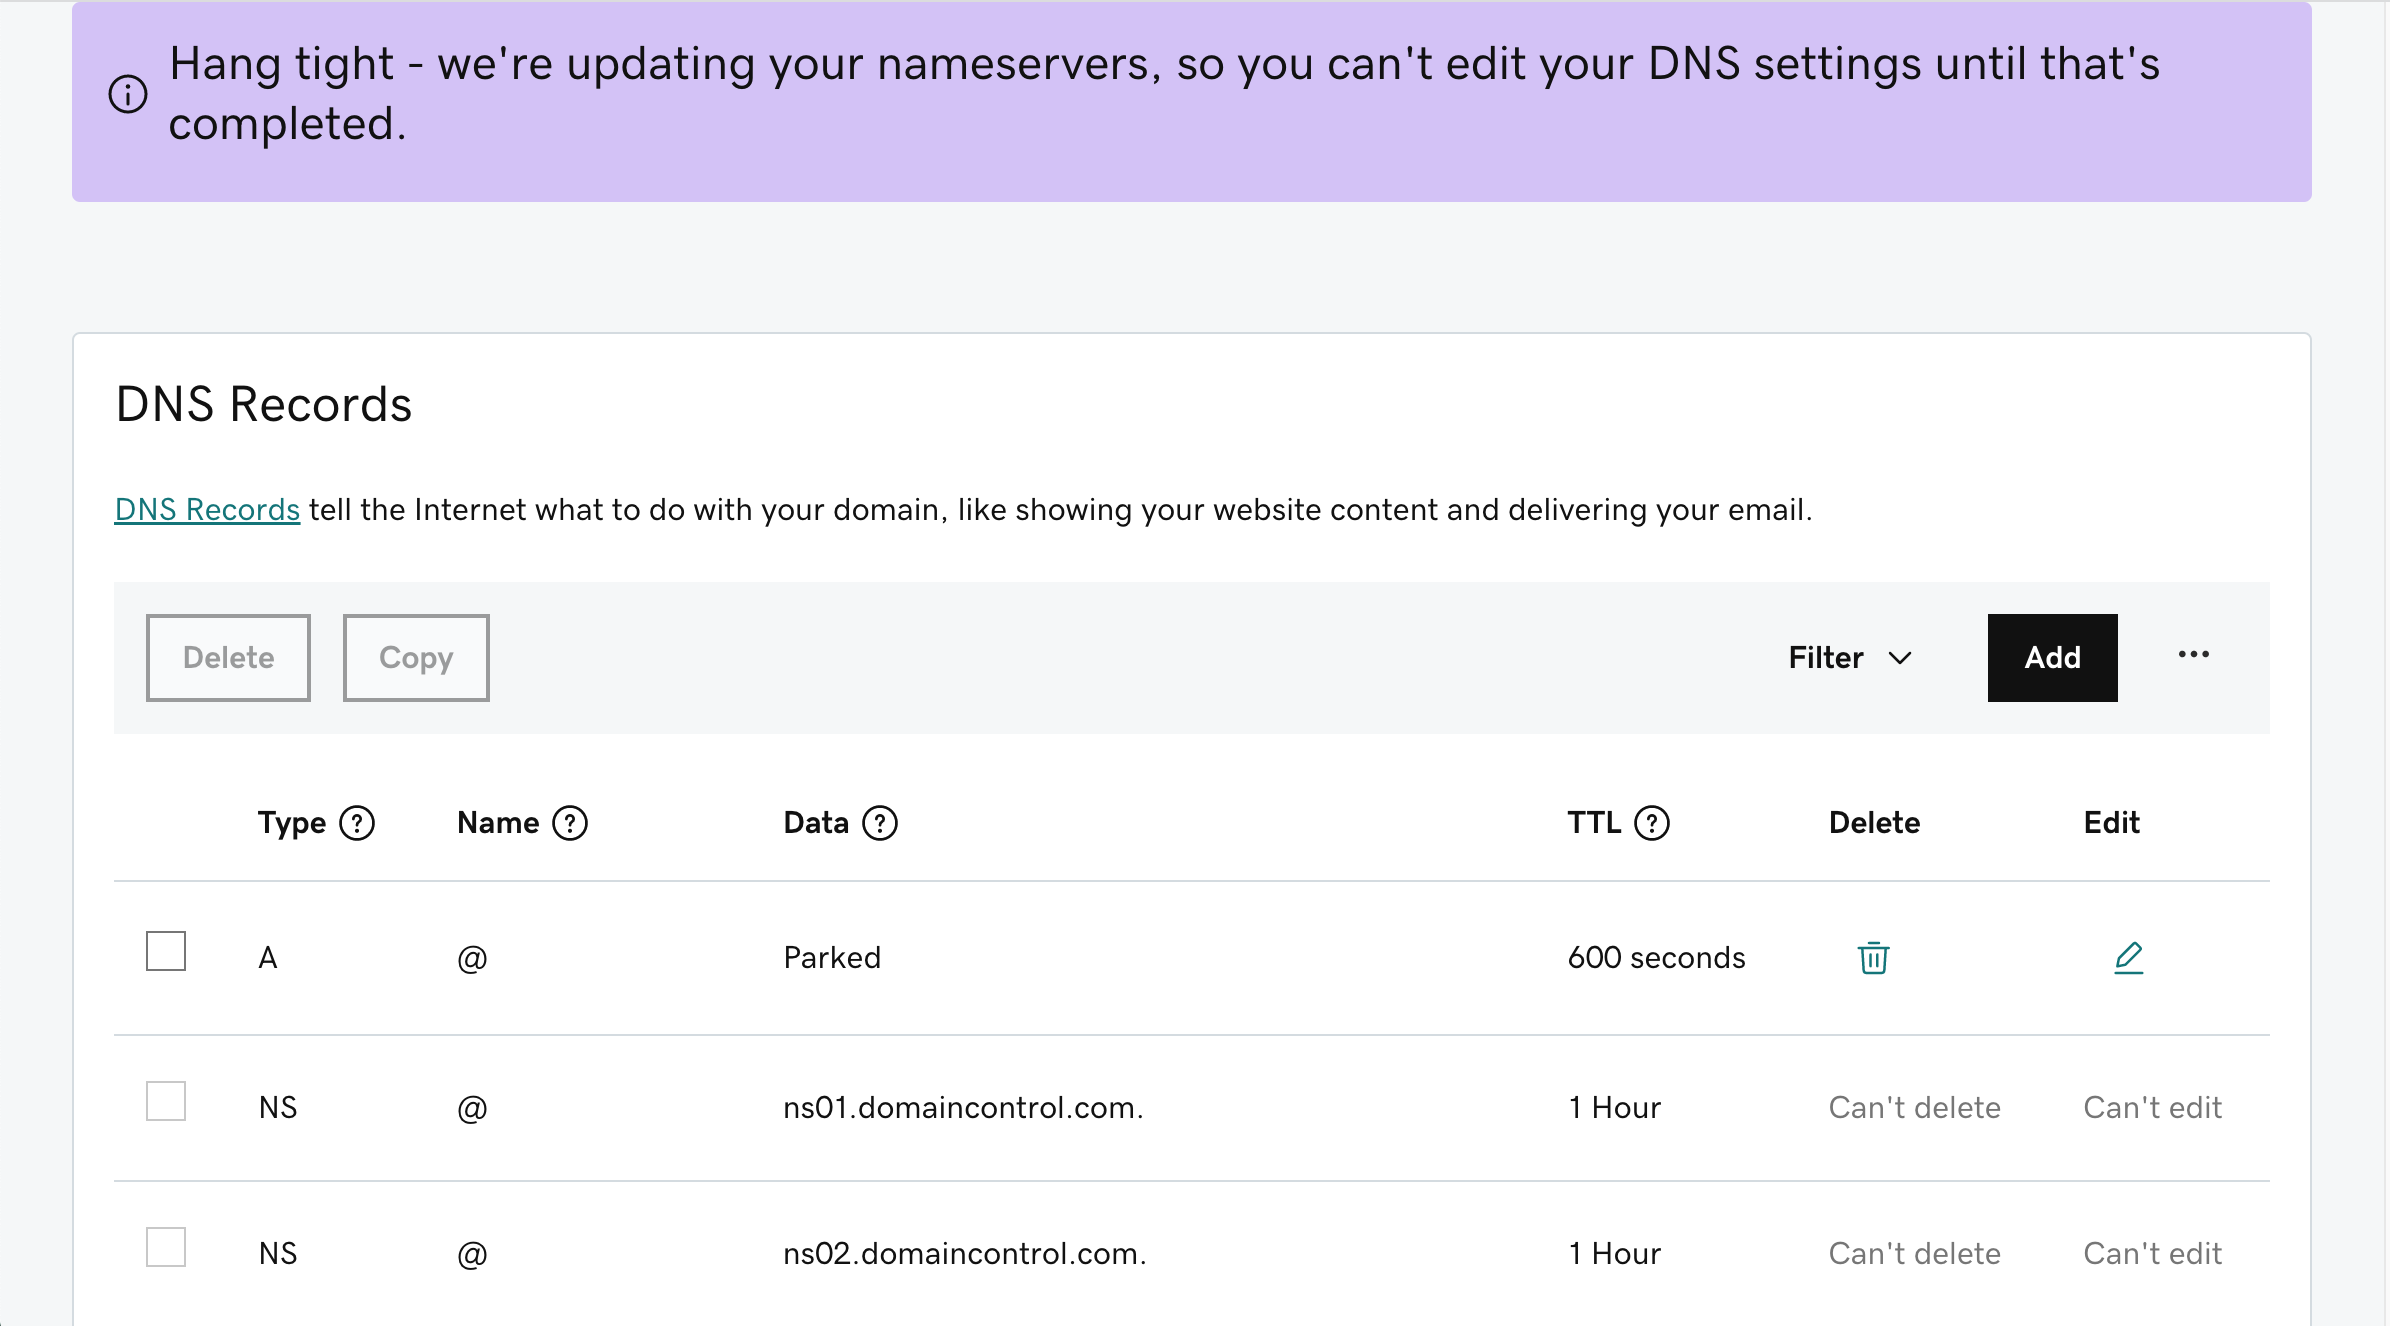
Export Zone File #
You can export Godaddy’s DNS settings through a text file (as known as the Zone File). By importing these settings into Route53 you are able to get uninterrupted DNS service when name servers are switched.
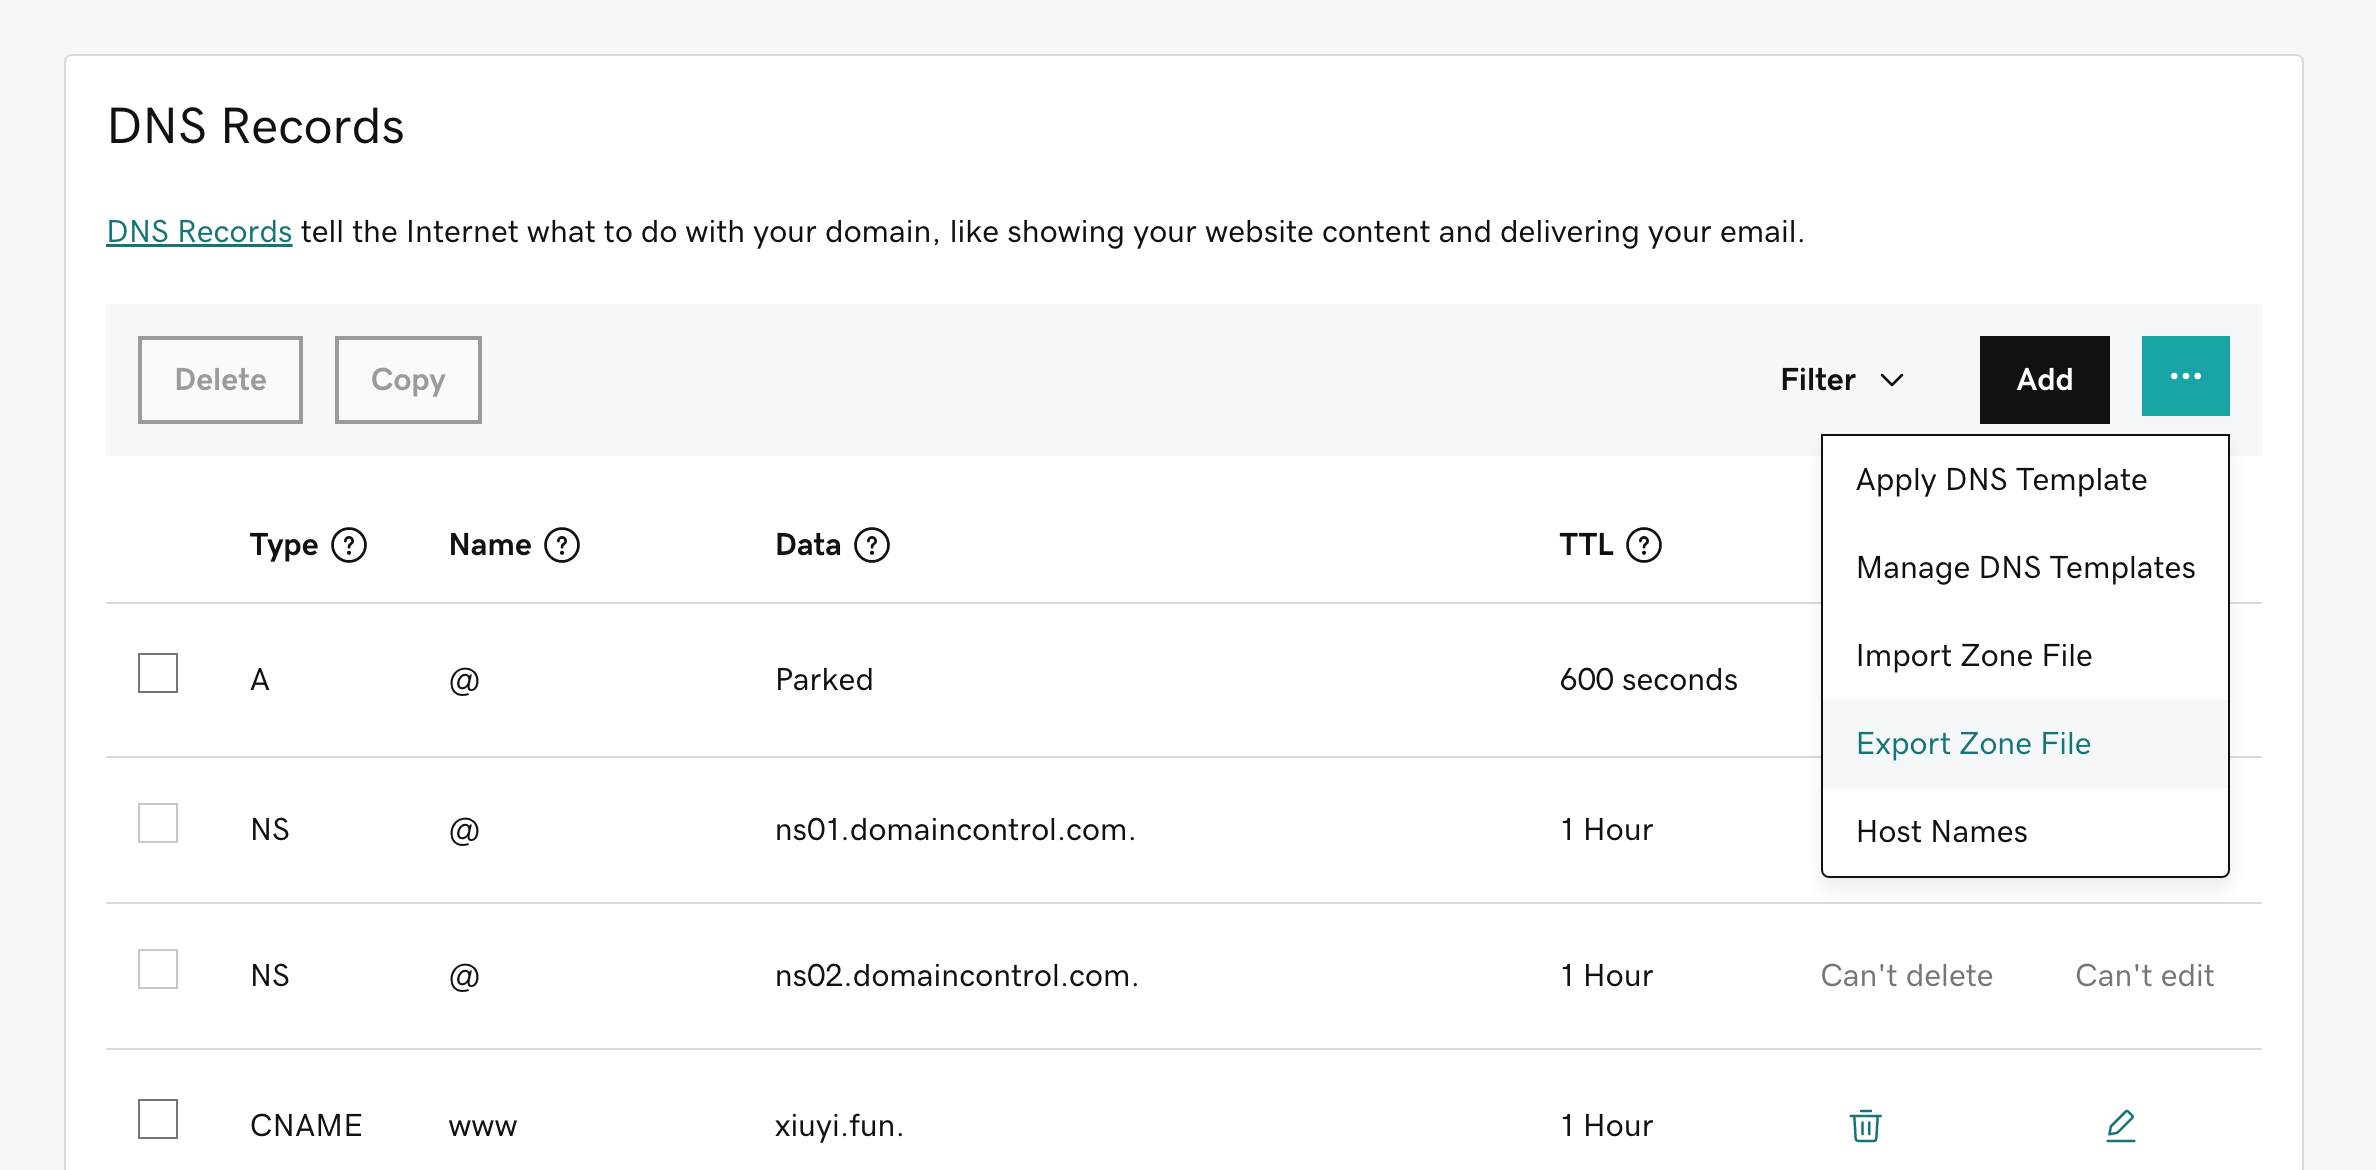
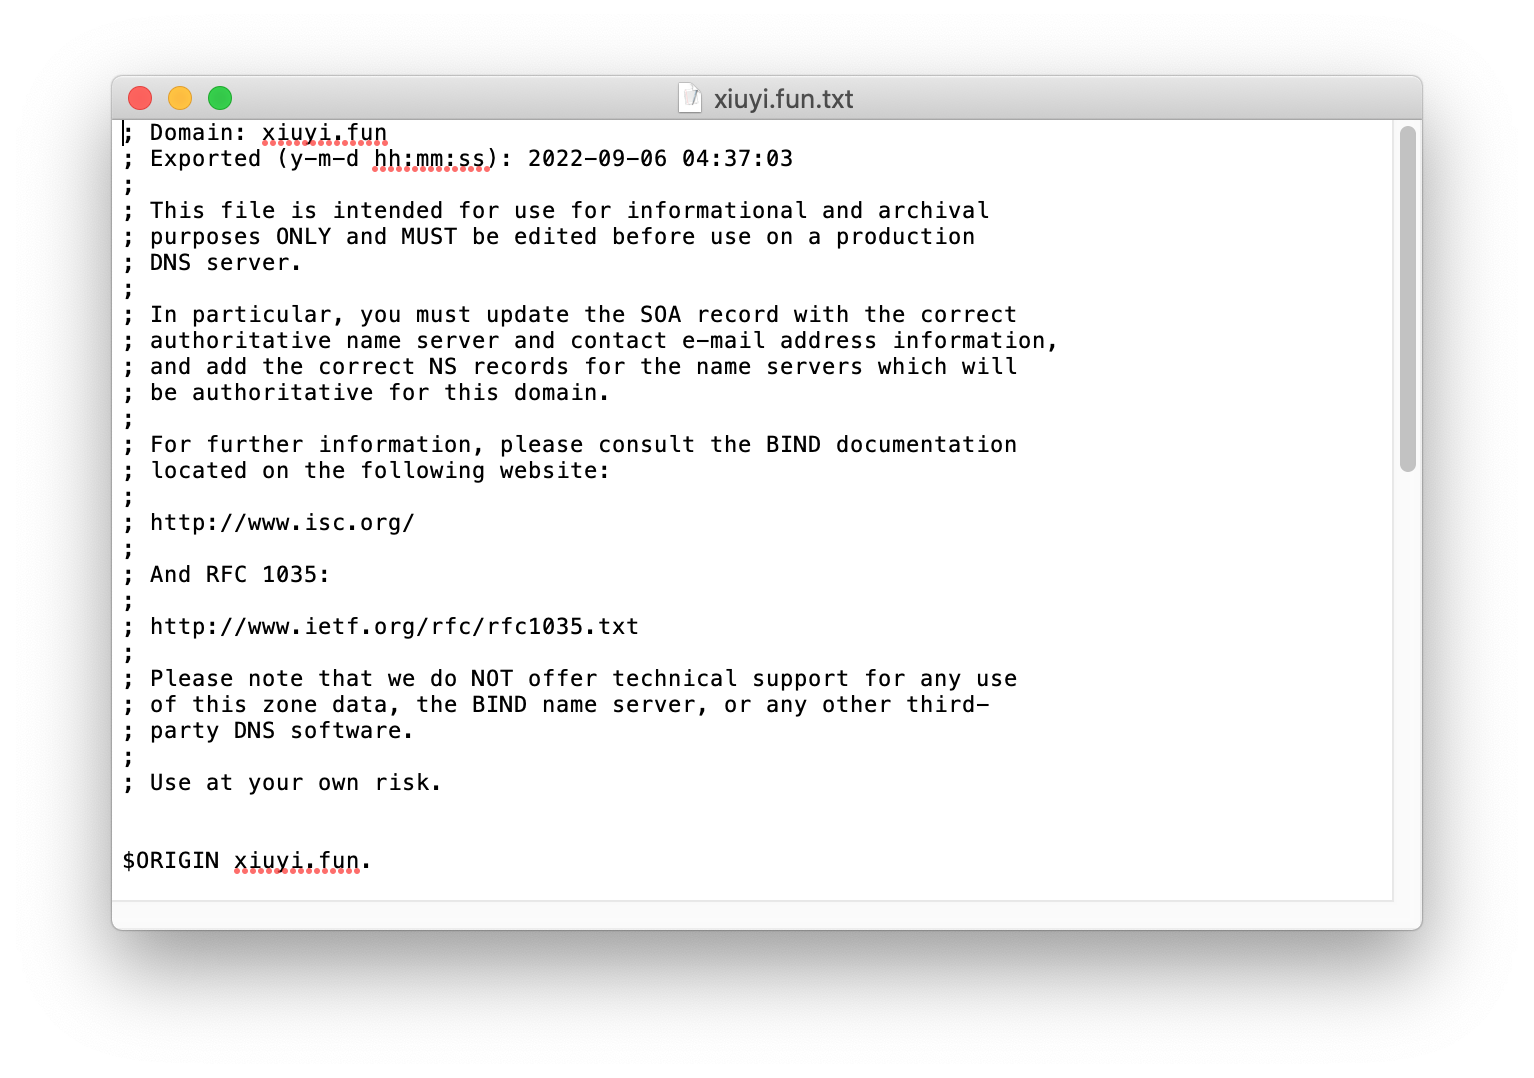
The exported Zone File has some records that are not usable for other DNS providers other than Godaddy.
Import Zone File #
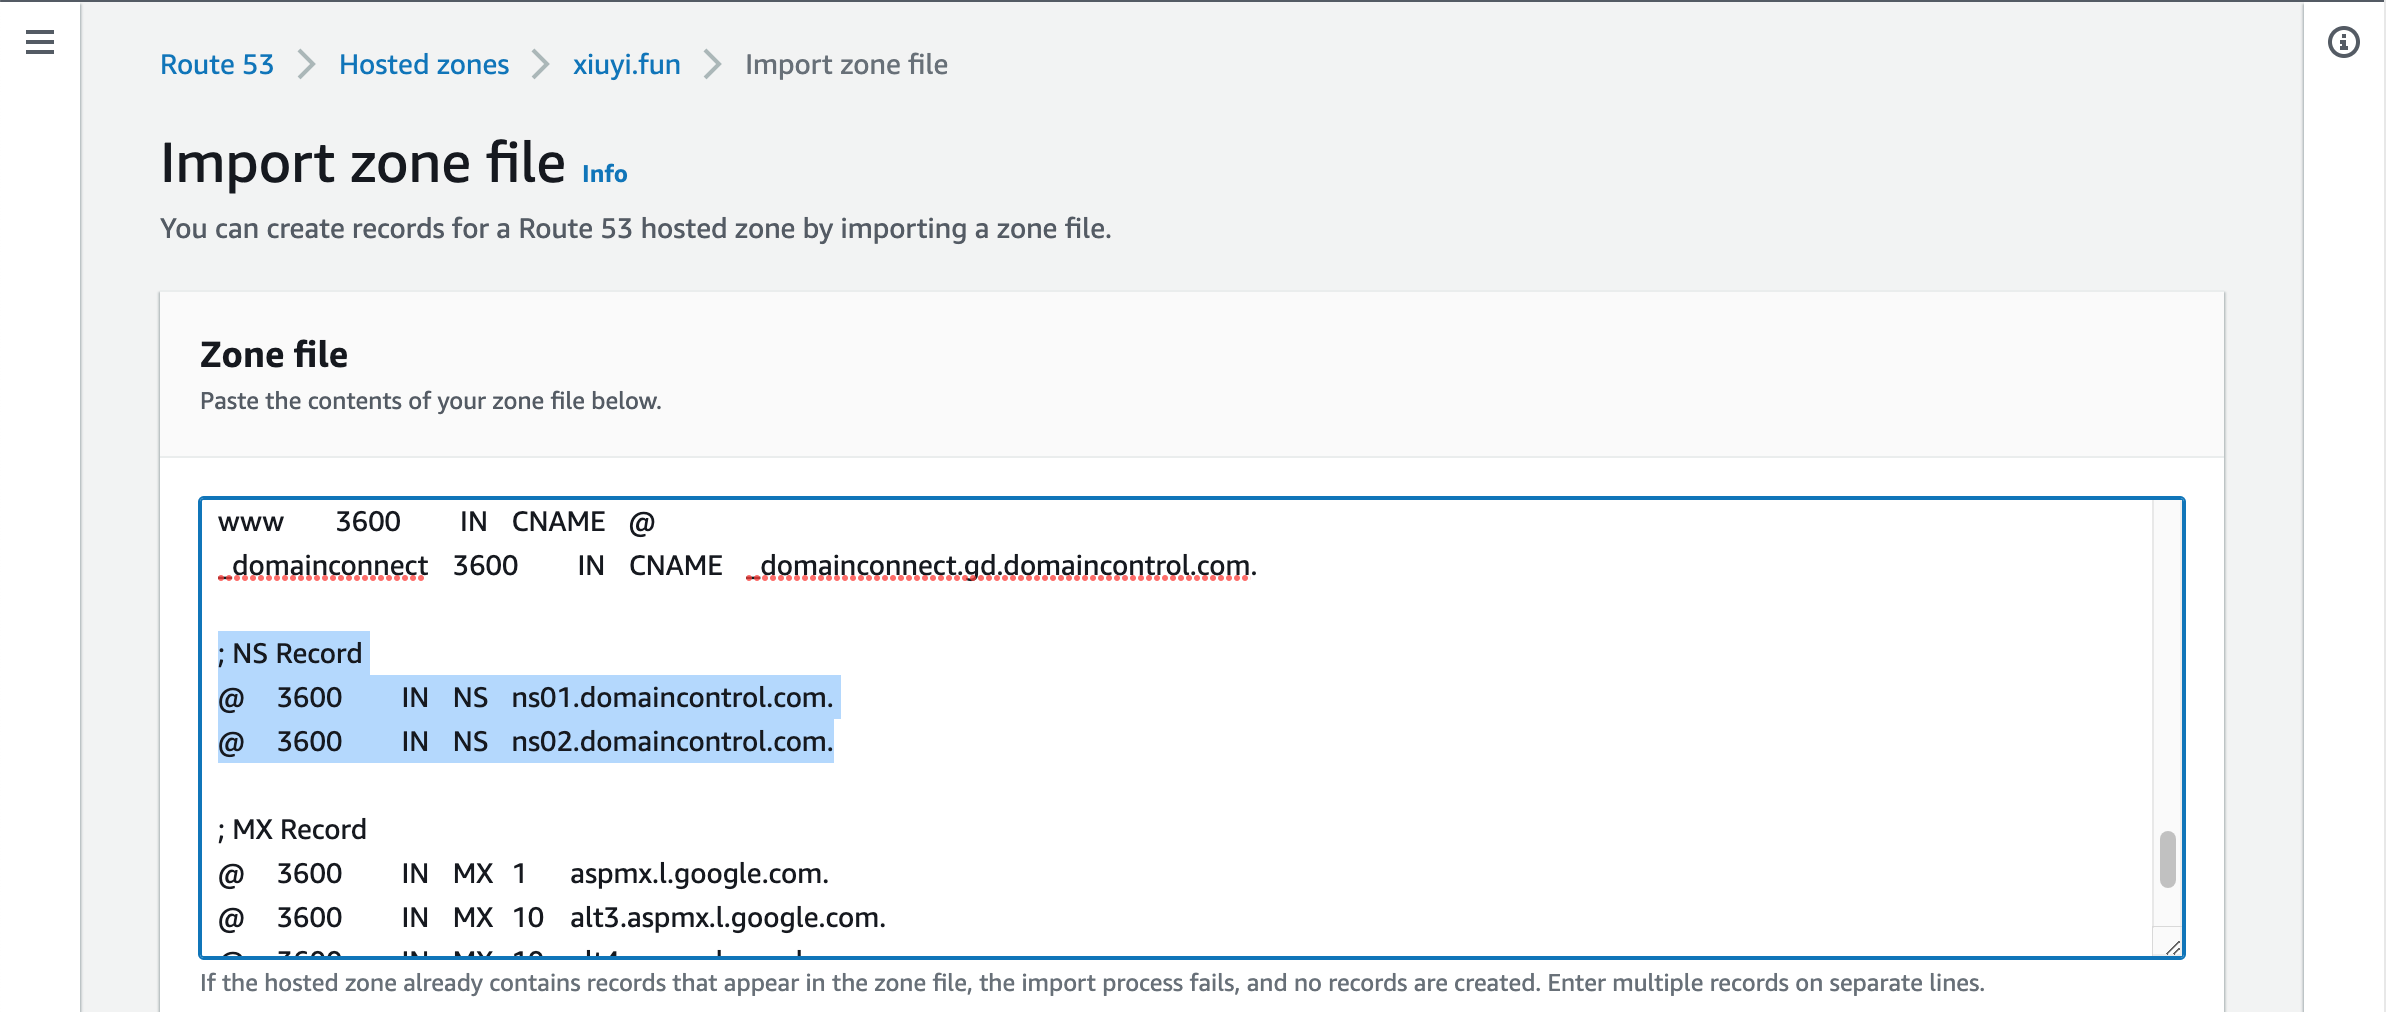
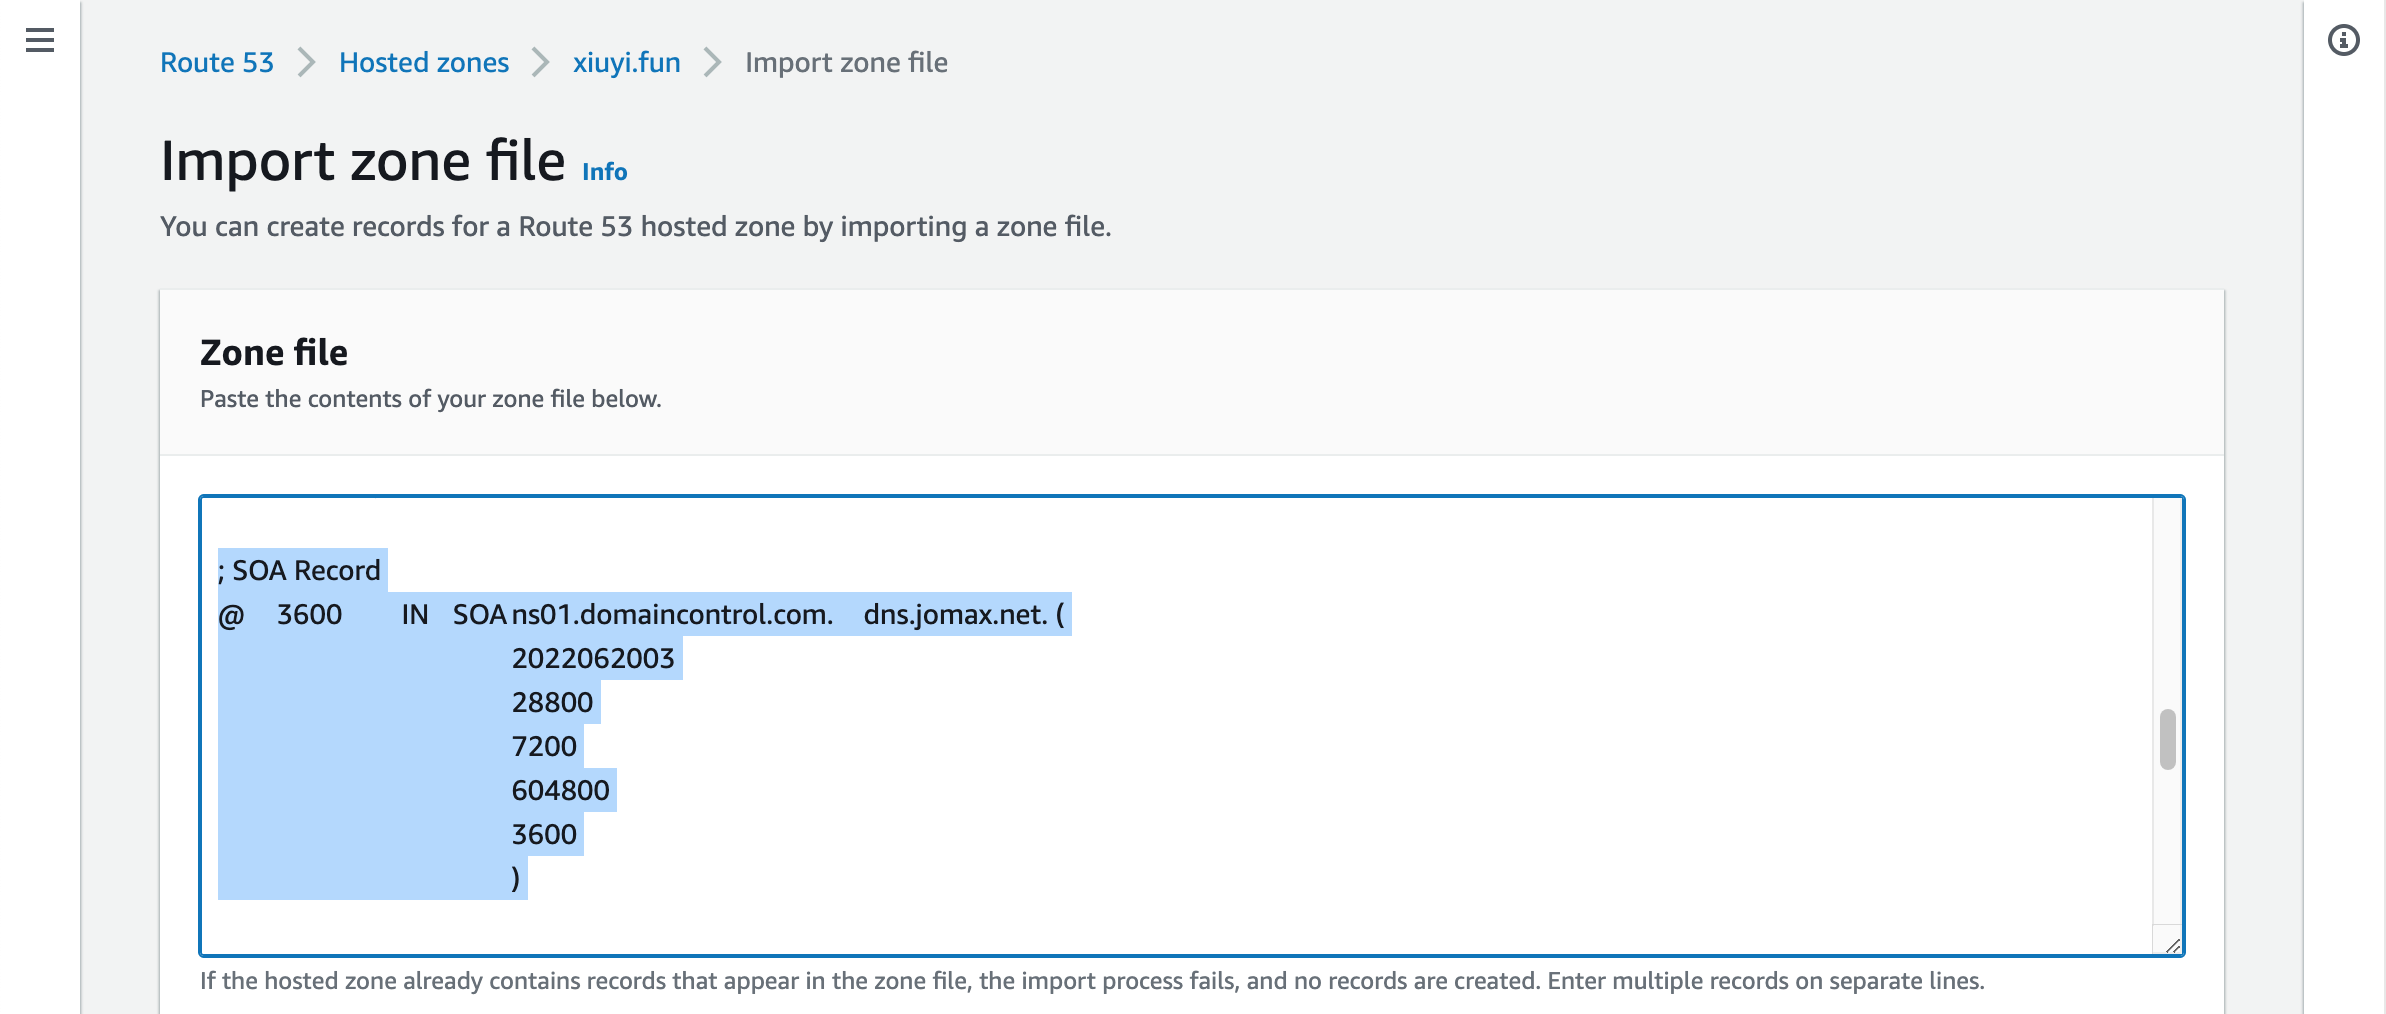
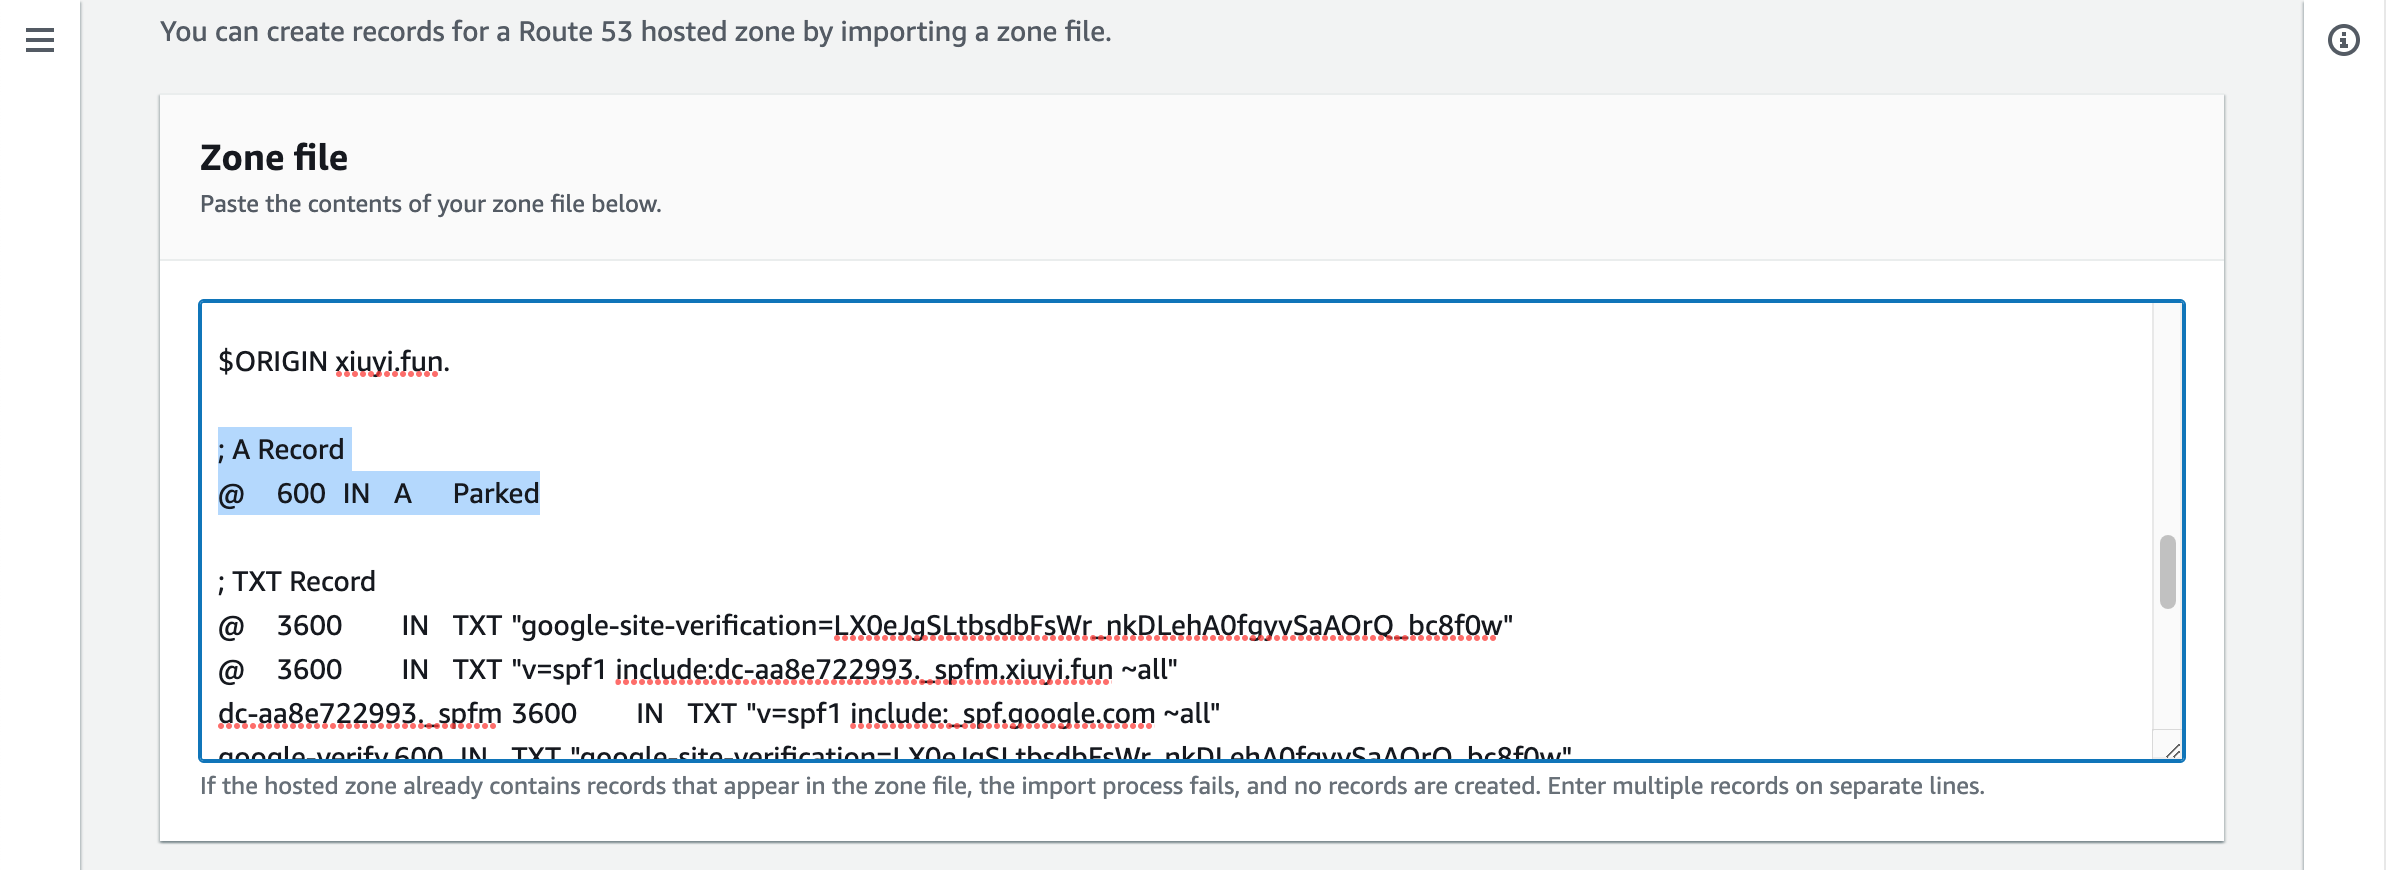
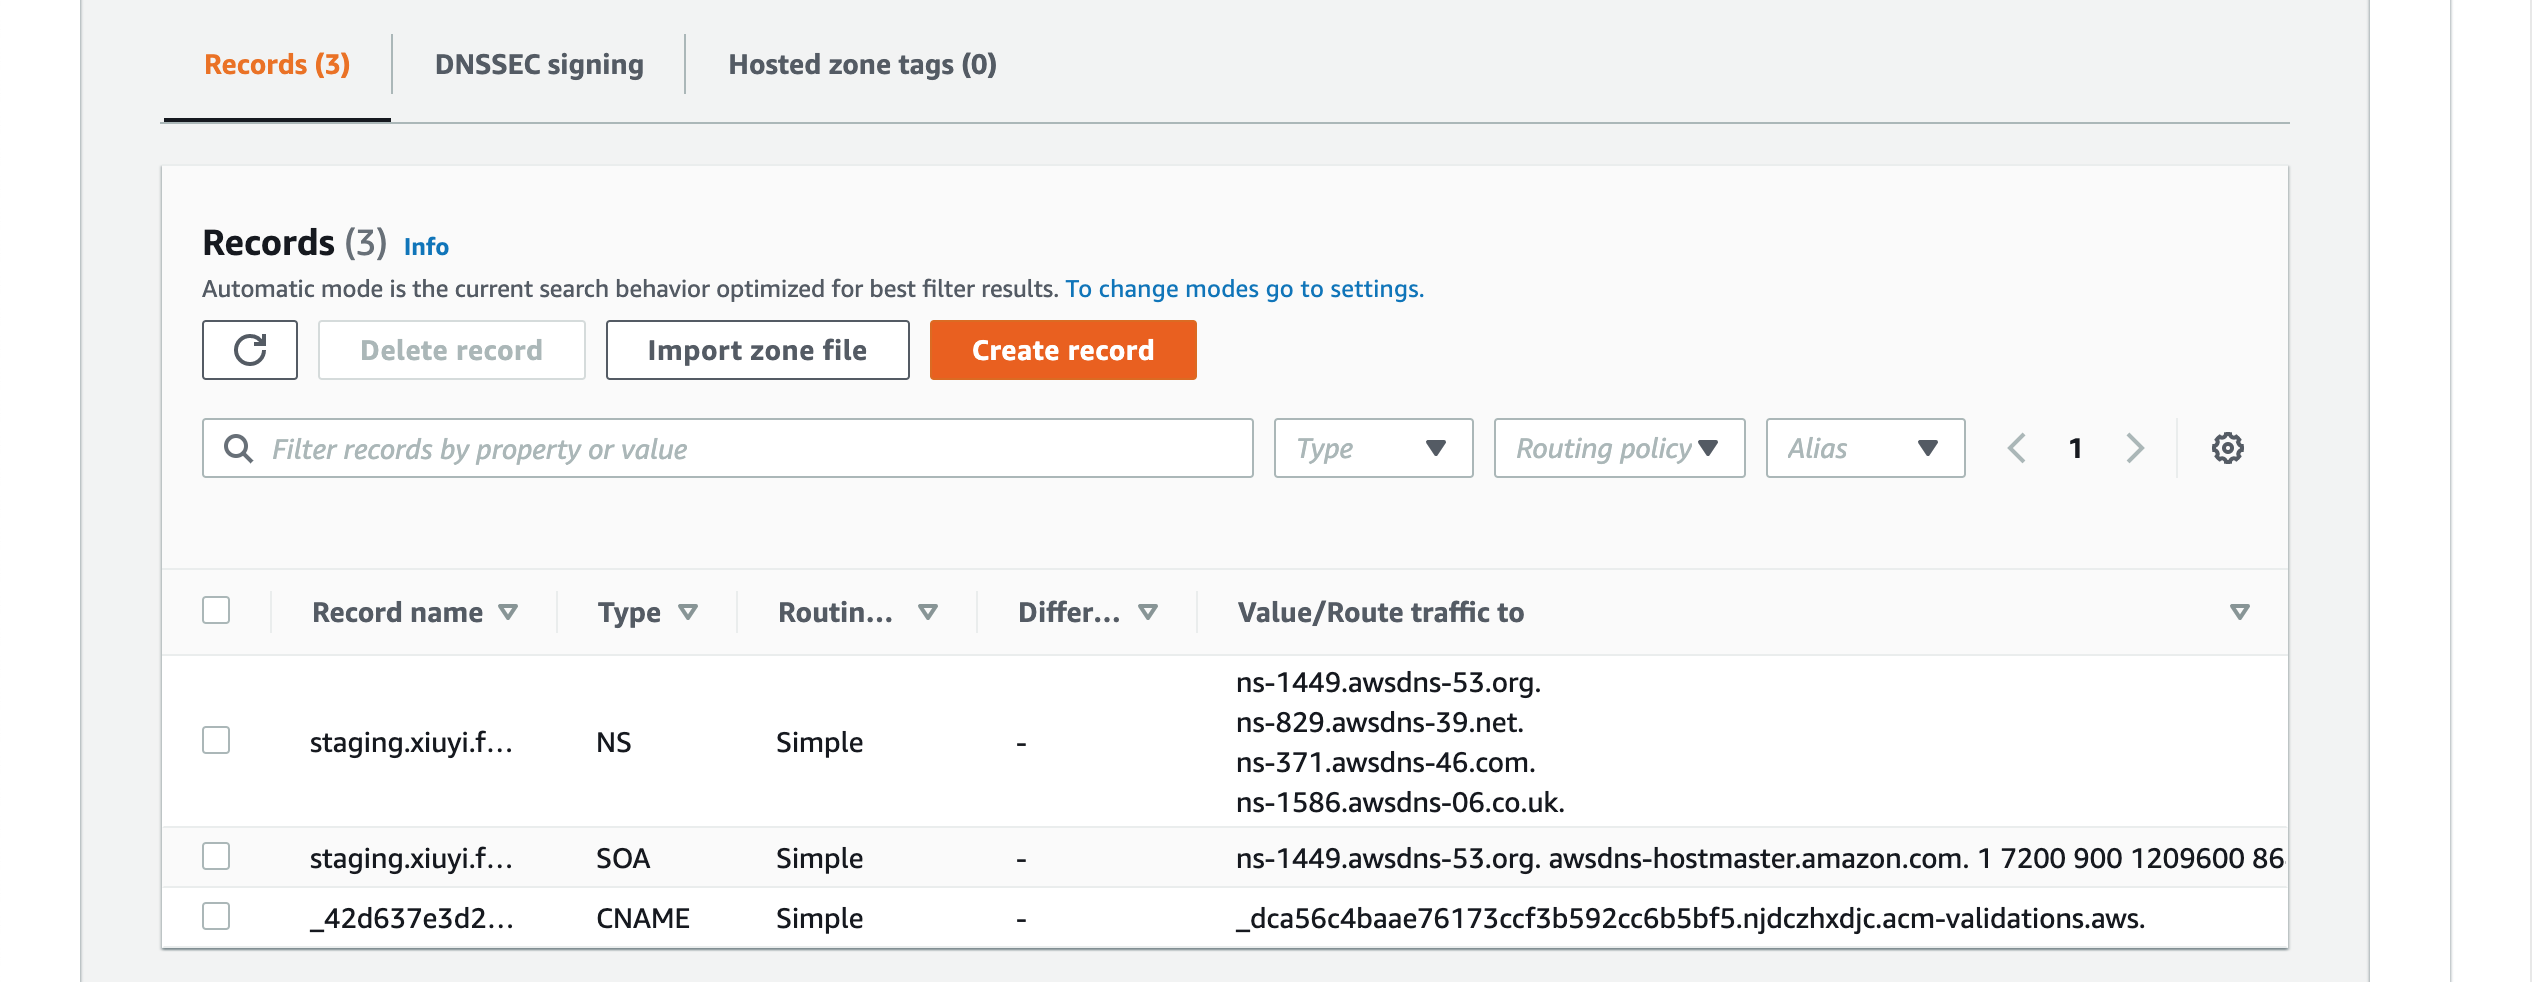
In the hosted zone go to the Records section and click the Import zone file. Copy paste the exported zone file into the text area for Zone file.
Then remove the NS records, SOA records, and the A record from the imported zone file content.
Scroll to the bottom and click Import.
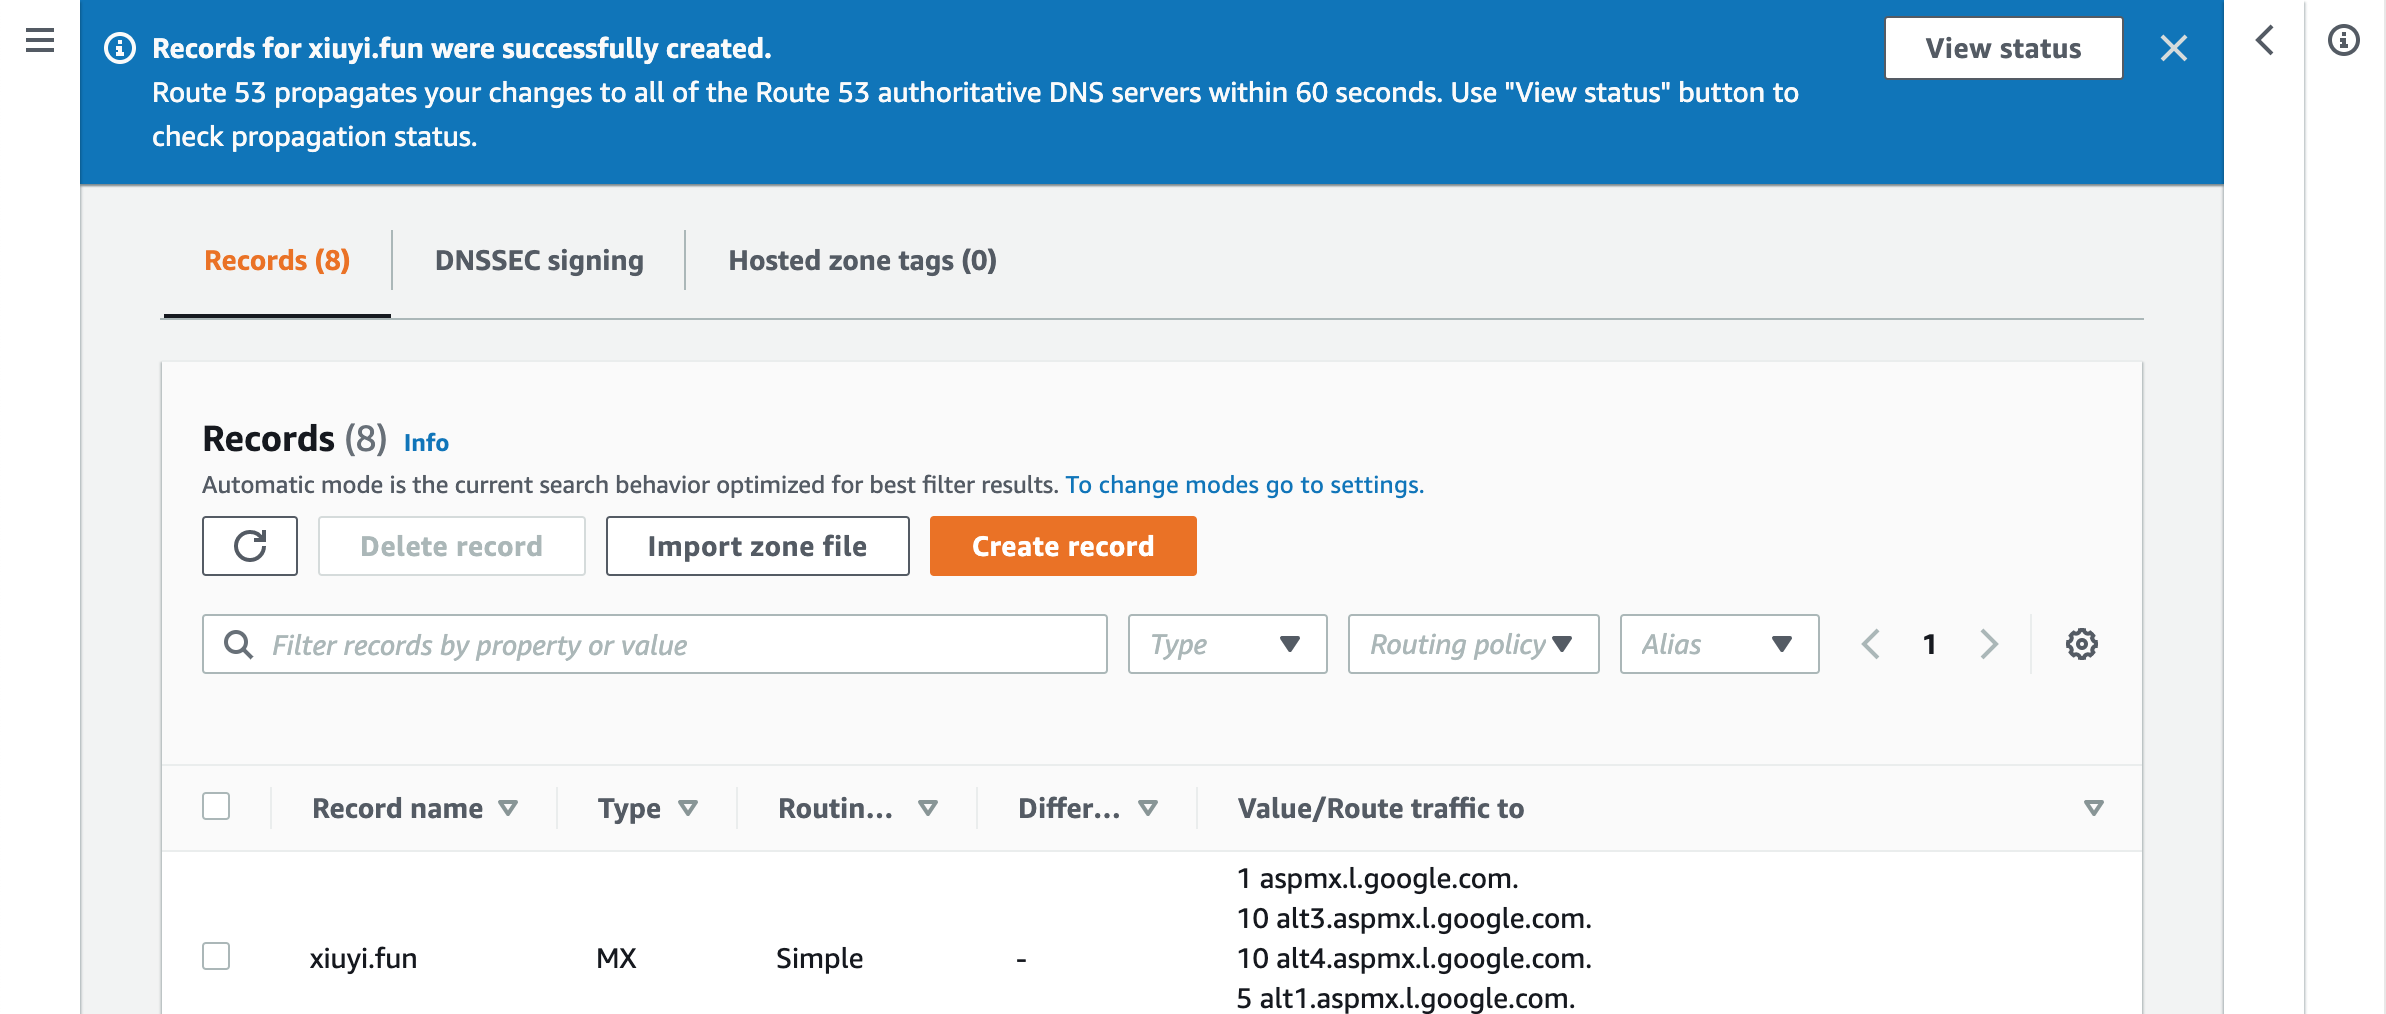
After successfully importing the Zone File we are ready to switch the name server
Switch Name Server #
⚠️ The following instructions are ONLY applicable to a brand new domain. Nameserver migration is a tedious process especially when DNSSEC is enabled. DNSViz.net and DNSSEC Analyzer are two great tools to help. AWS provides detailed instructions for Making Route 53 the DNS service for a domain that’s in use.
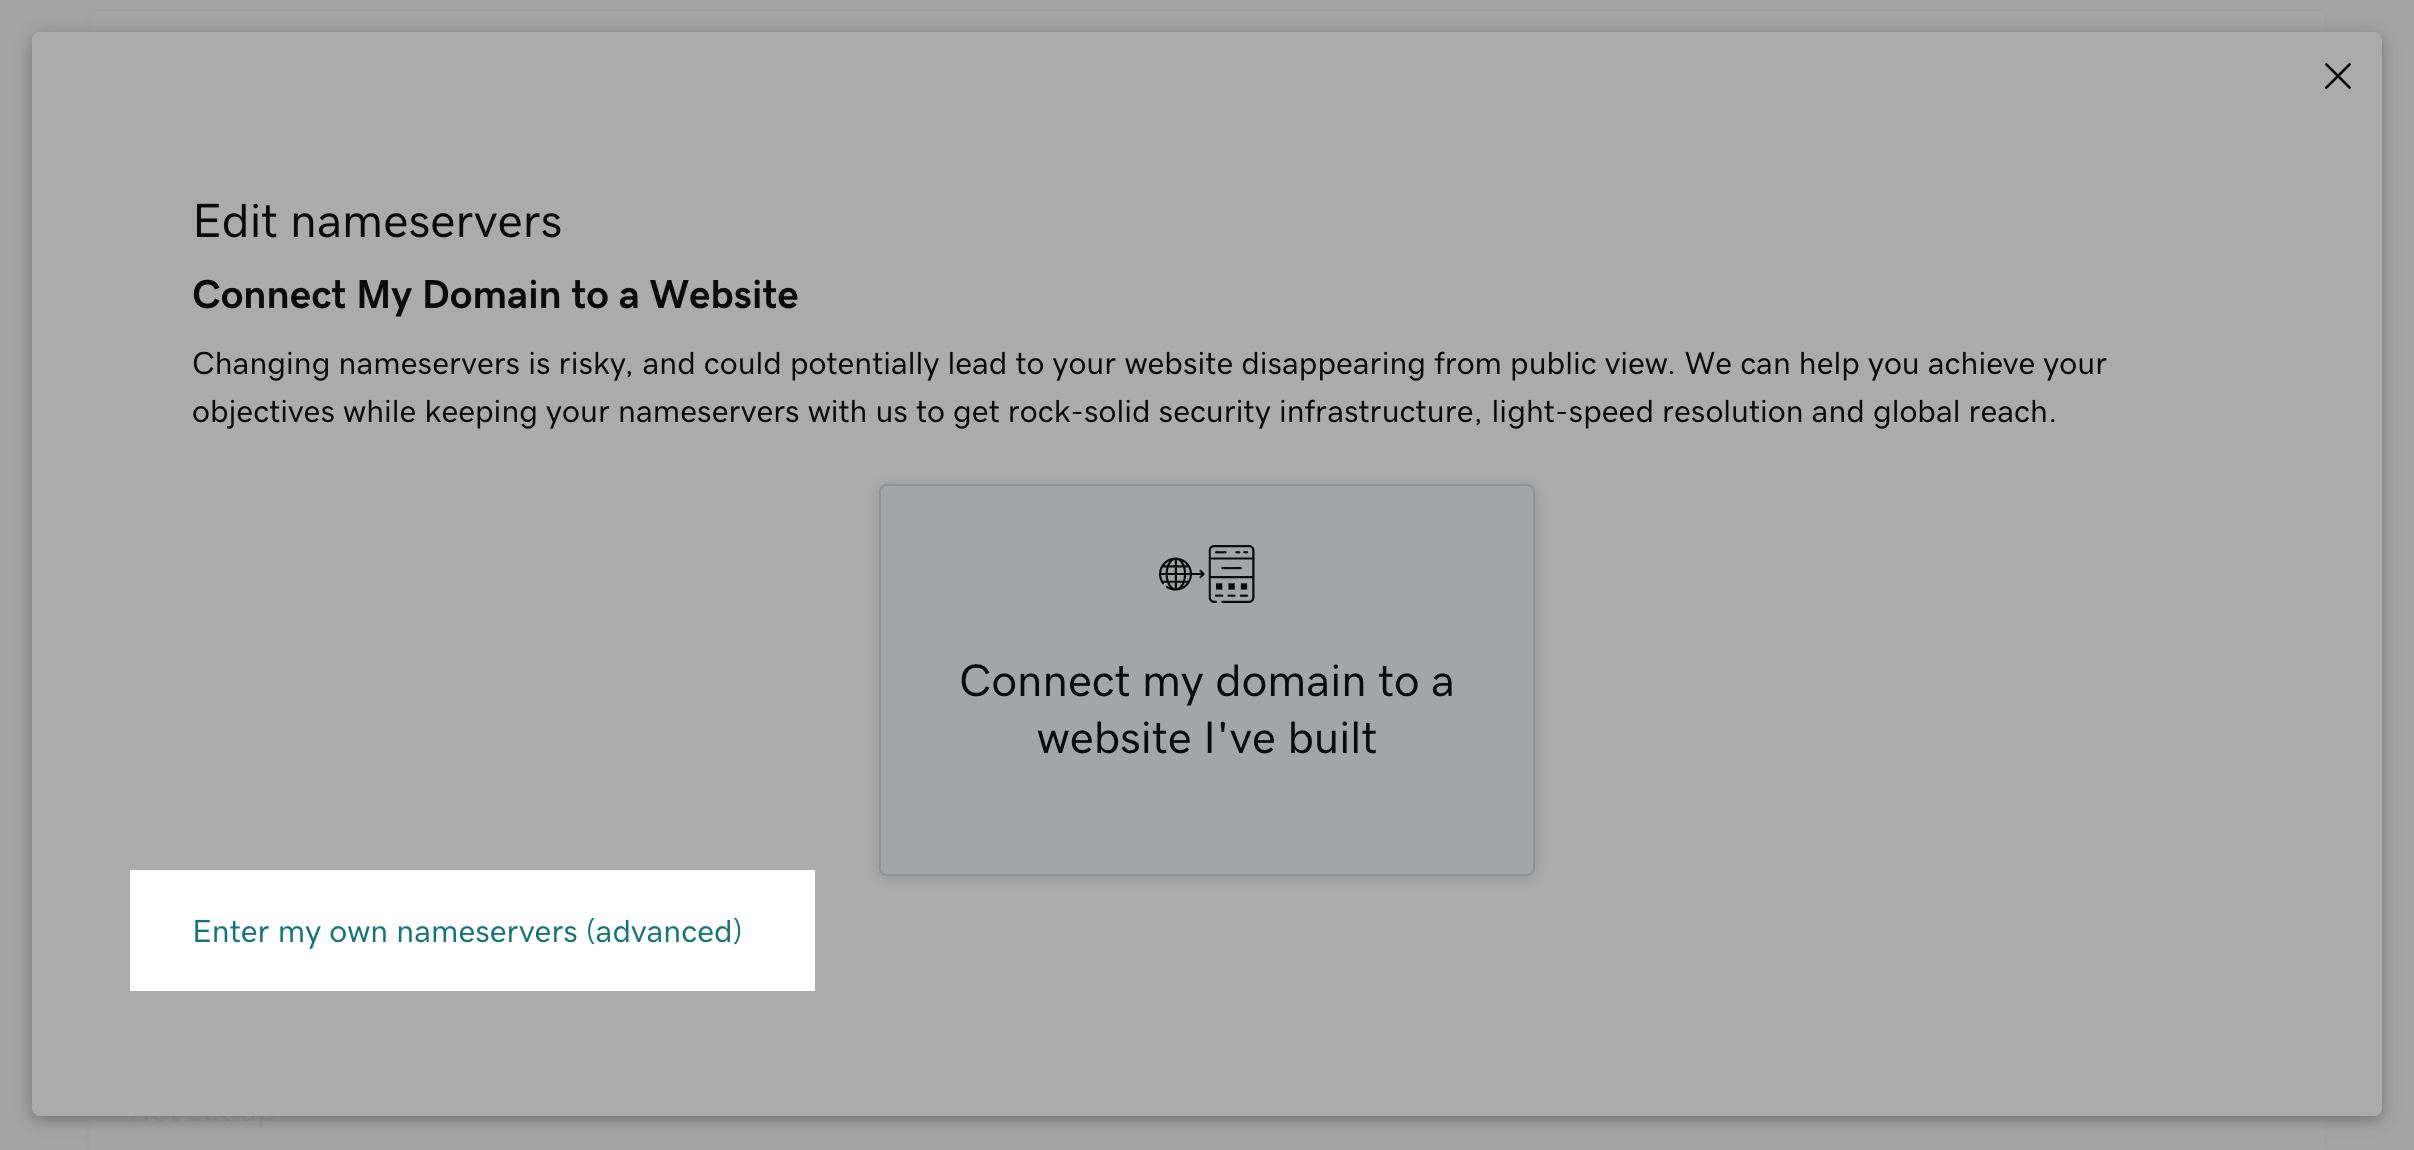
Go to DNS management for the domain in Godaddy. In the Nameservers section click Enter your own nameservers.
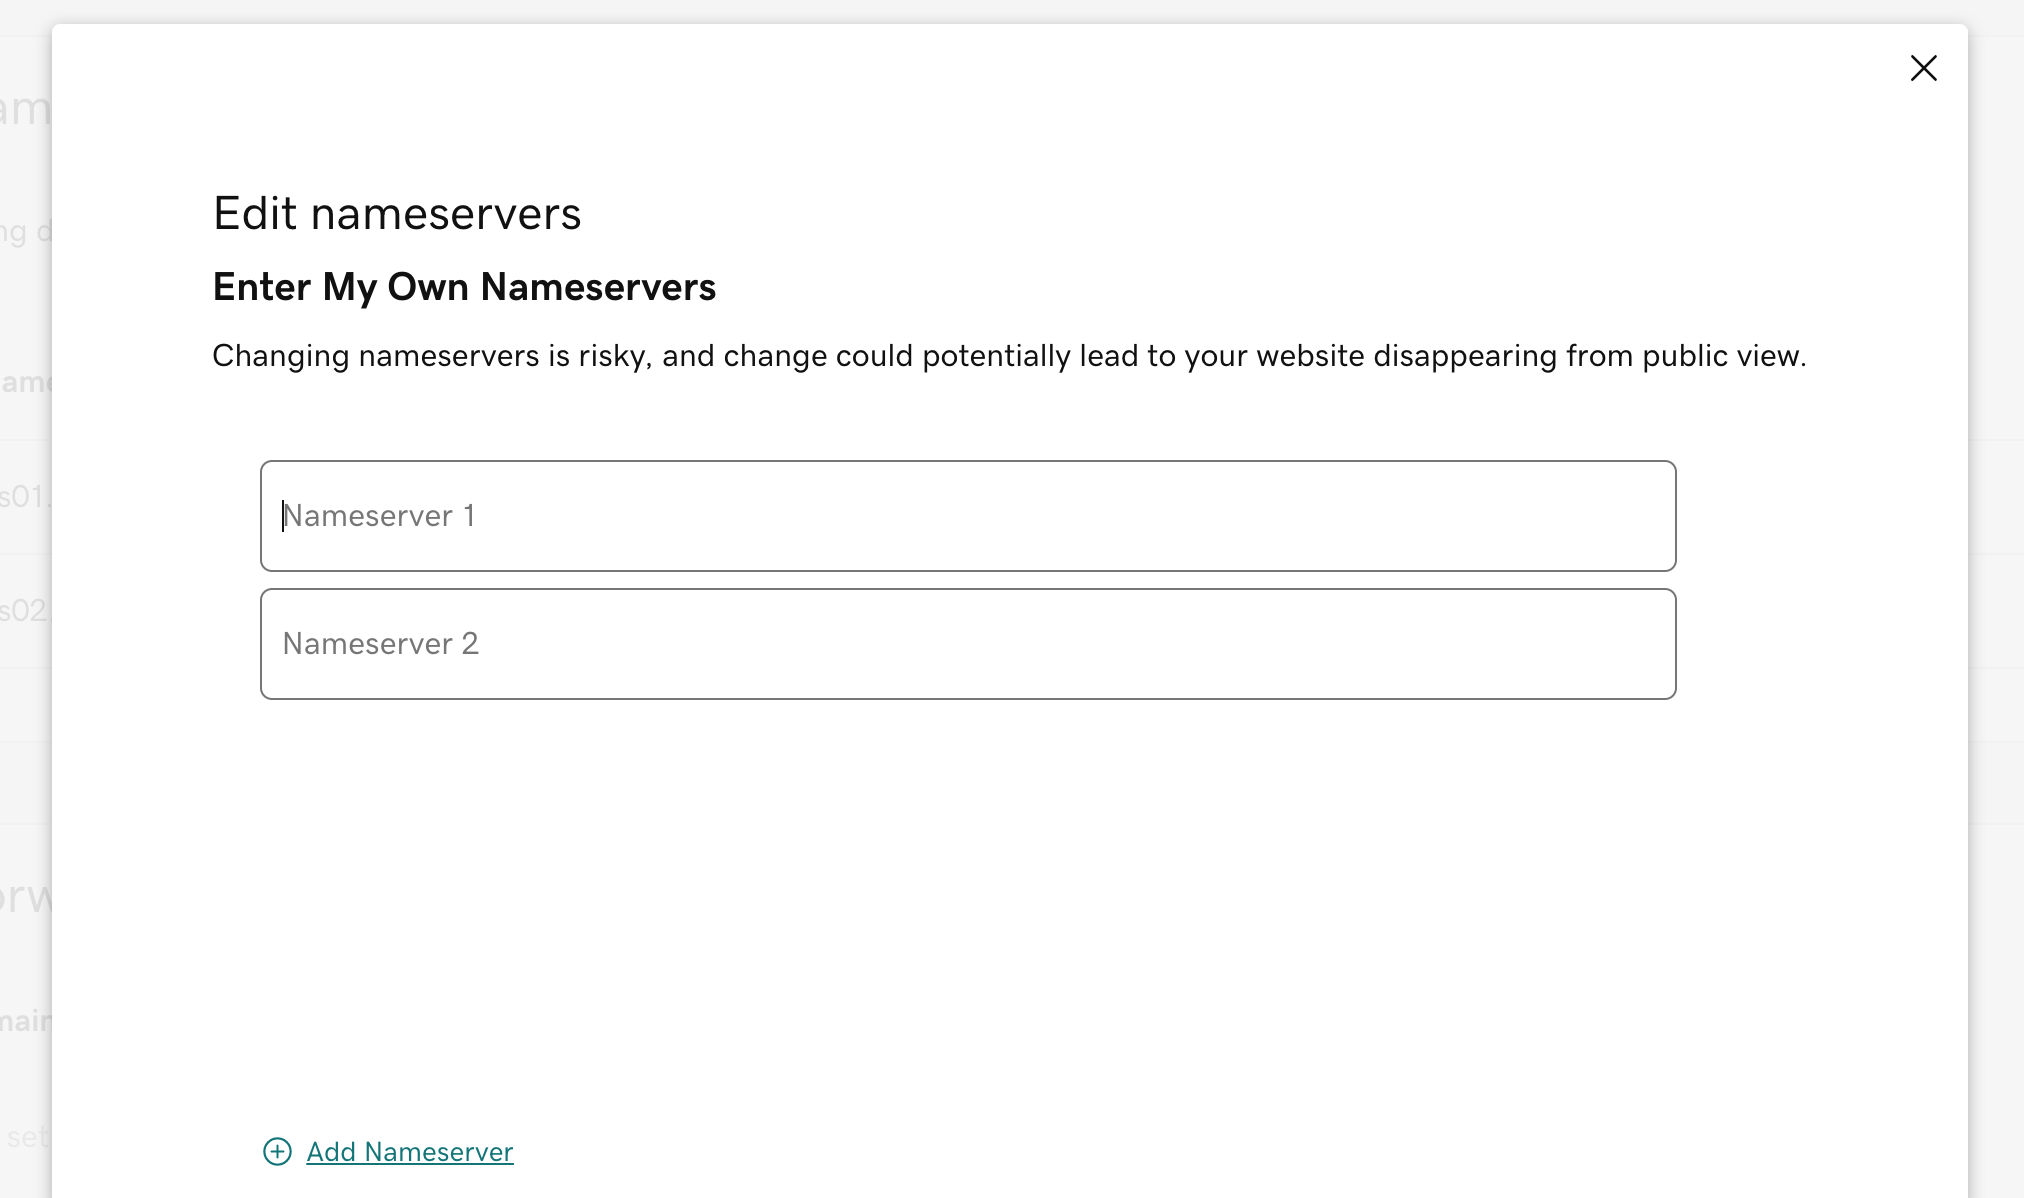
Go to the Route53 hosted zone and find out the NS records.
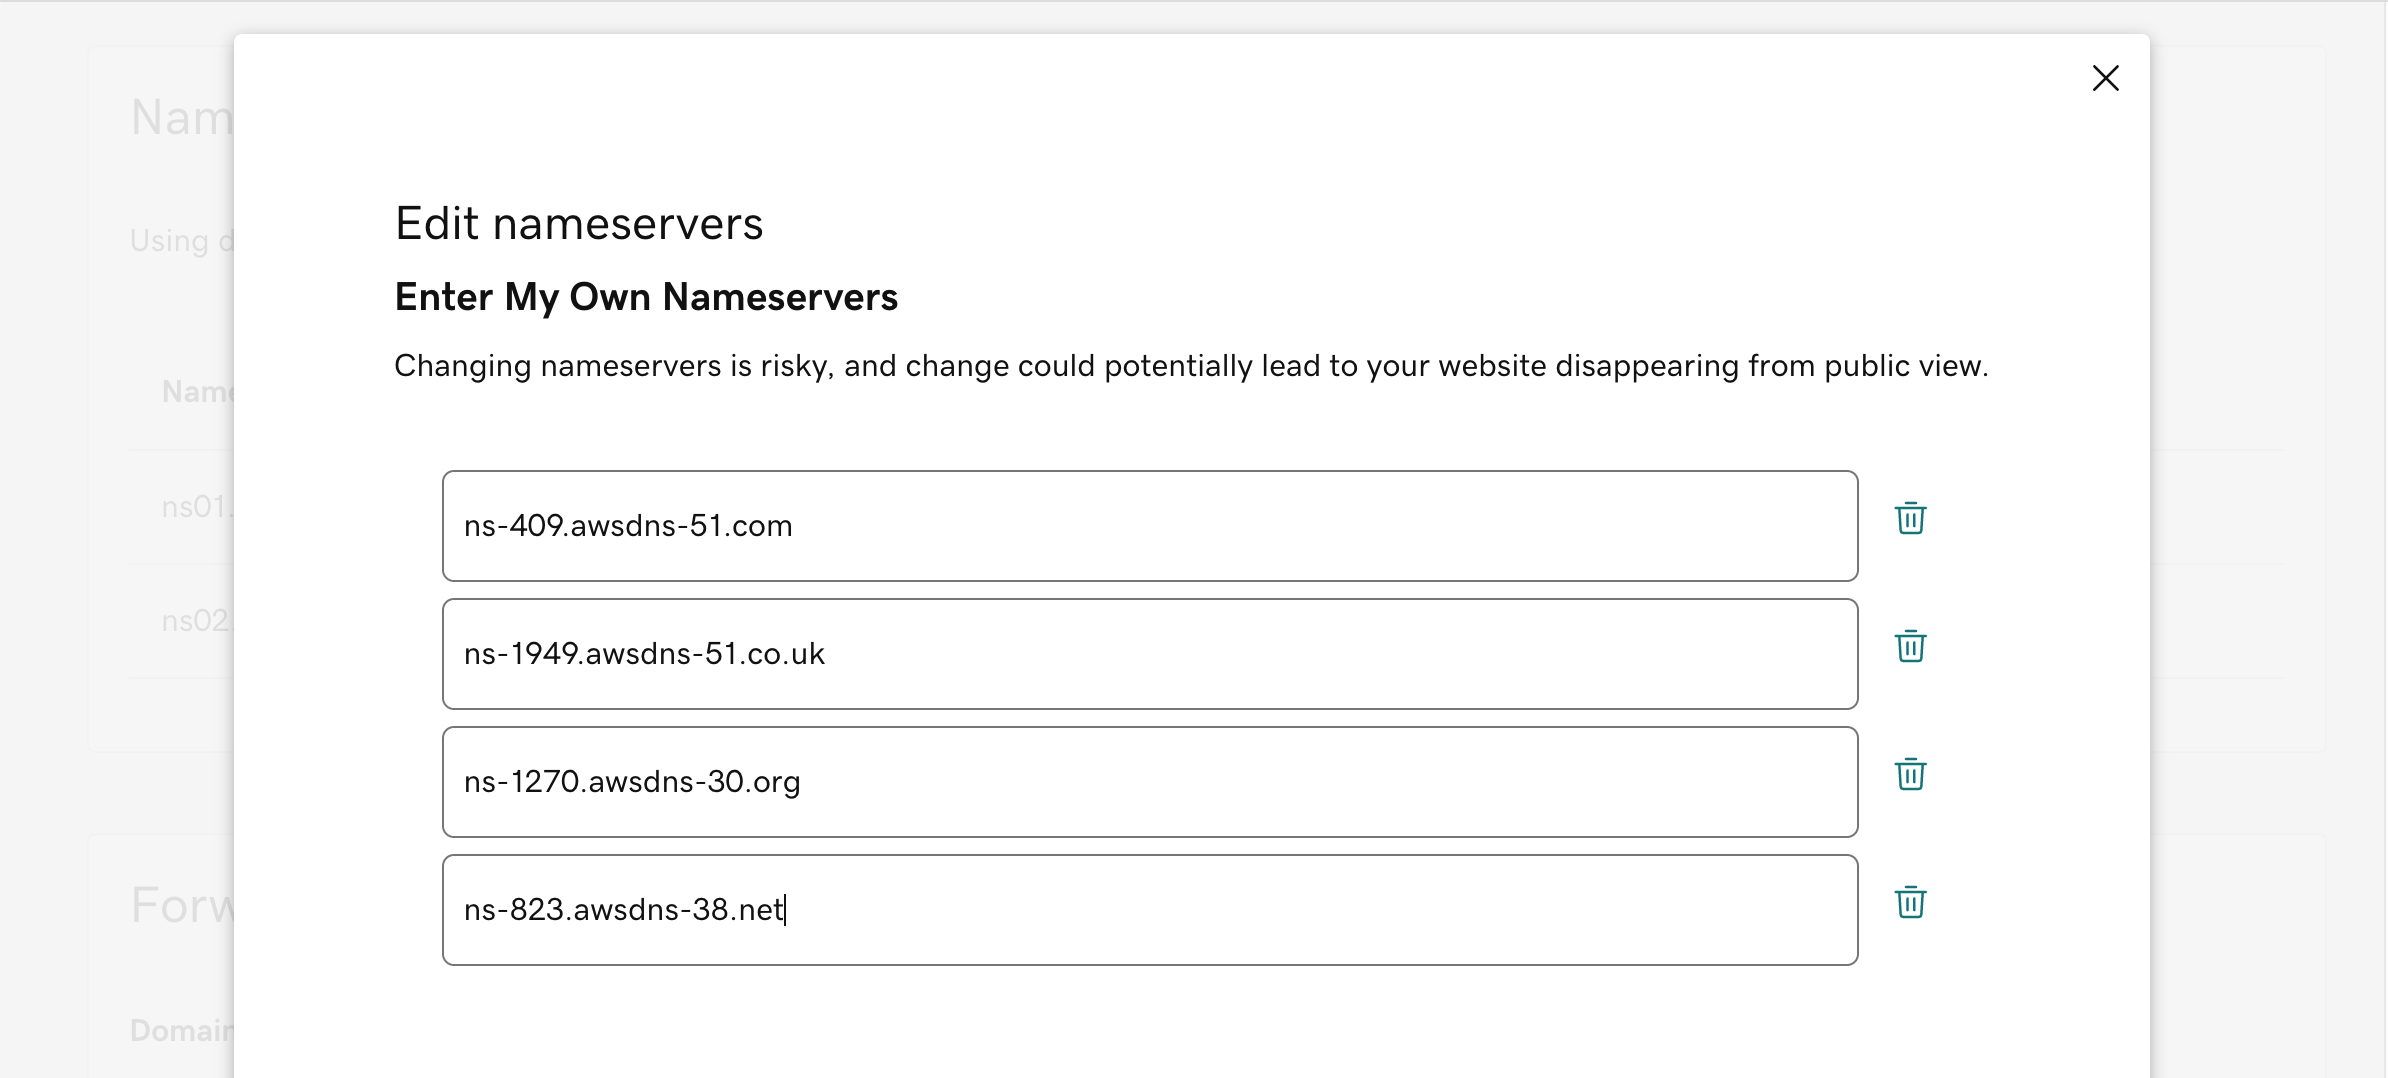
Upon saving the changes a warning message is provided. Please confirm the import.
DNS update will take some time to be effective.
Before
After
Create A Sub-Domain for Staging #
We are going to deploy the site to a password protected staging site first. With primary DNS managed by Route53 it’s easy to create a subdomain.
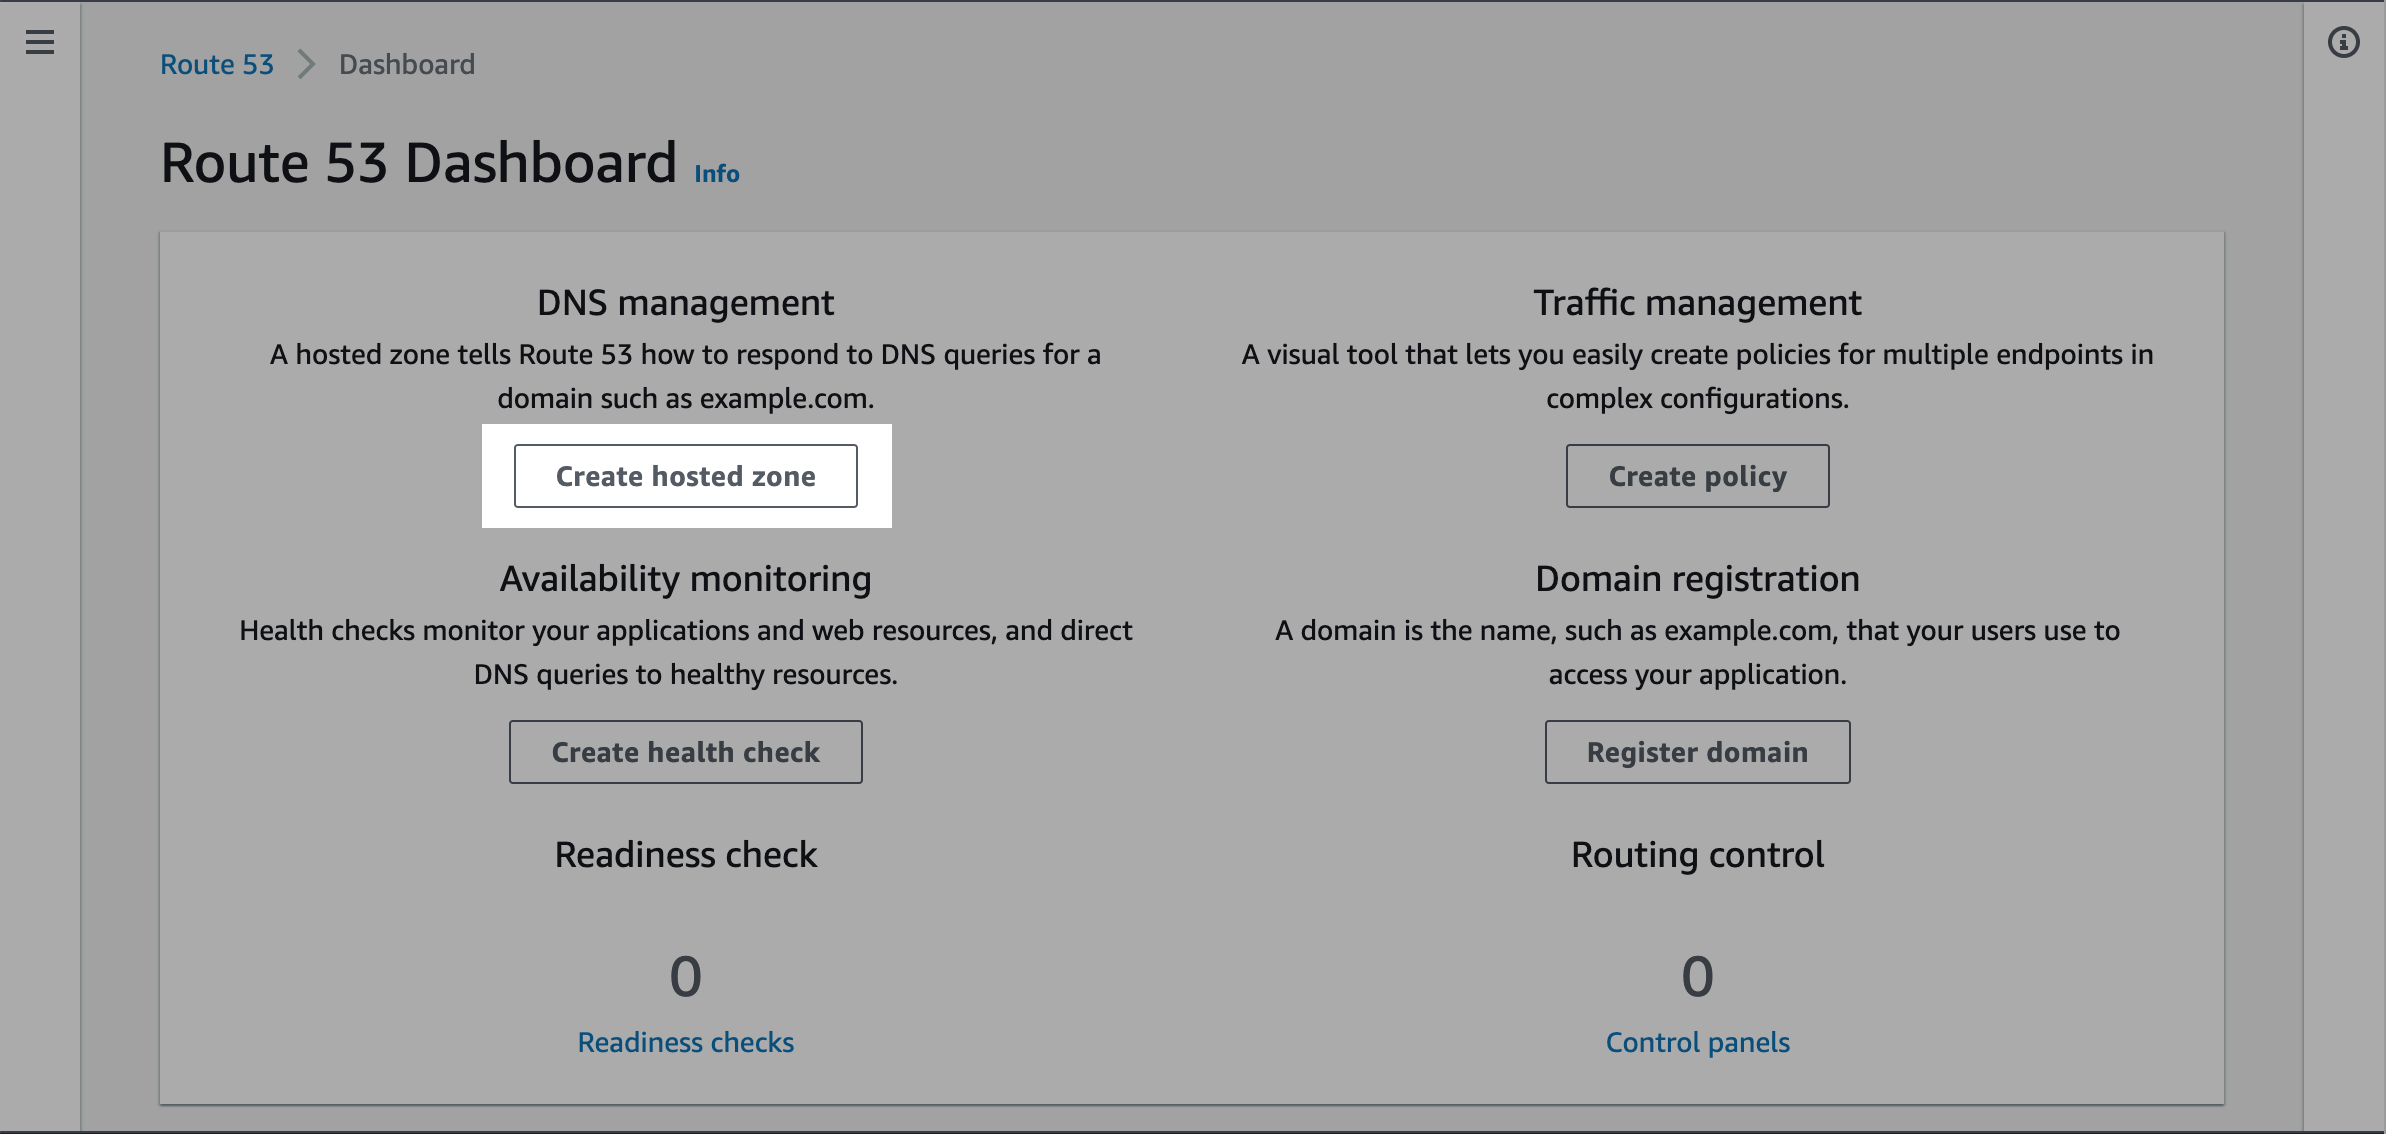
Open Route53 and go to Hosted zones.
Click Create hosted zone.
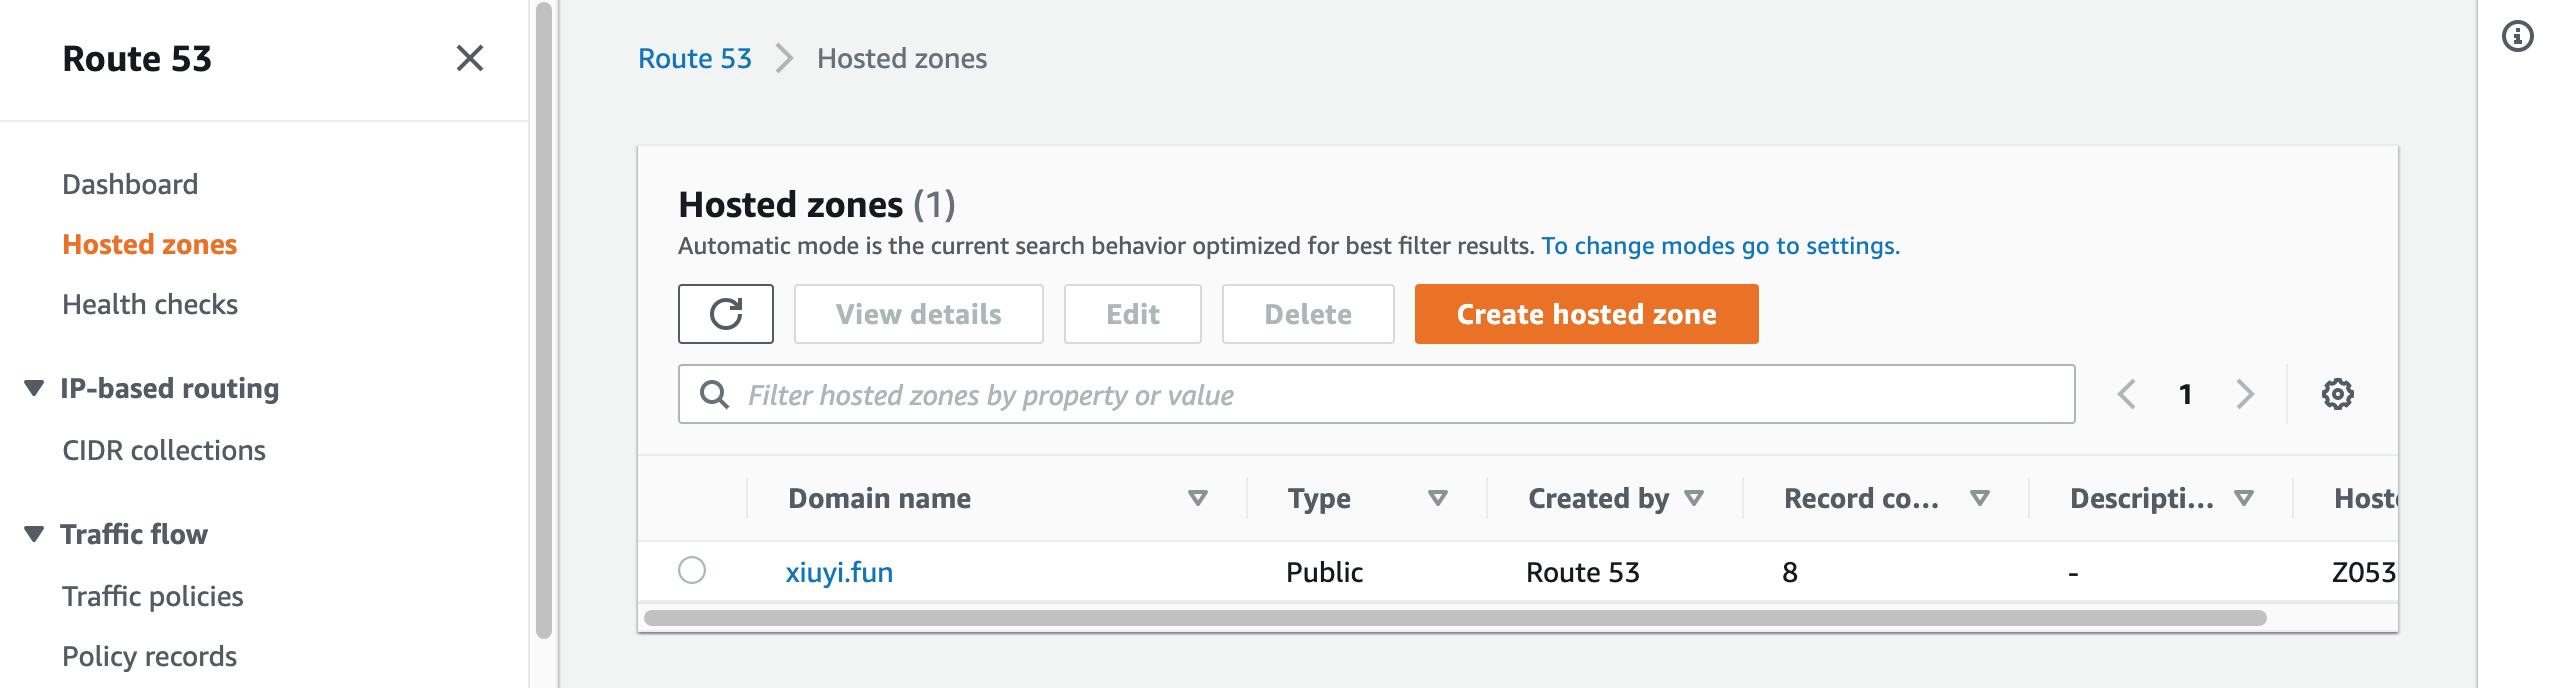
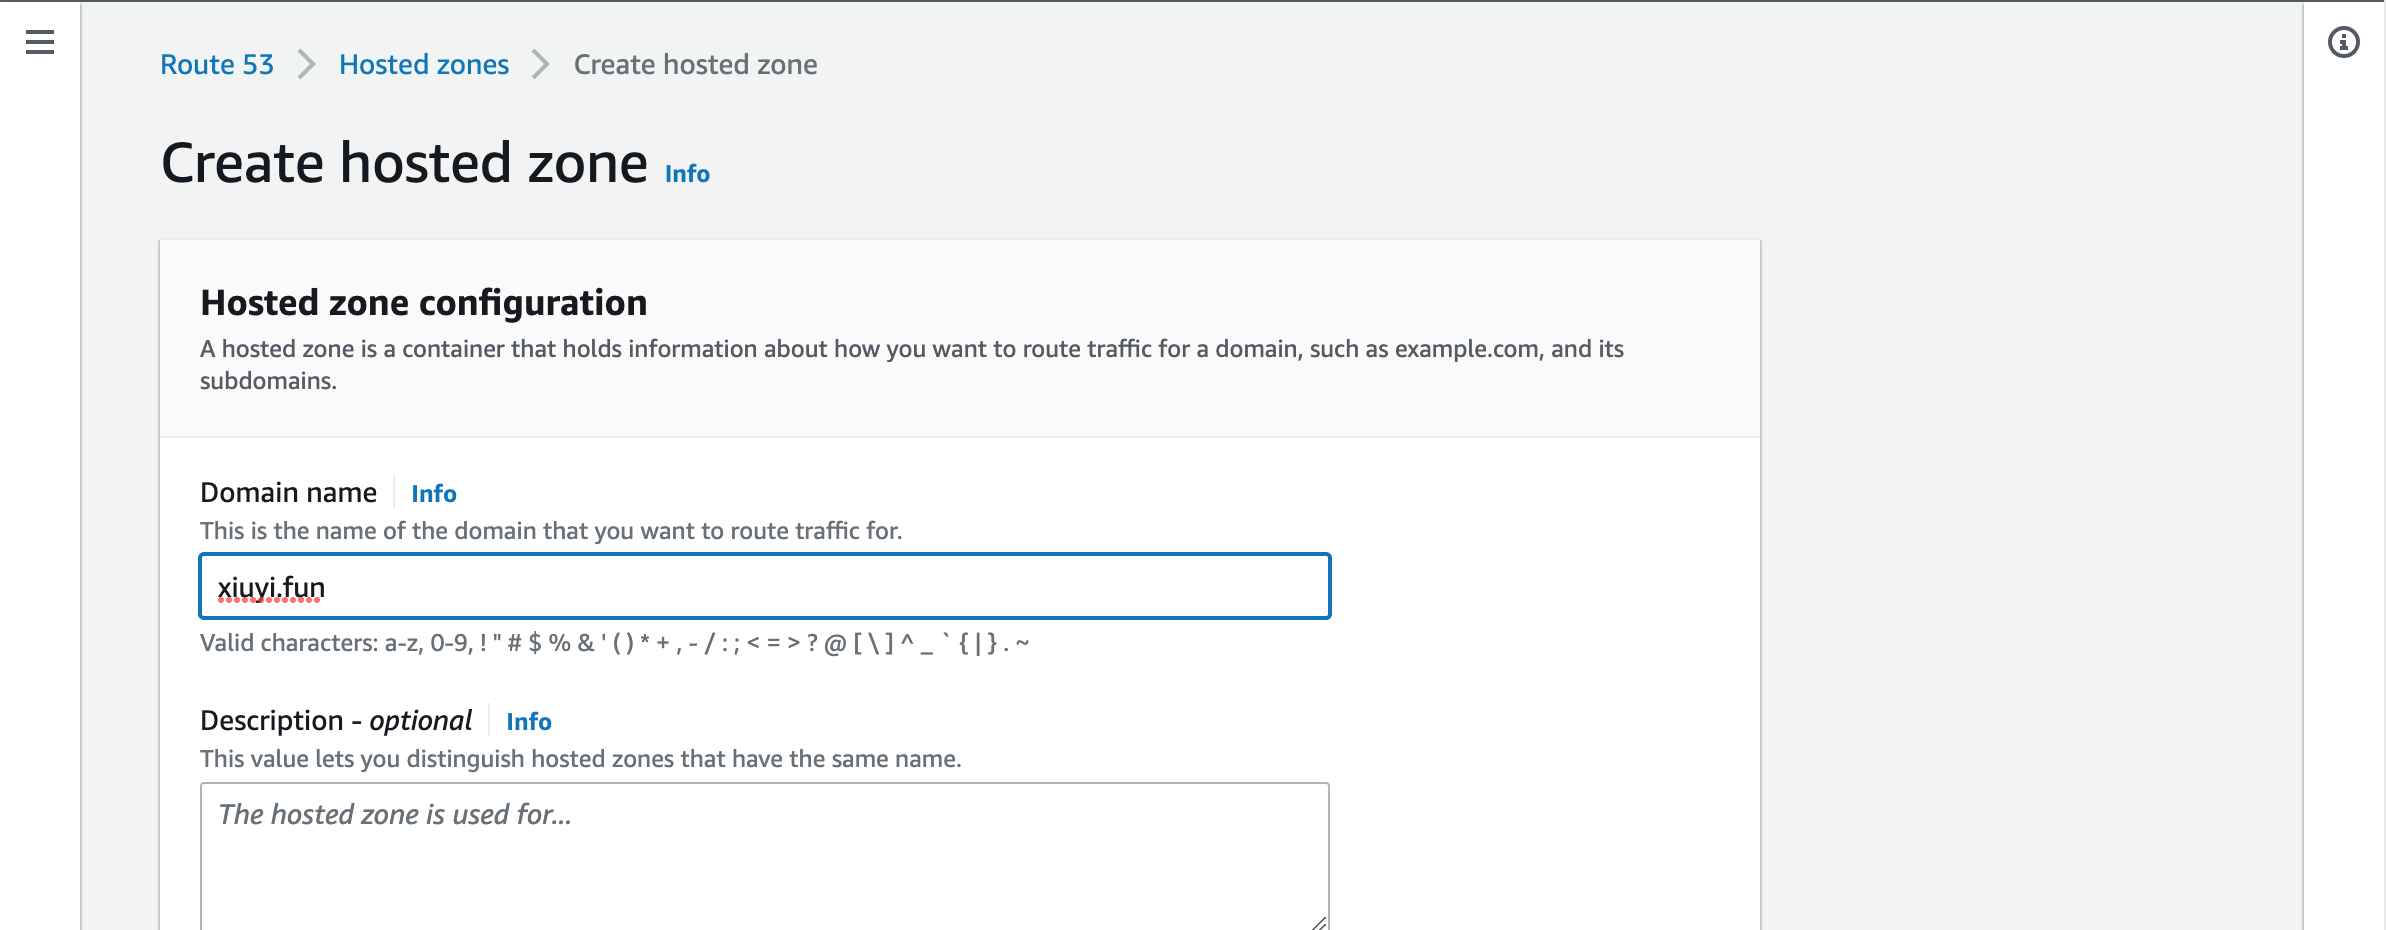
Put your staging domain name for example staging.<your domain name>.
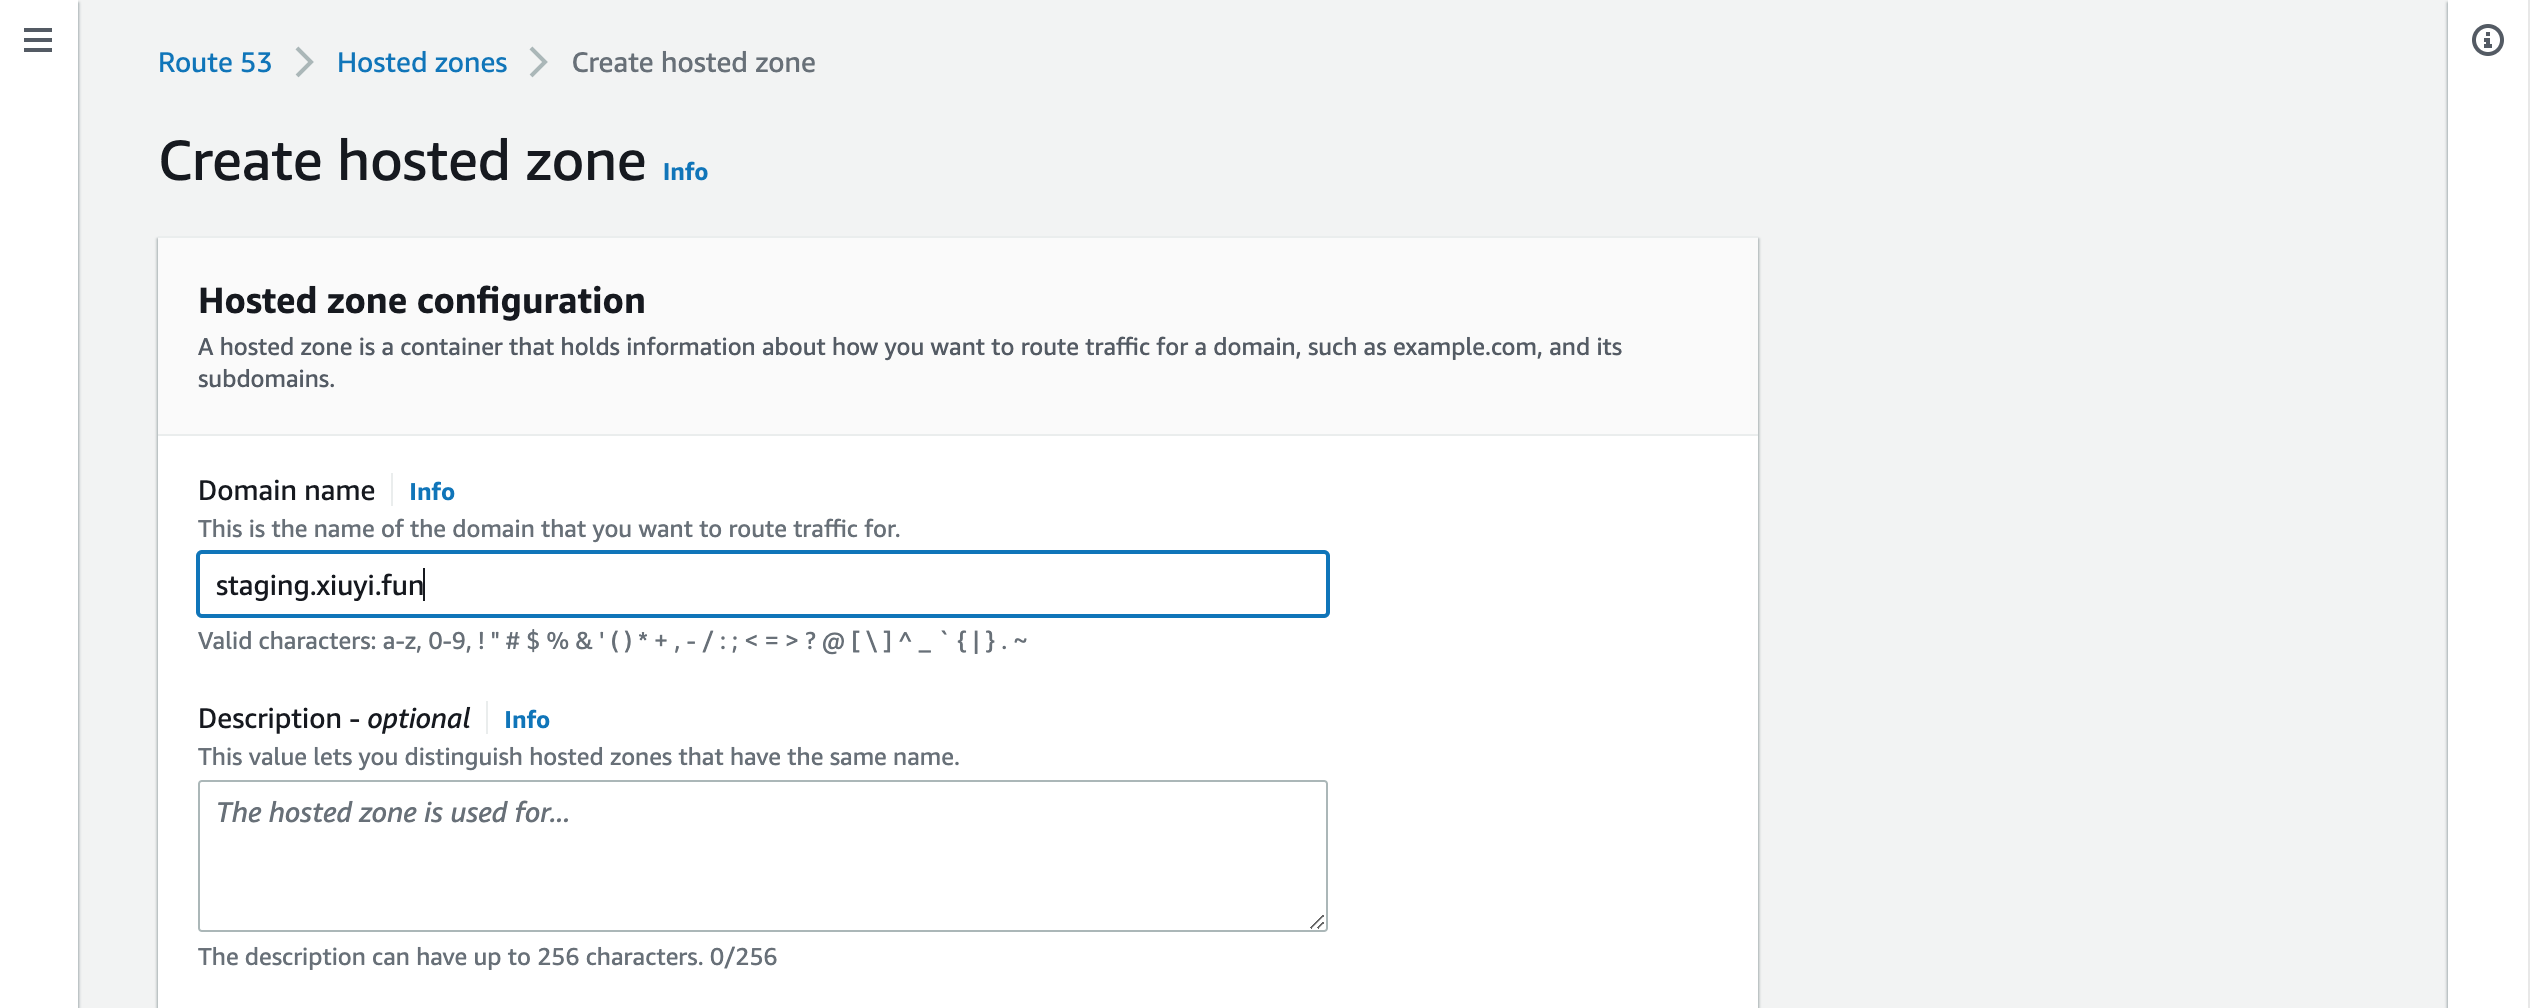
Click Create hosted zone.
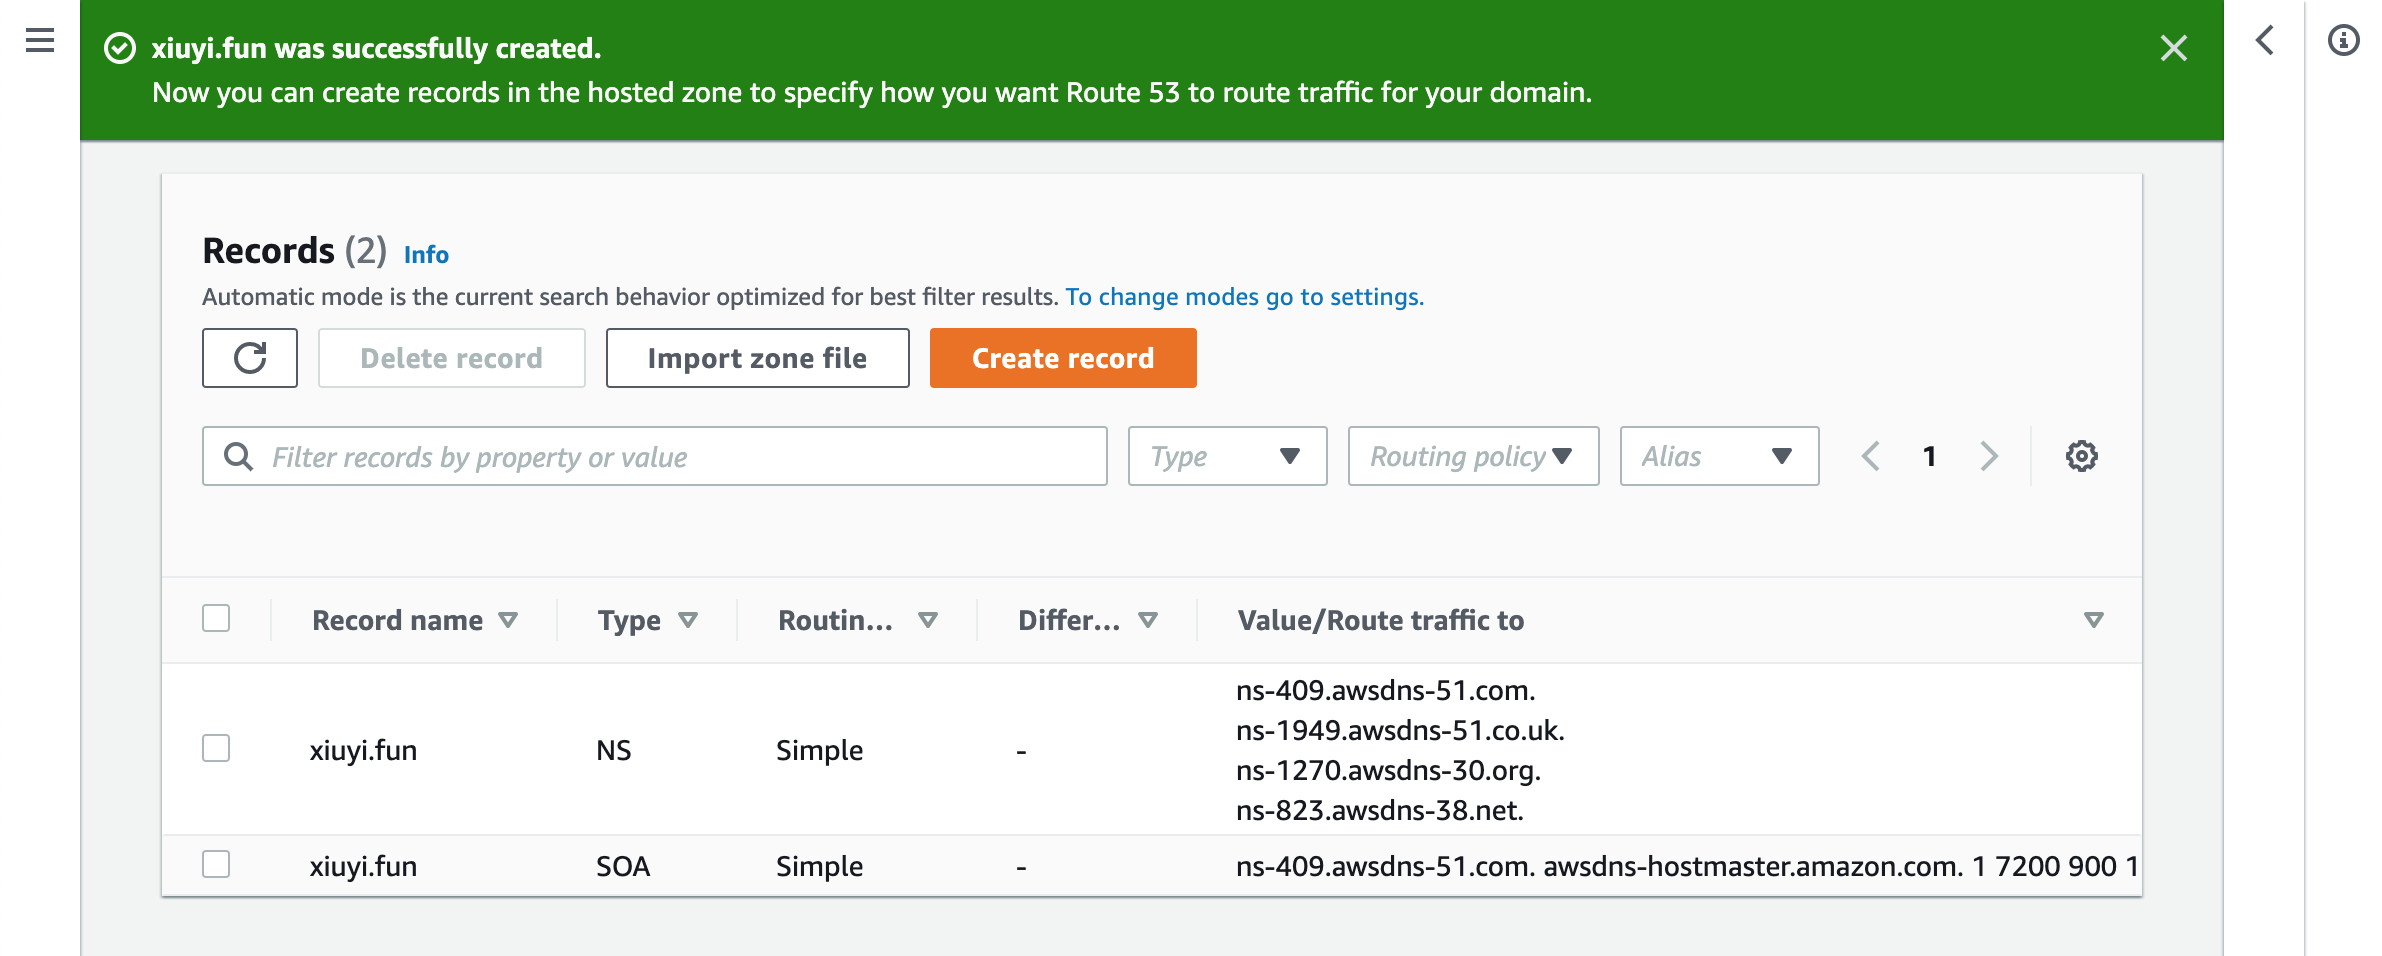
Copy all 4 DNS records.
Go back to the Hosted zones. Open the root domain. Click Create record.
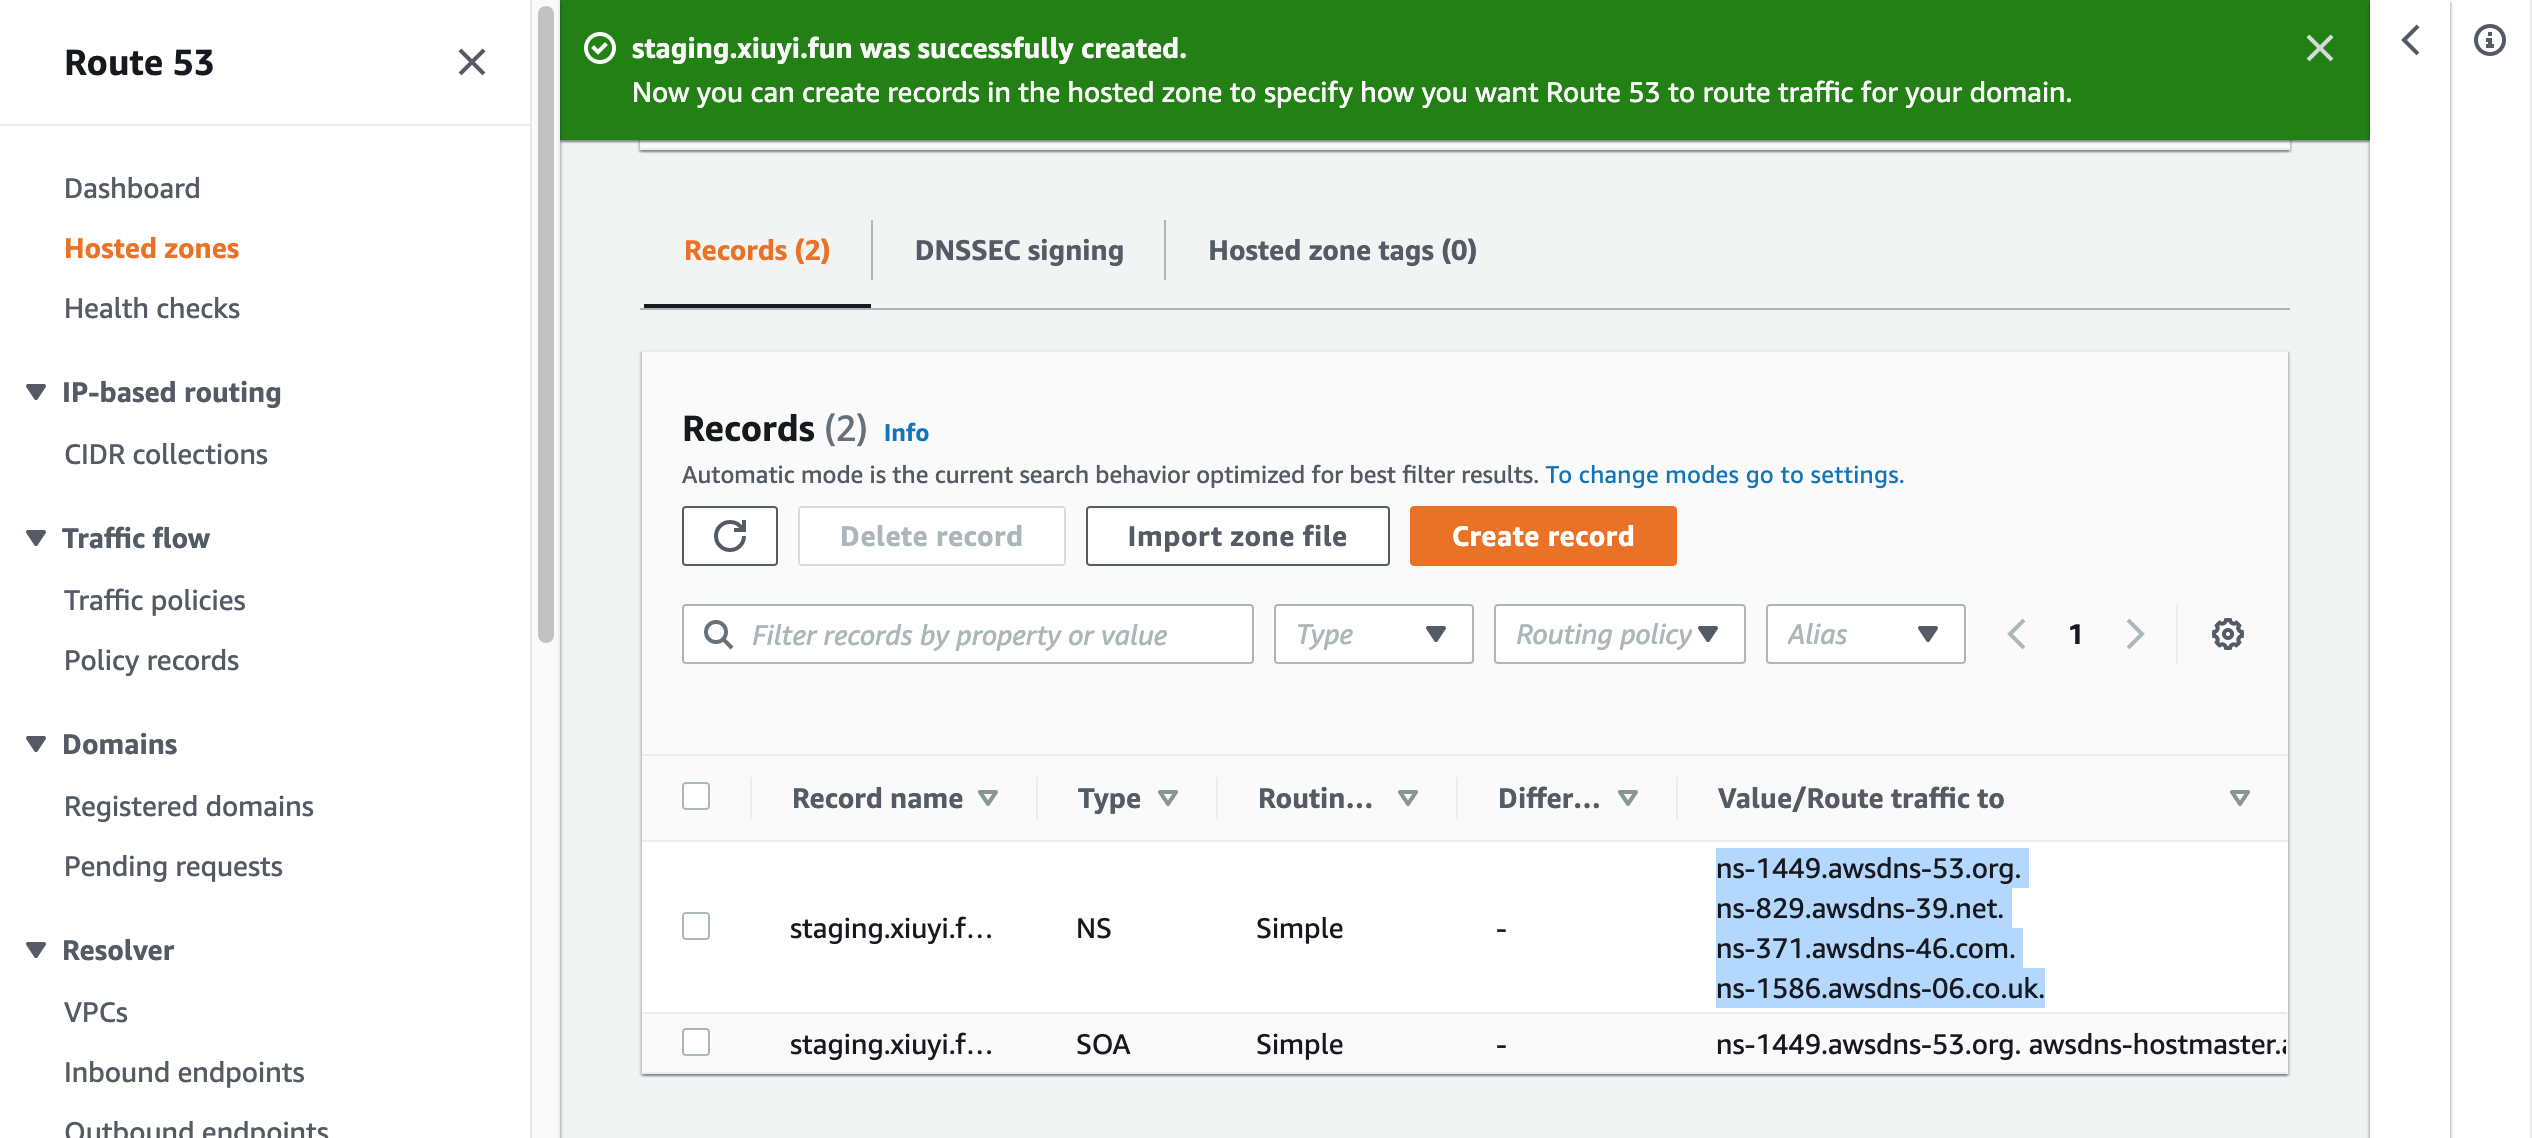
Put the subdomain name (e.g. staging) into the Record name field.
Choose Record type NS - Name servers for a hosted zone.
Paste the NS values from the previous screen into the Value field.
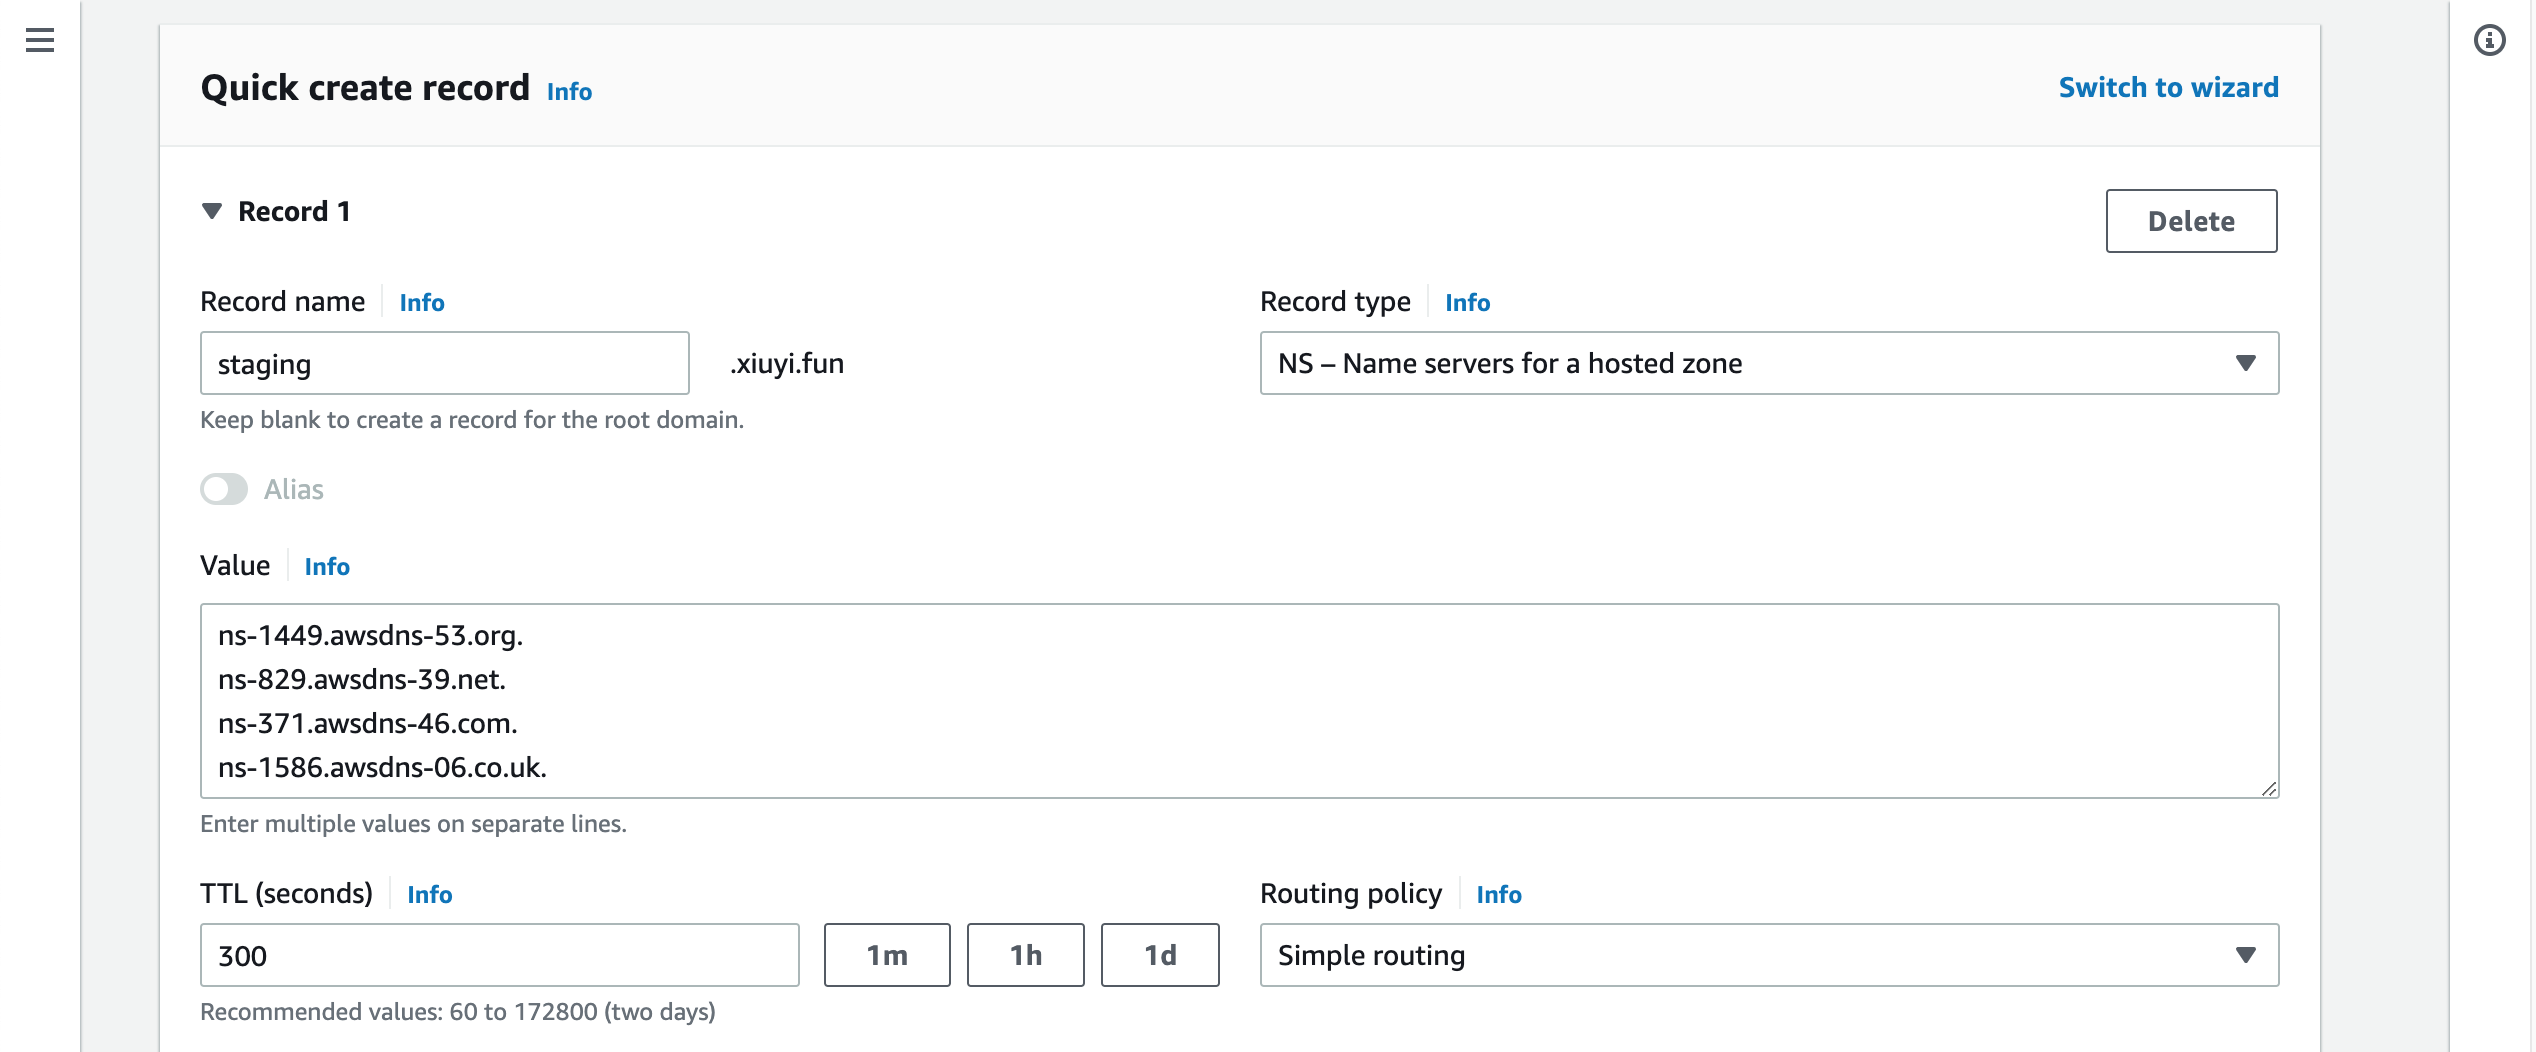
Click the Create records.
Now the subdomain is created successfully and connected with the root domain.
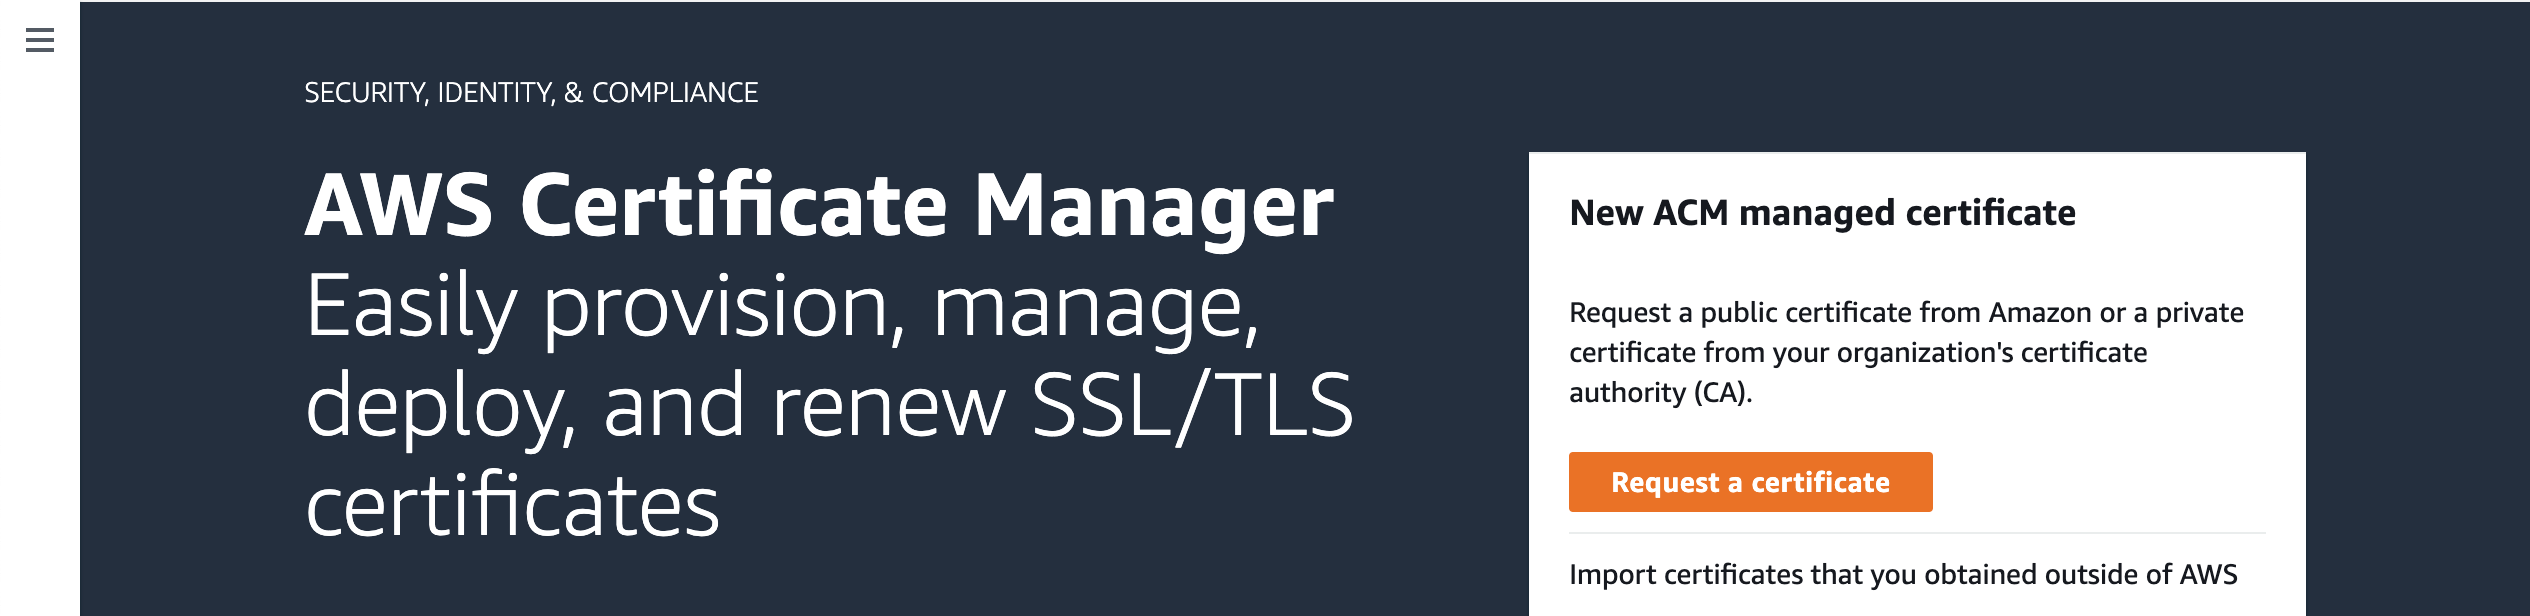
Request SSL Certificate #
One benefit of using Route53 is getting the free SSL certificate for the hosted zone. Let’s request one for the staging site. It’s the same process when you request one for your production site. Just need to be aware that for the production site you may want to include both with and without www.. So that the certificate will work for both xiuyi.fun and www.xiuyi.fun
Go to AWS Certificate Manager.
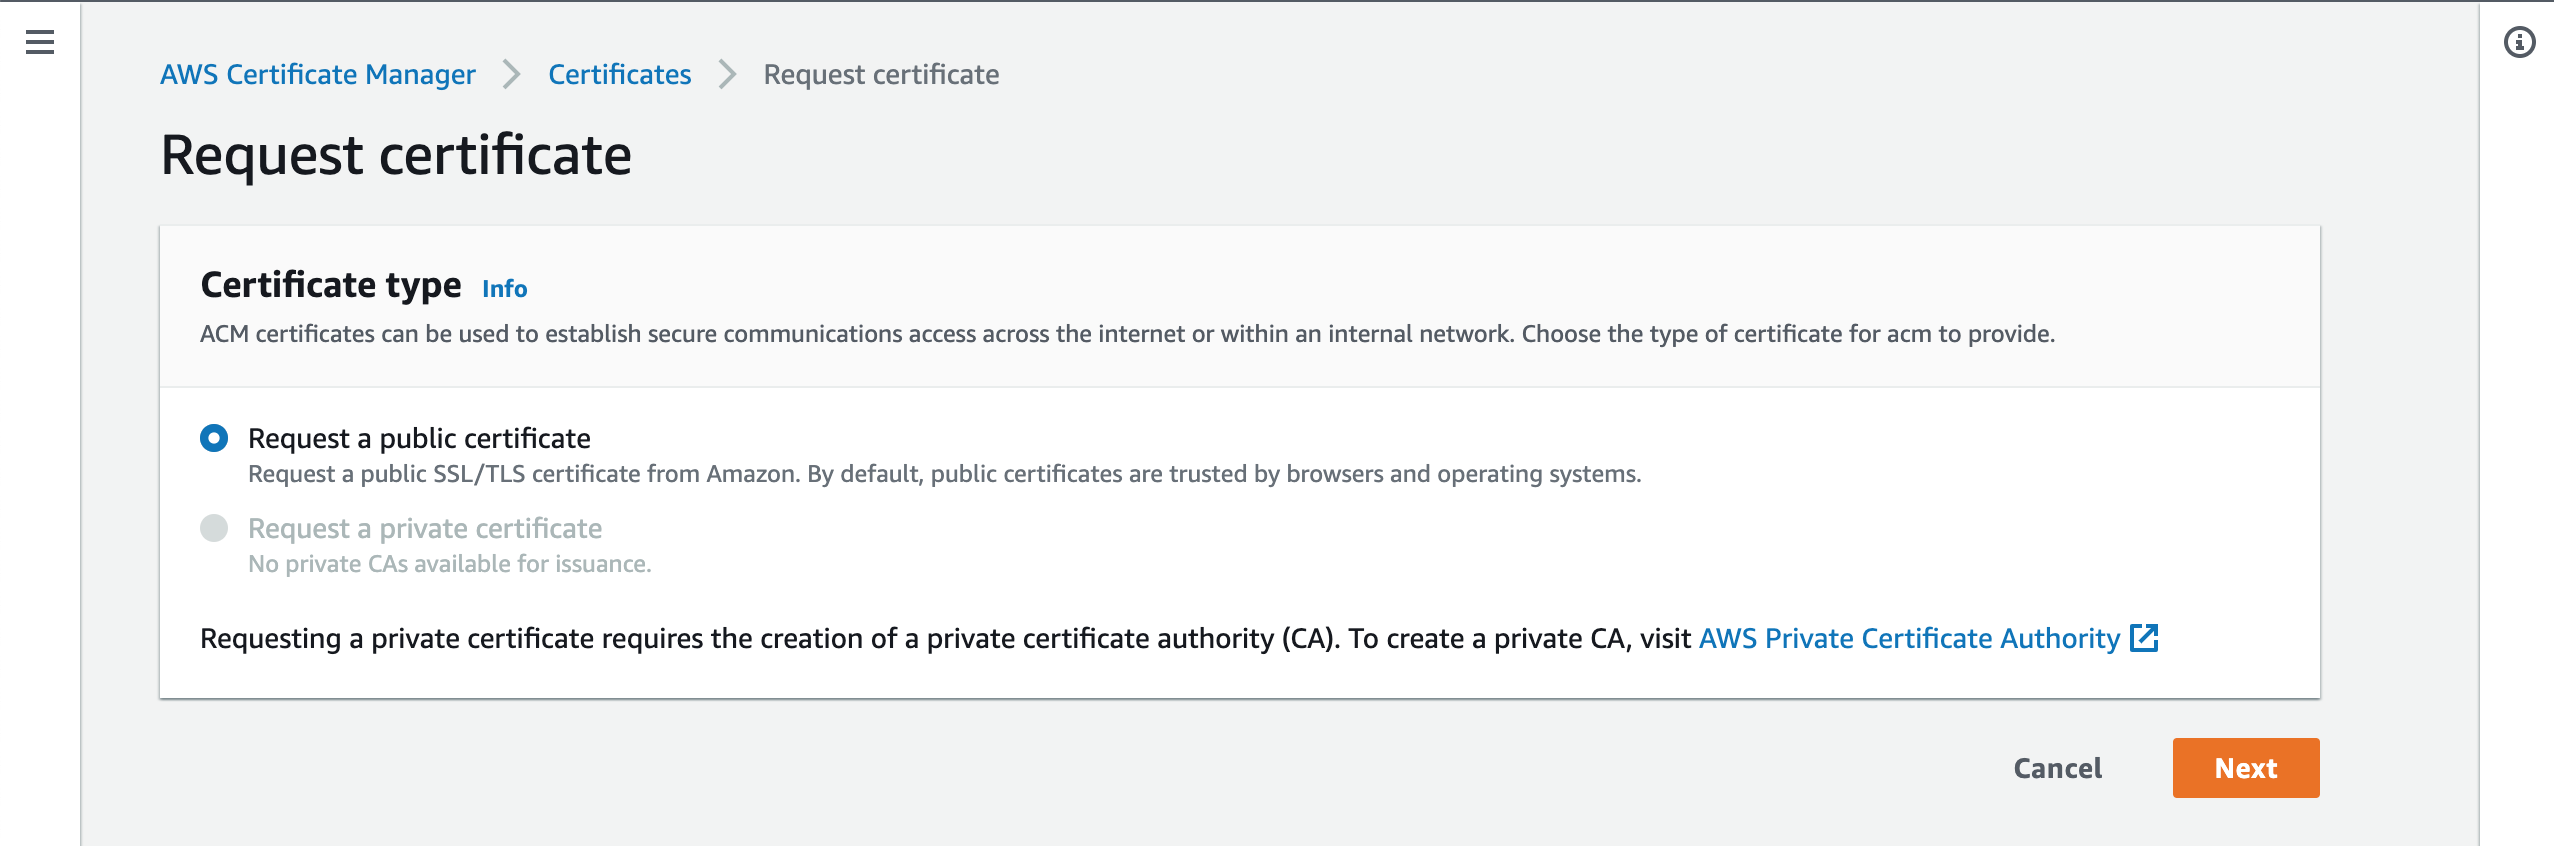
Click the Request a certificate.
Choose Request a public certificate. Then click Next.
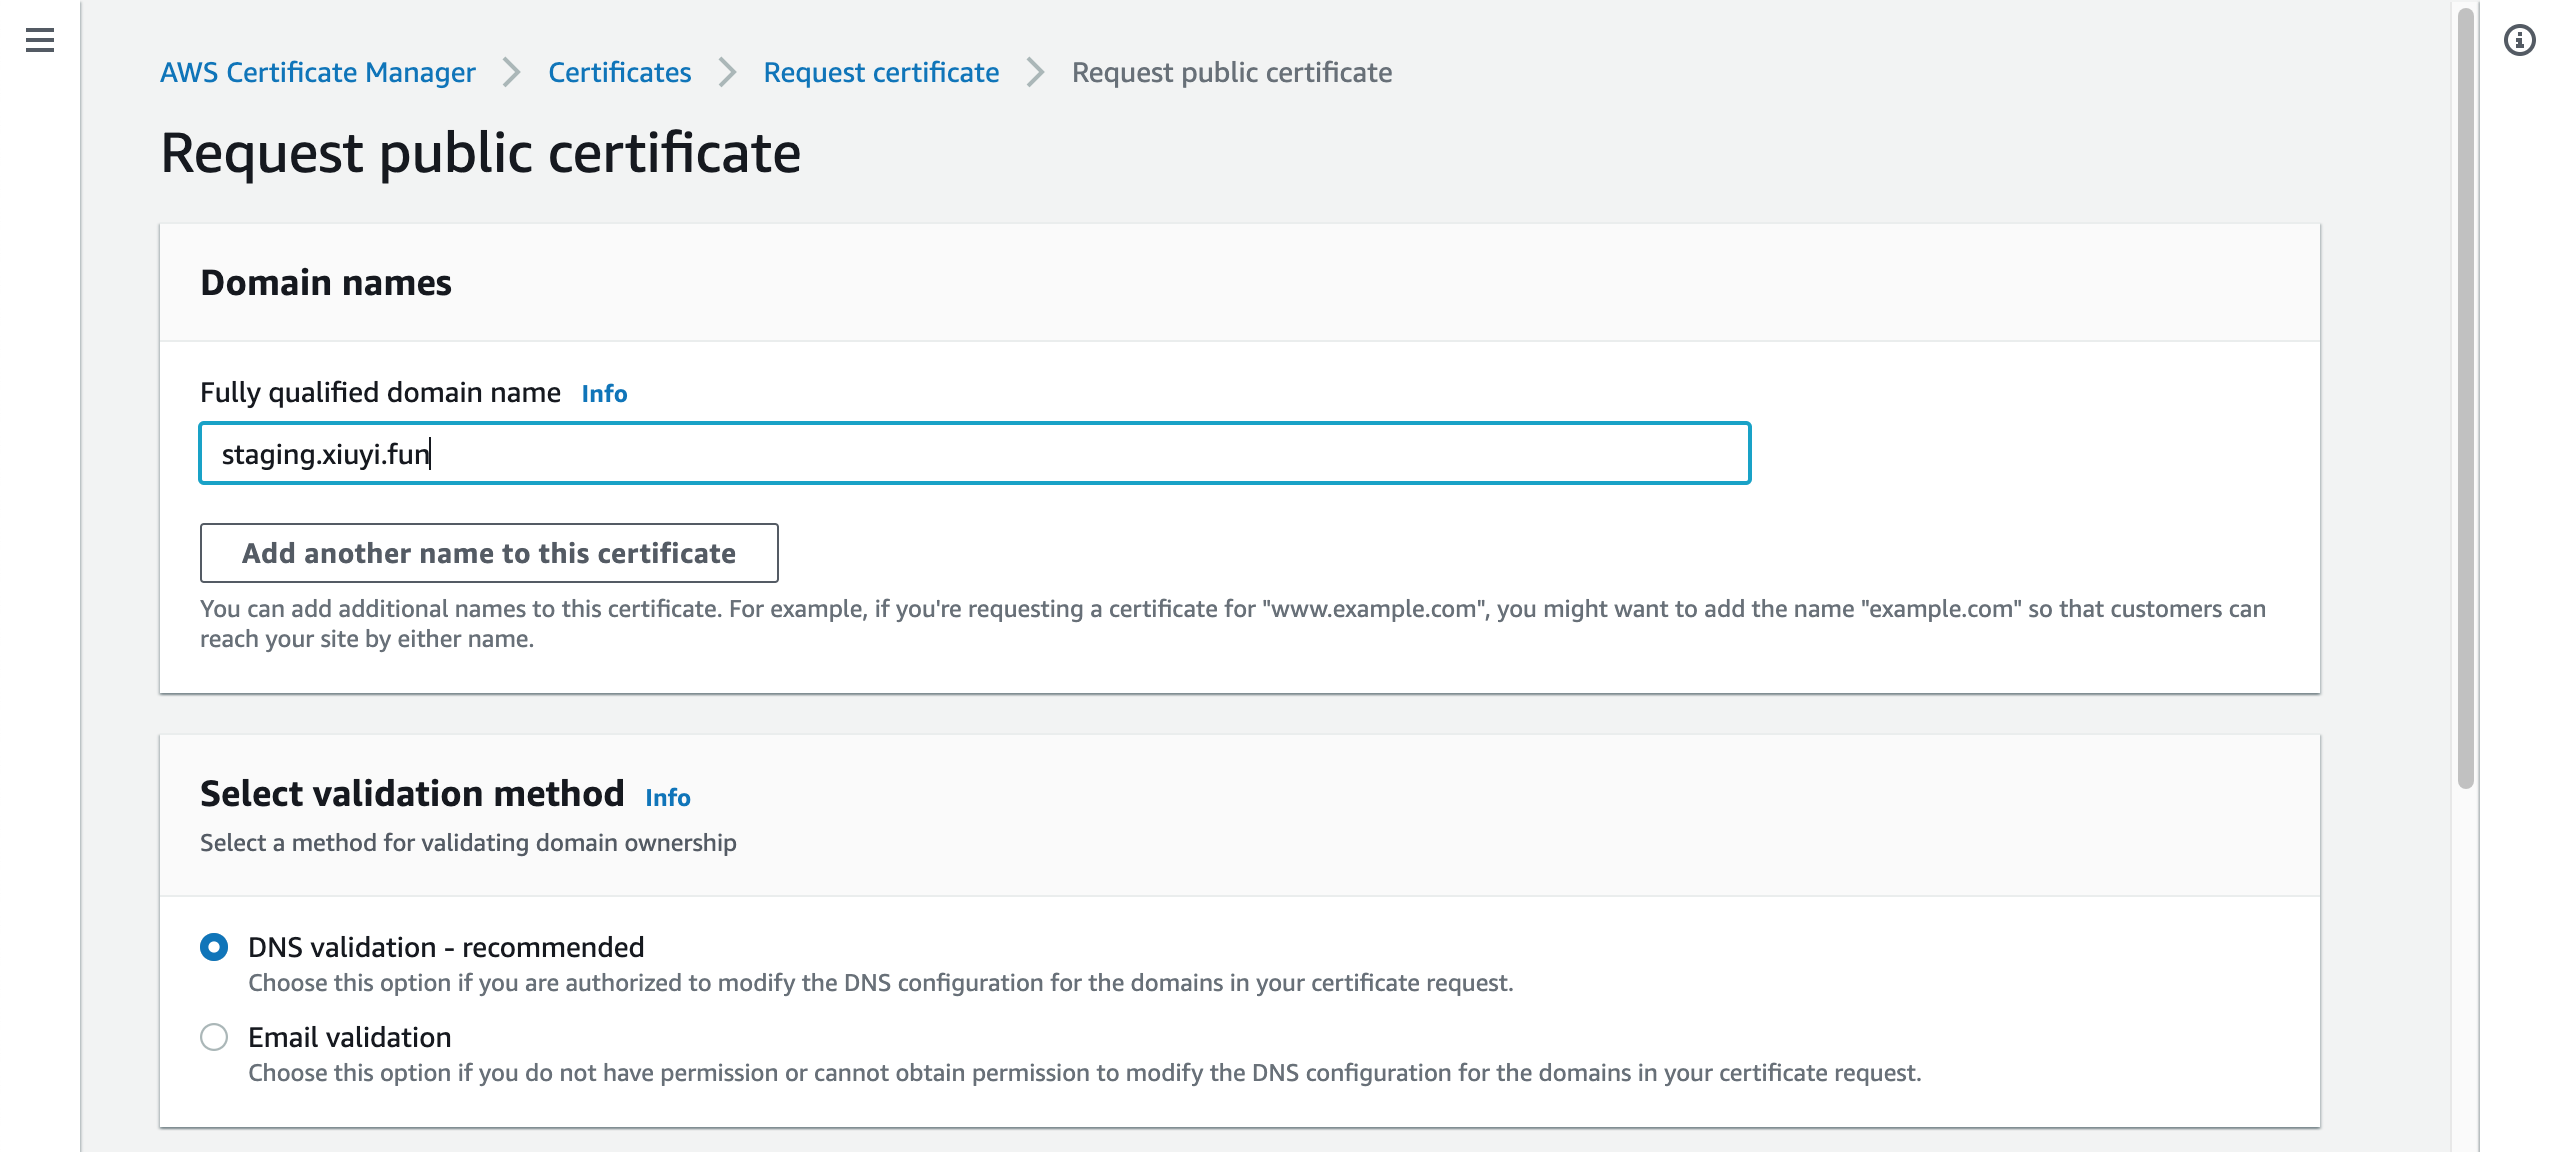
In the Fully qualified domain name put staging.<your domain name>.
Then click Request.
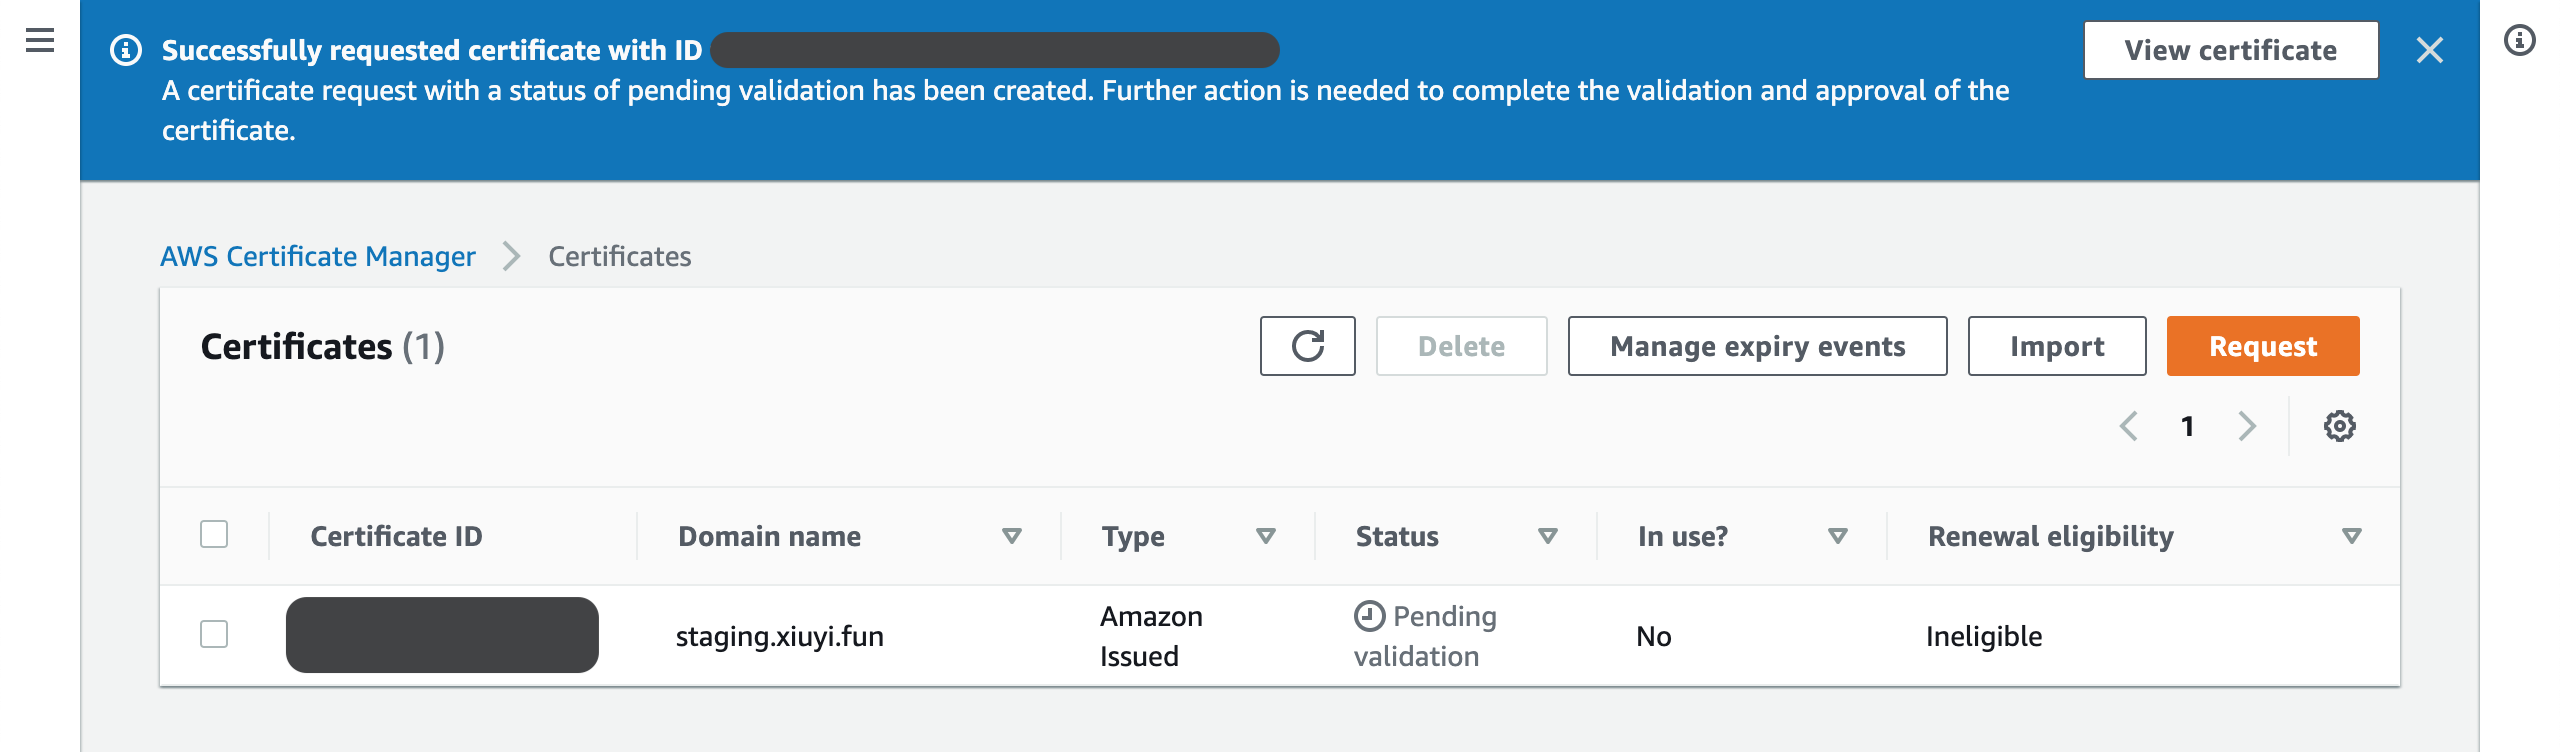
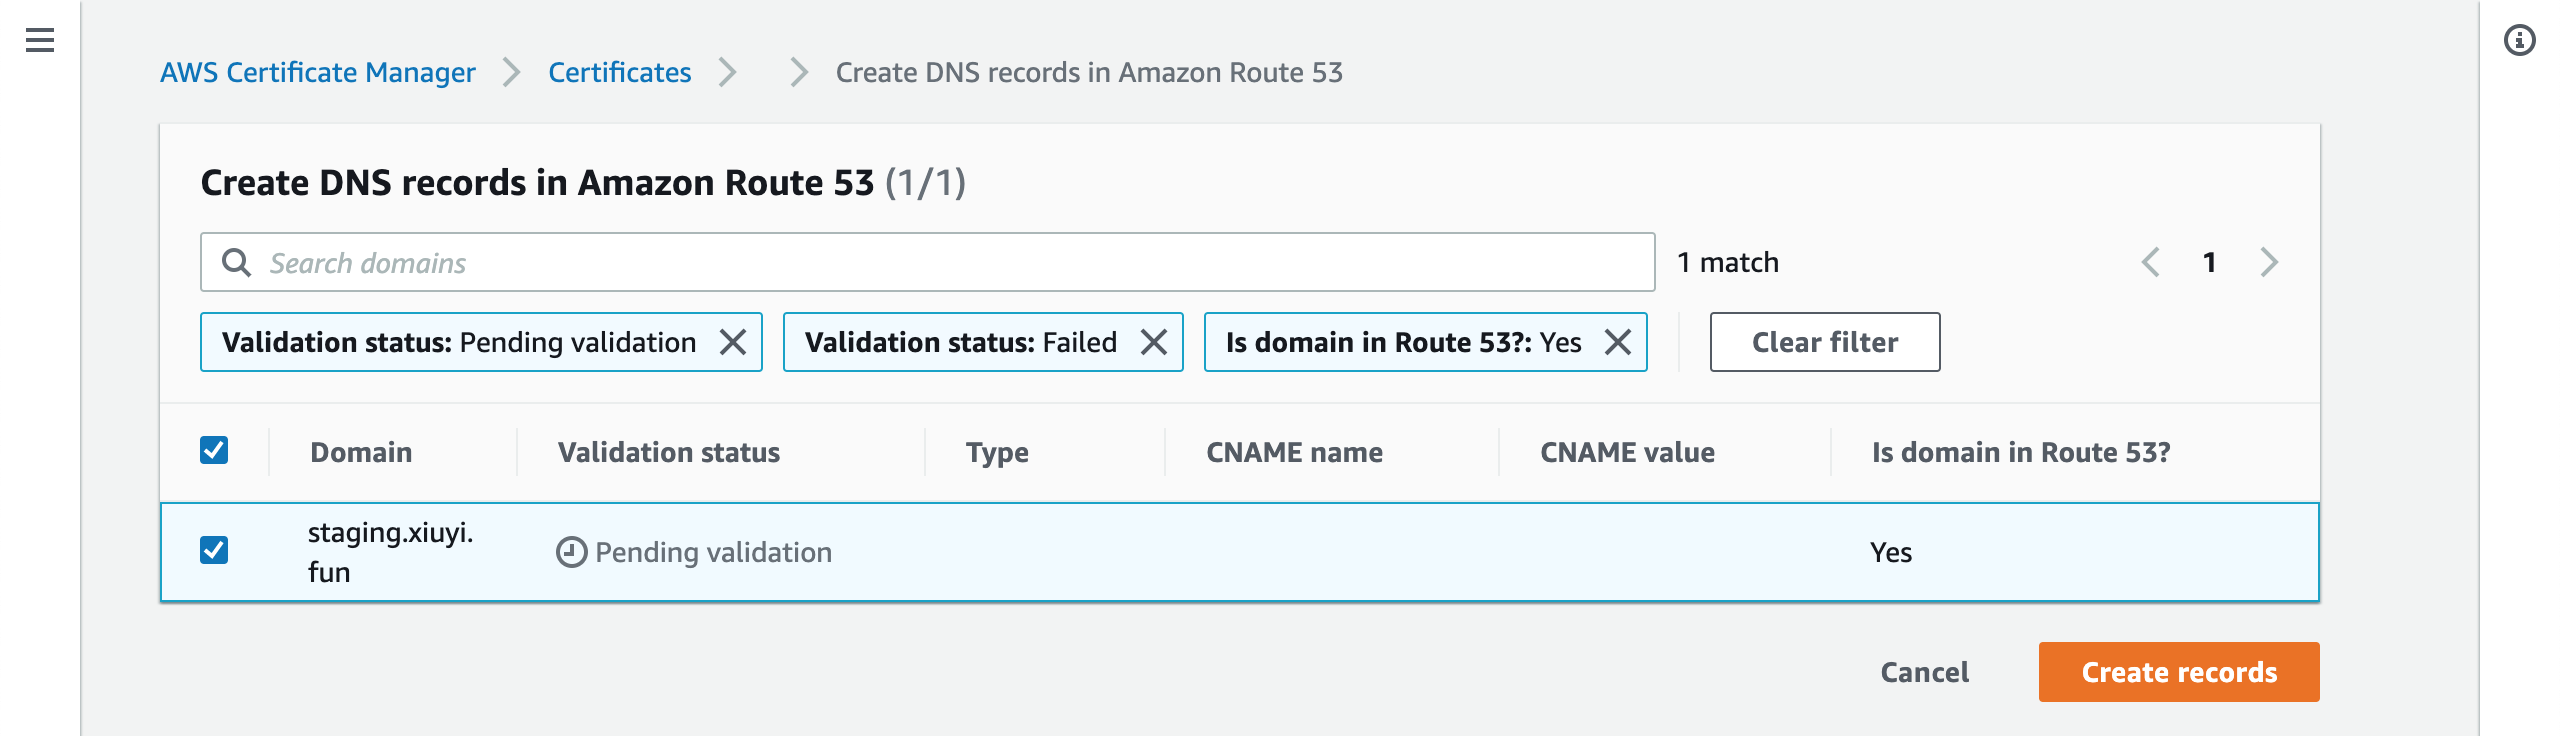
The request will show status Pending validation. Click on the request’s Certification ID to open this request again.
Click Create records in Route 53.

In this screen all the pending request will be listed and selected. Click Create records.
With the successful confirmation
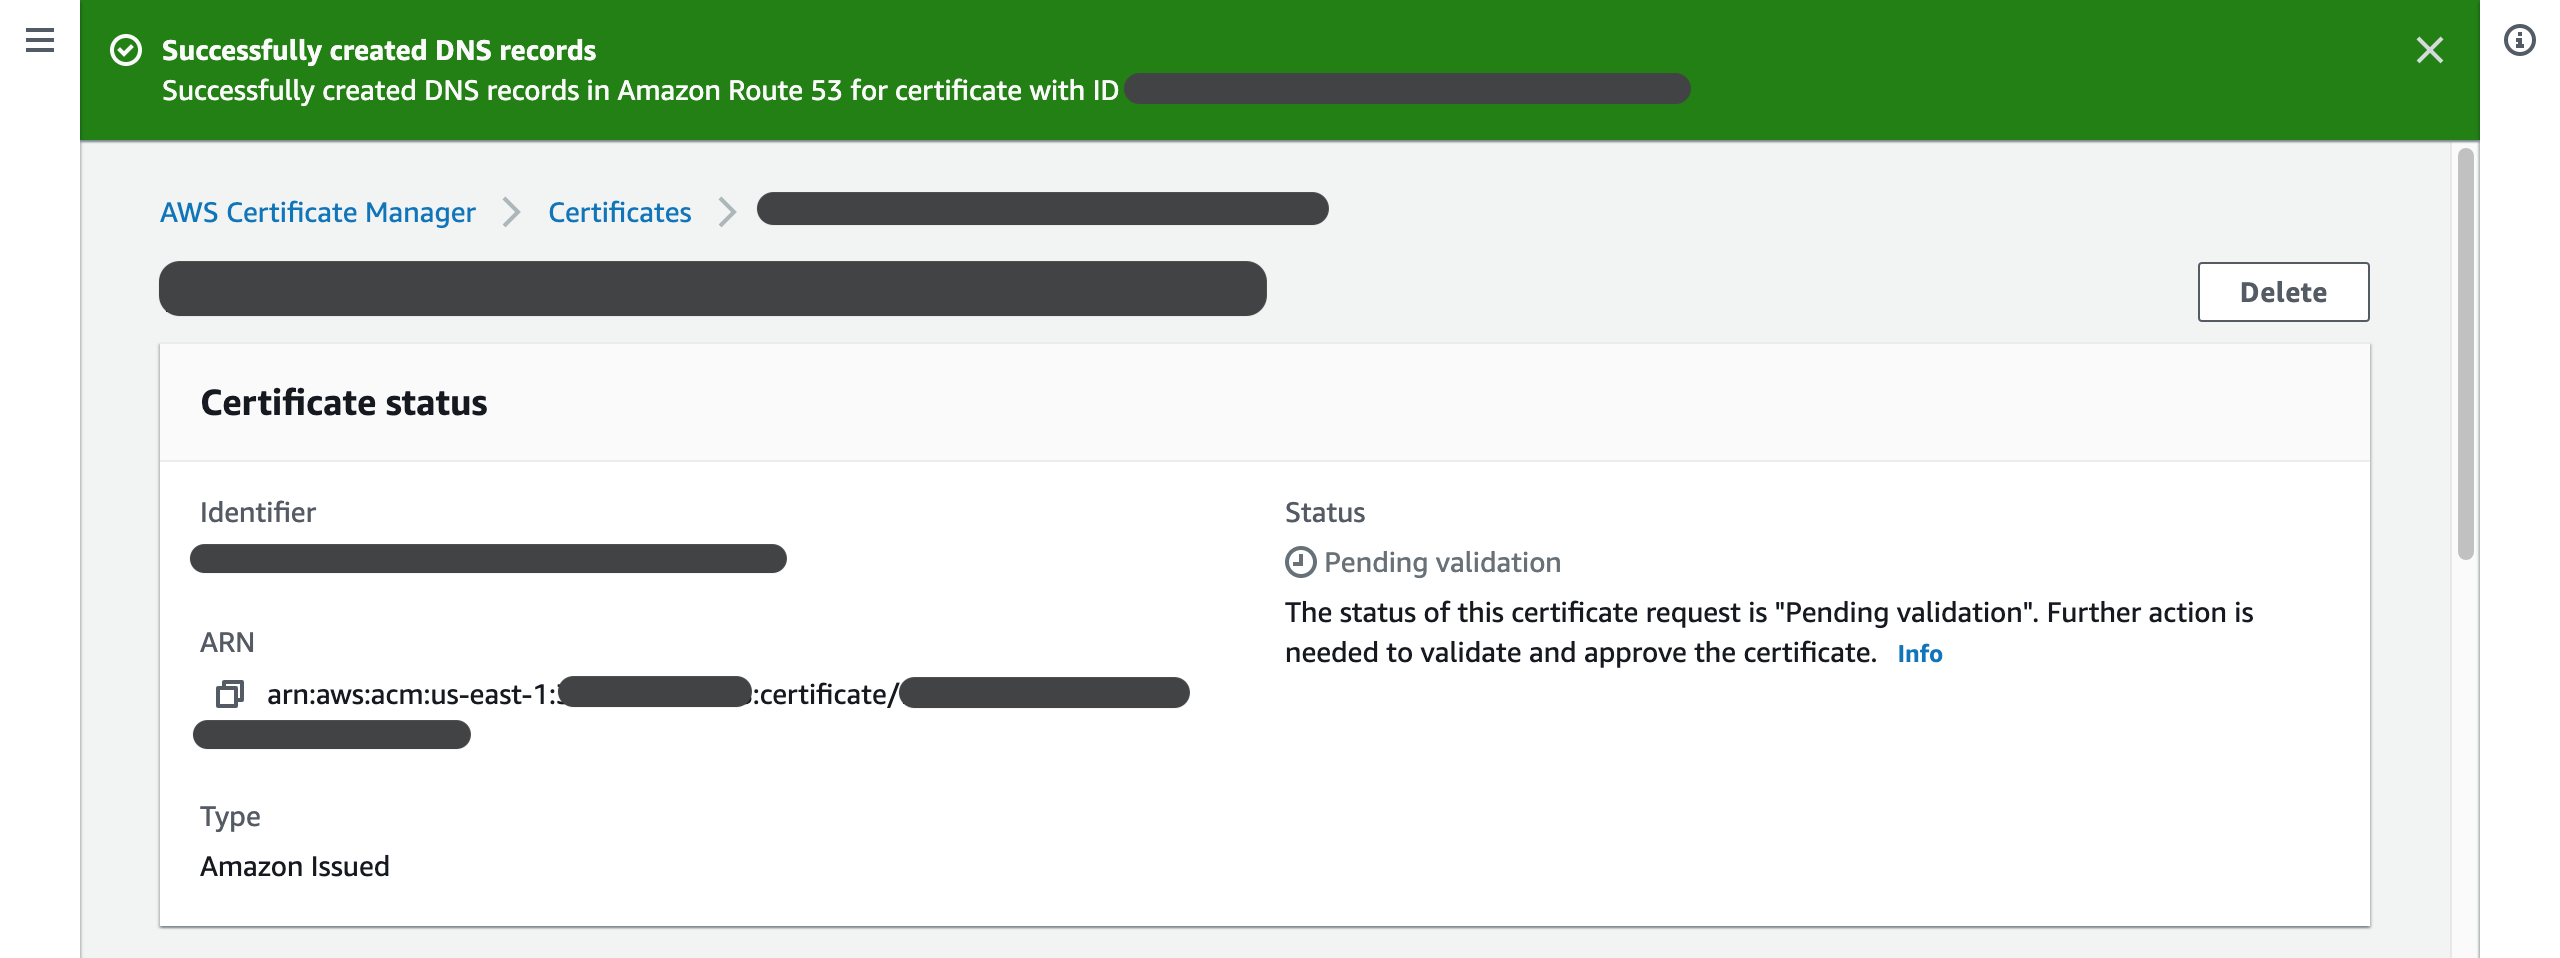
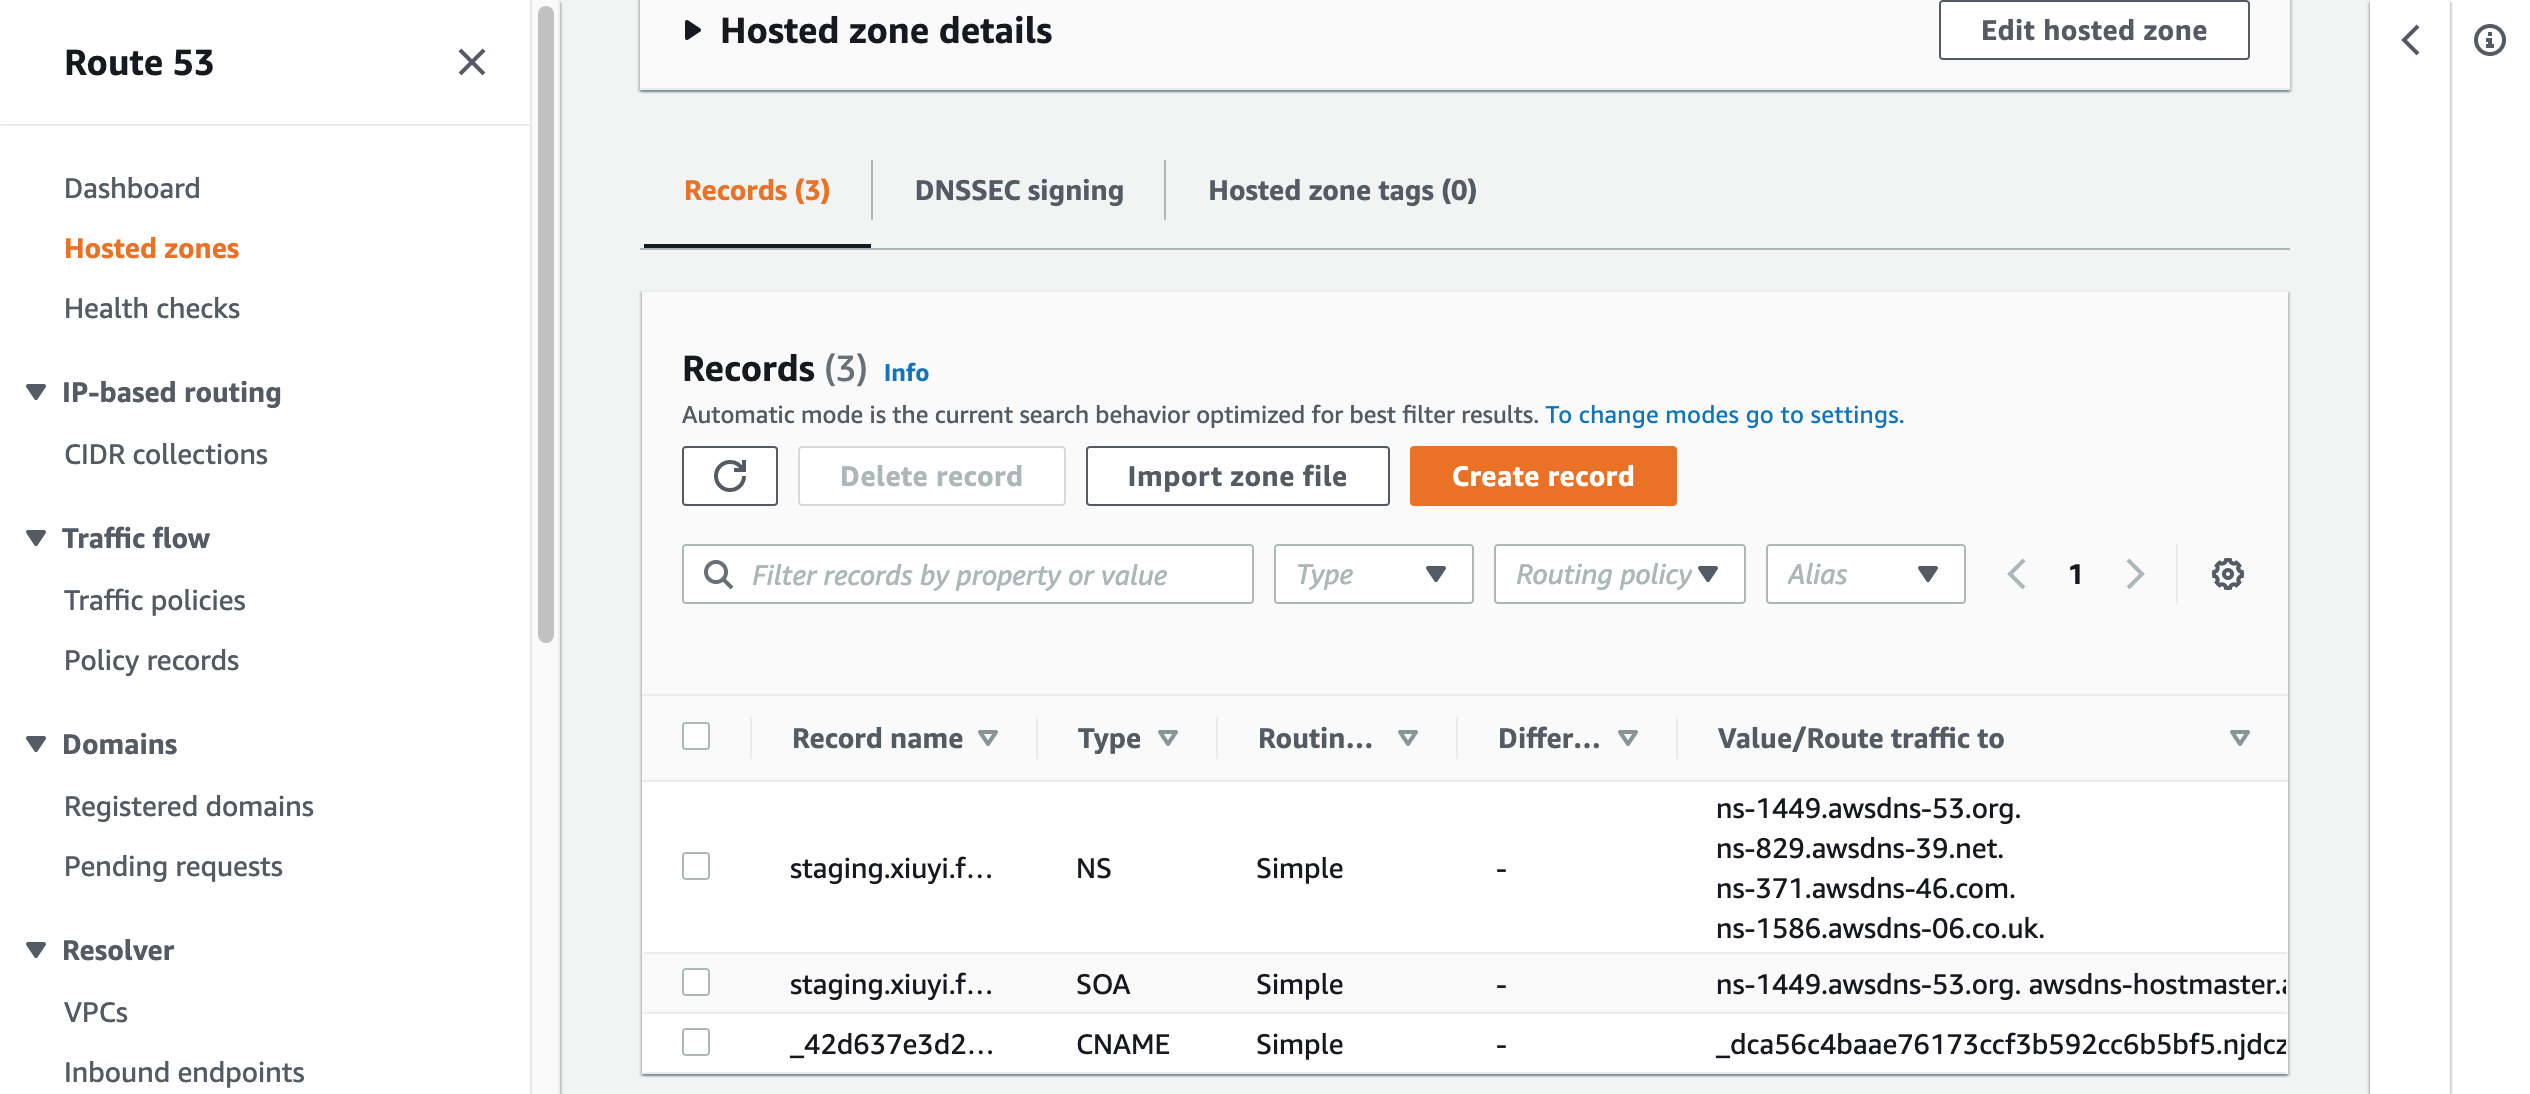
We can go back to Route53 and confirm the new CNAME record is added.
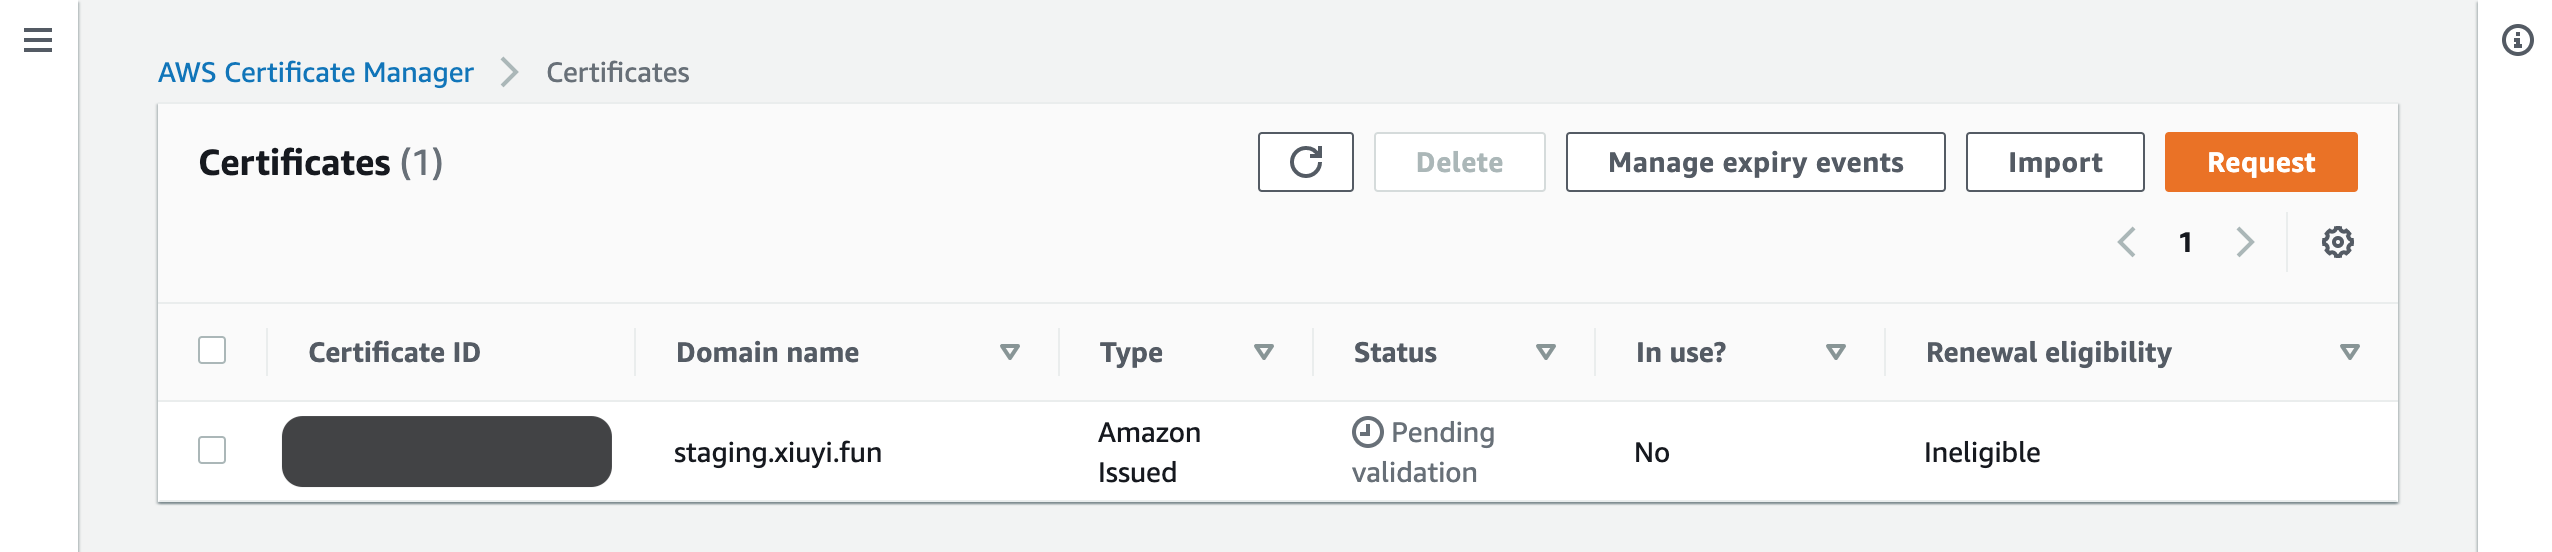
Go back to the Certificate Manager the request may still be in the status of Pending validation.
Wait for 5 minutes or so and click the refresh button and the request should show status Issued.

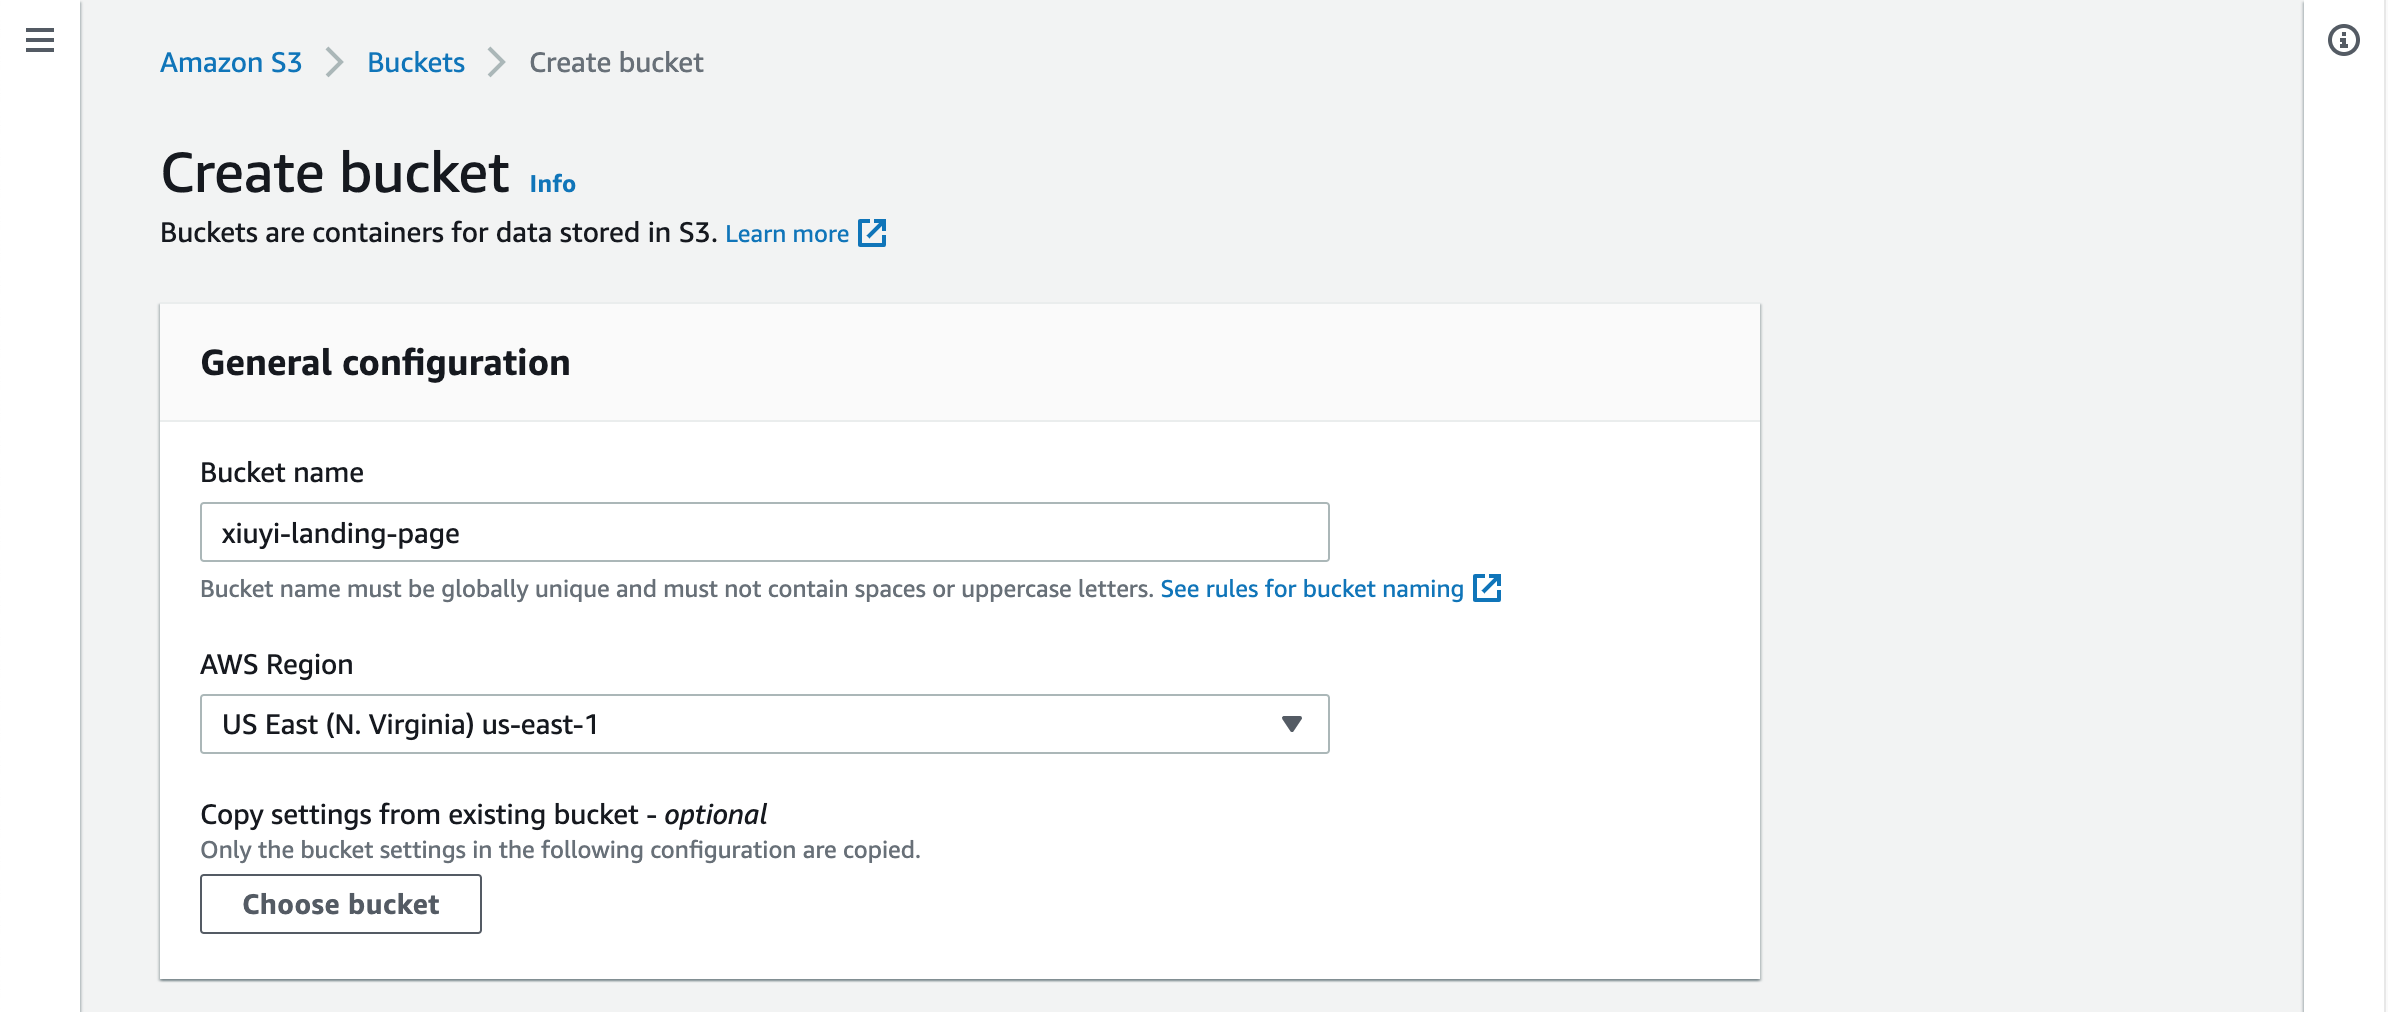
Create S3 Bucket #
We are going to name our S3 Bucket as xiuyi-landing-page (💡 Please choose your own name since each S3 bucket name is globally unique). S3 bucket name is globally unique though the bucket itself is a regional resource. We will deploy site content to the bucket in different “folder” for staging and production.
With this Organizing objects in the Amazon S3 console using folders you will be able to tell what is a “folder” for S3.
📚 AWS has this concept of Region, AZ, and Edge locations etc. Here is a brief introduction about Regions and Zones. If you are commited to use AWS for long-term please consider to take the AWS Certified Cloud Practitioner certificate. The free AWS Skill Builder | Cloud Essential Learning Plan (14h 16m) is a good starting point. I also recommend A Cloud Guru as a paid learning resource for preparing the certification exam. I took it and passed 3 certification exams so far.
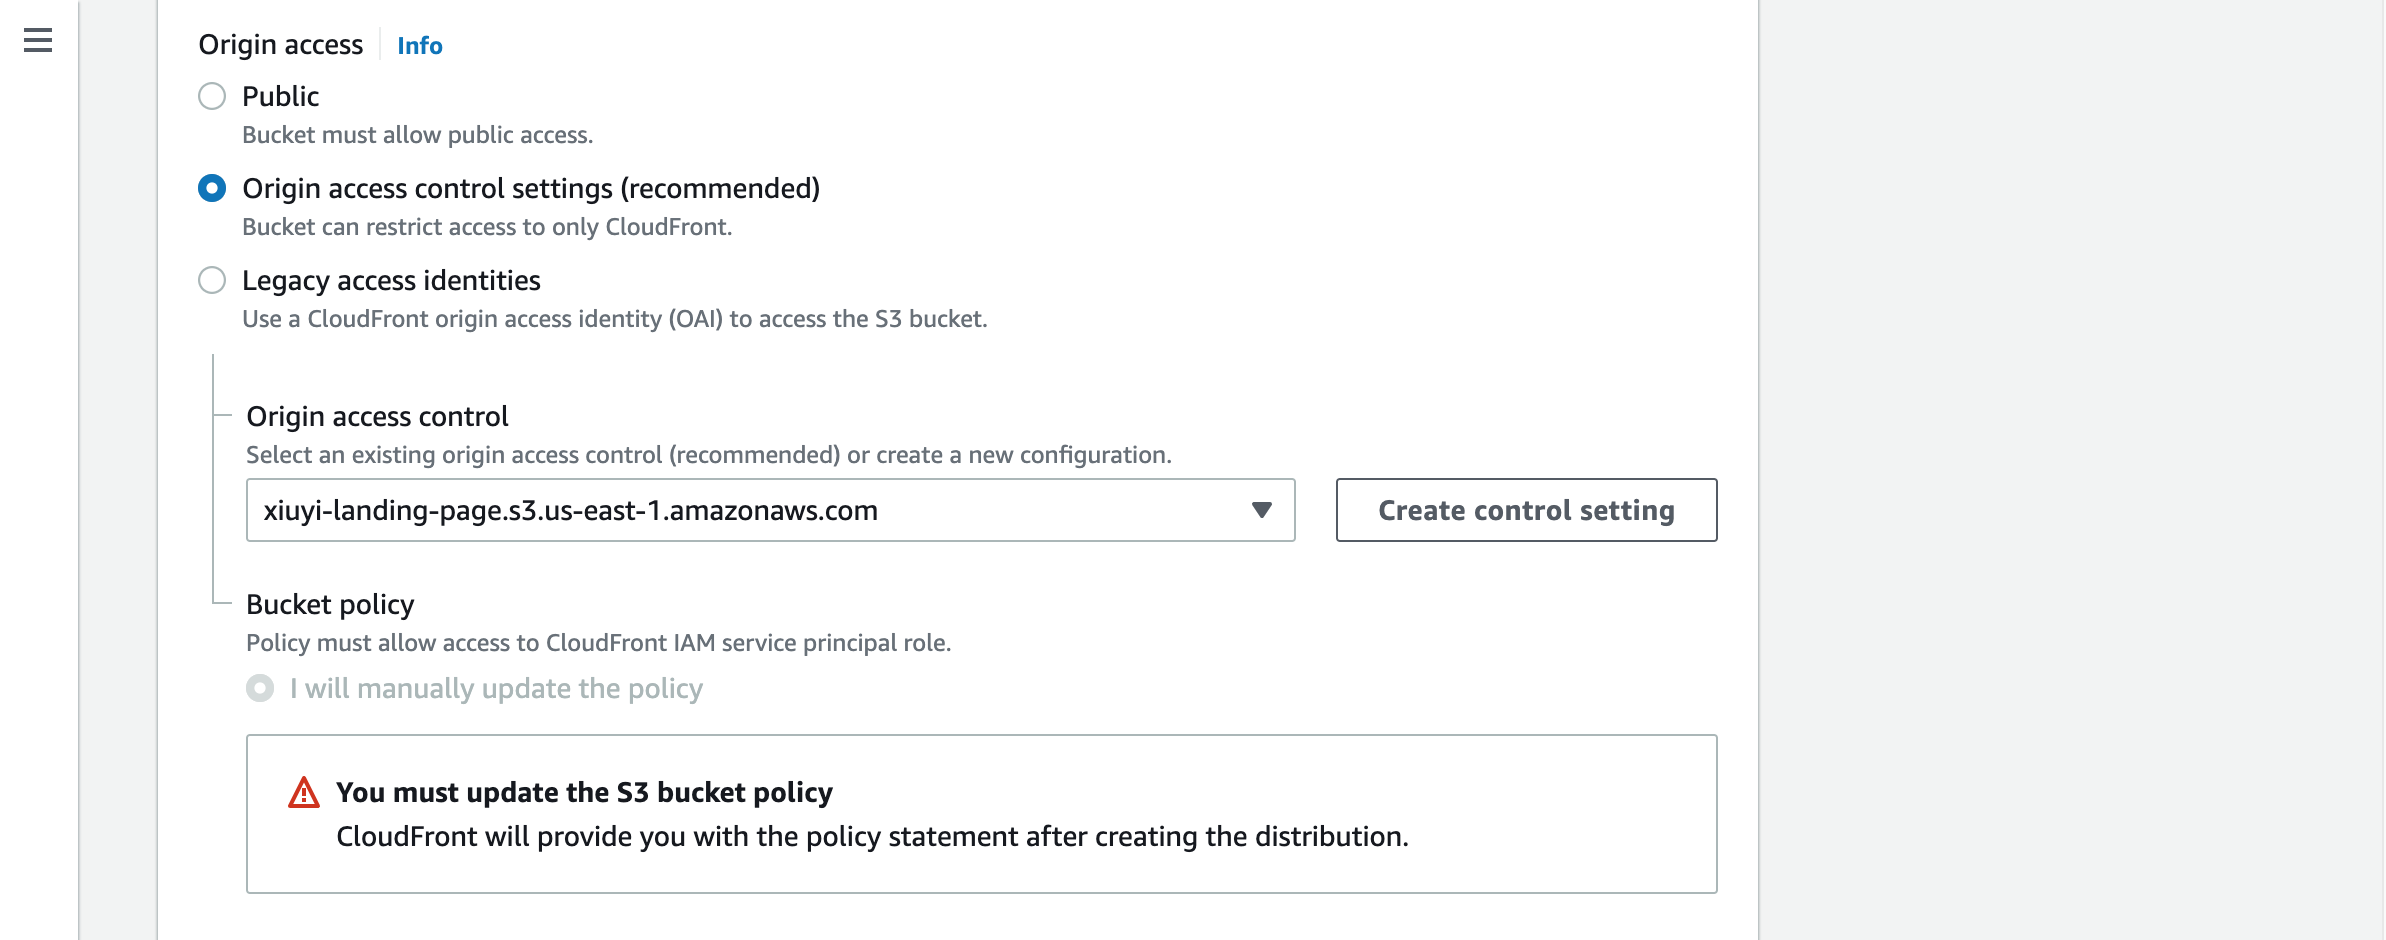
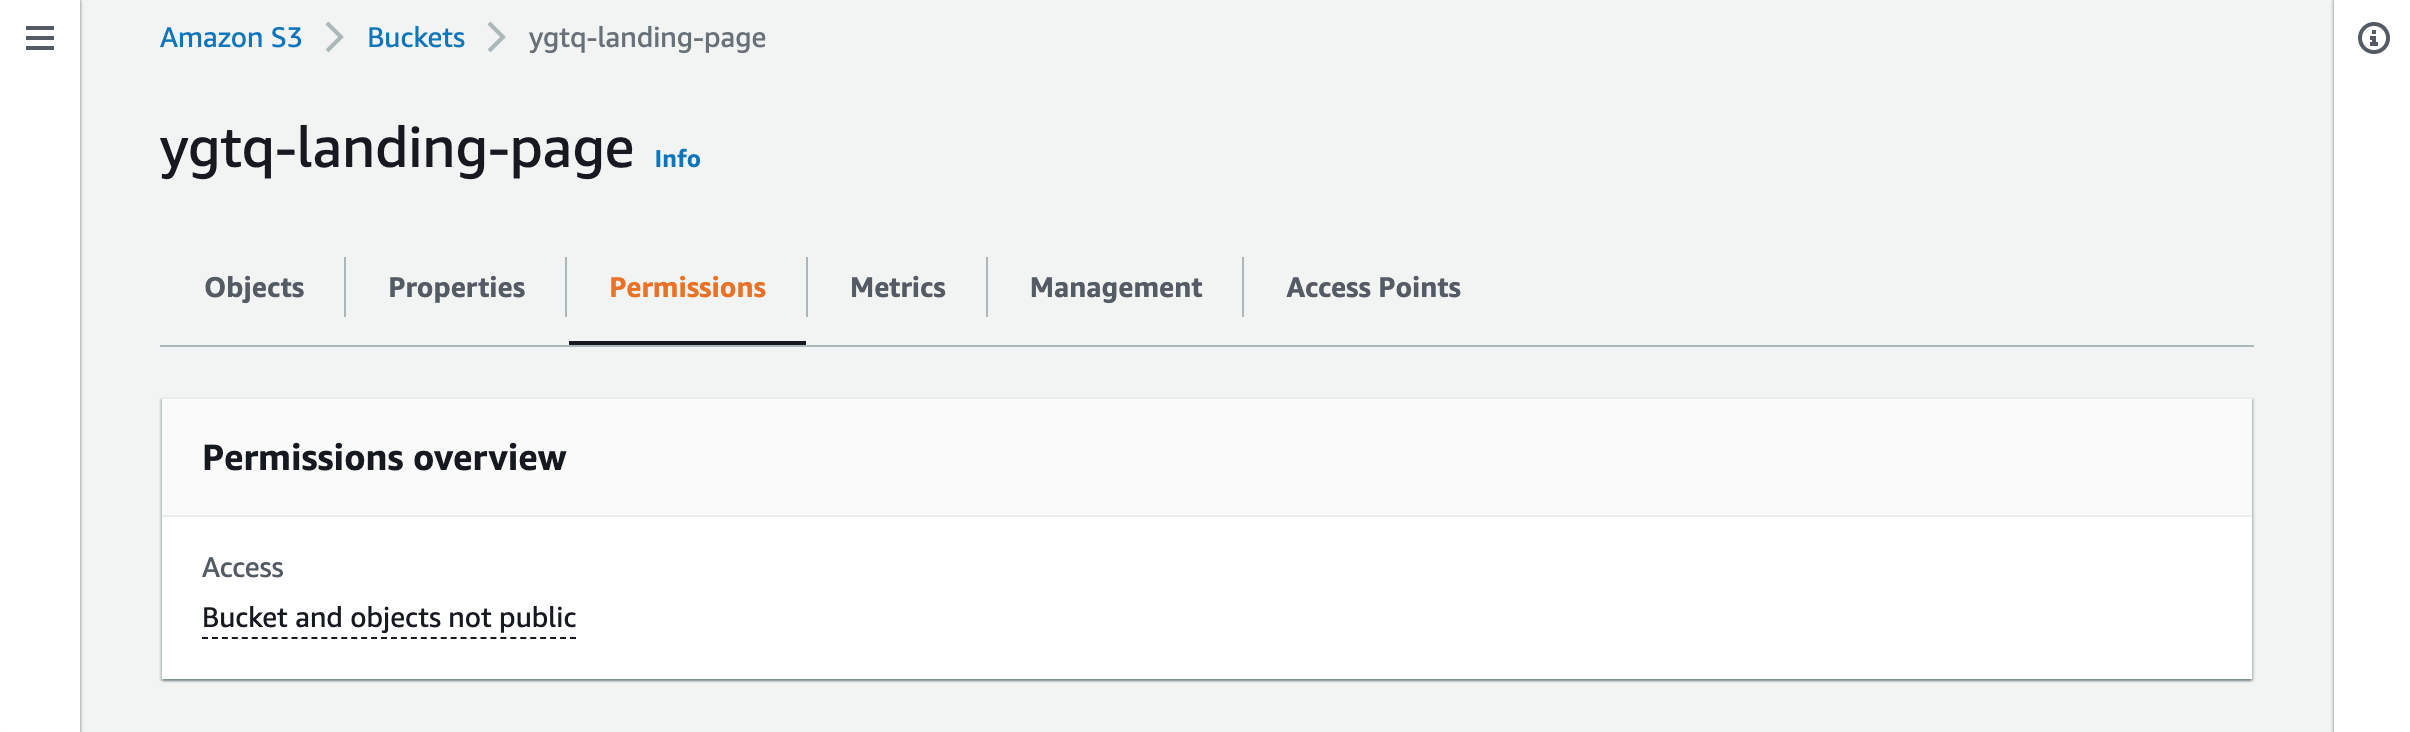
Open the AWS Console and go to S3. Click the Create bucket button and put the name into Bucket name. For the rest just leave them as the default setting. It’s correct to disable all the public access to this bucket. We will use the Origin Access Control (OAC) to provide access for CloudFront to use this S3 bucket as the origin.
Let’s add a folder called out_test. Then upload the index.html to this folder.
xiuyi-landing-page
|- out_test/
|  |- index.html
index.html
<html>
    <body>
        Hello World.
    </body>
</html>
You can drag the file or a folder directly to the S3 console when it’s currently inside a bucket. It will let you upload the selected file and all sub-folders and files in the selected folder. Click Upload
Create CloudFront Distribution #
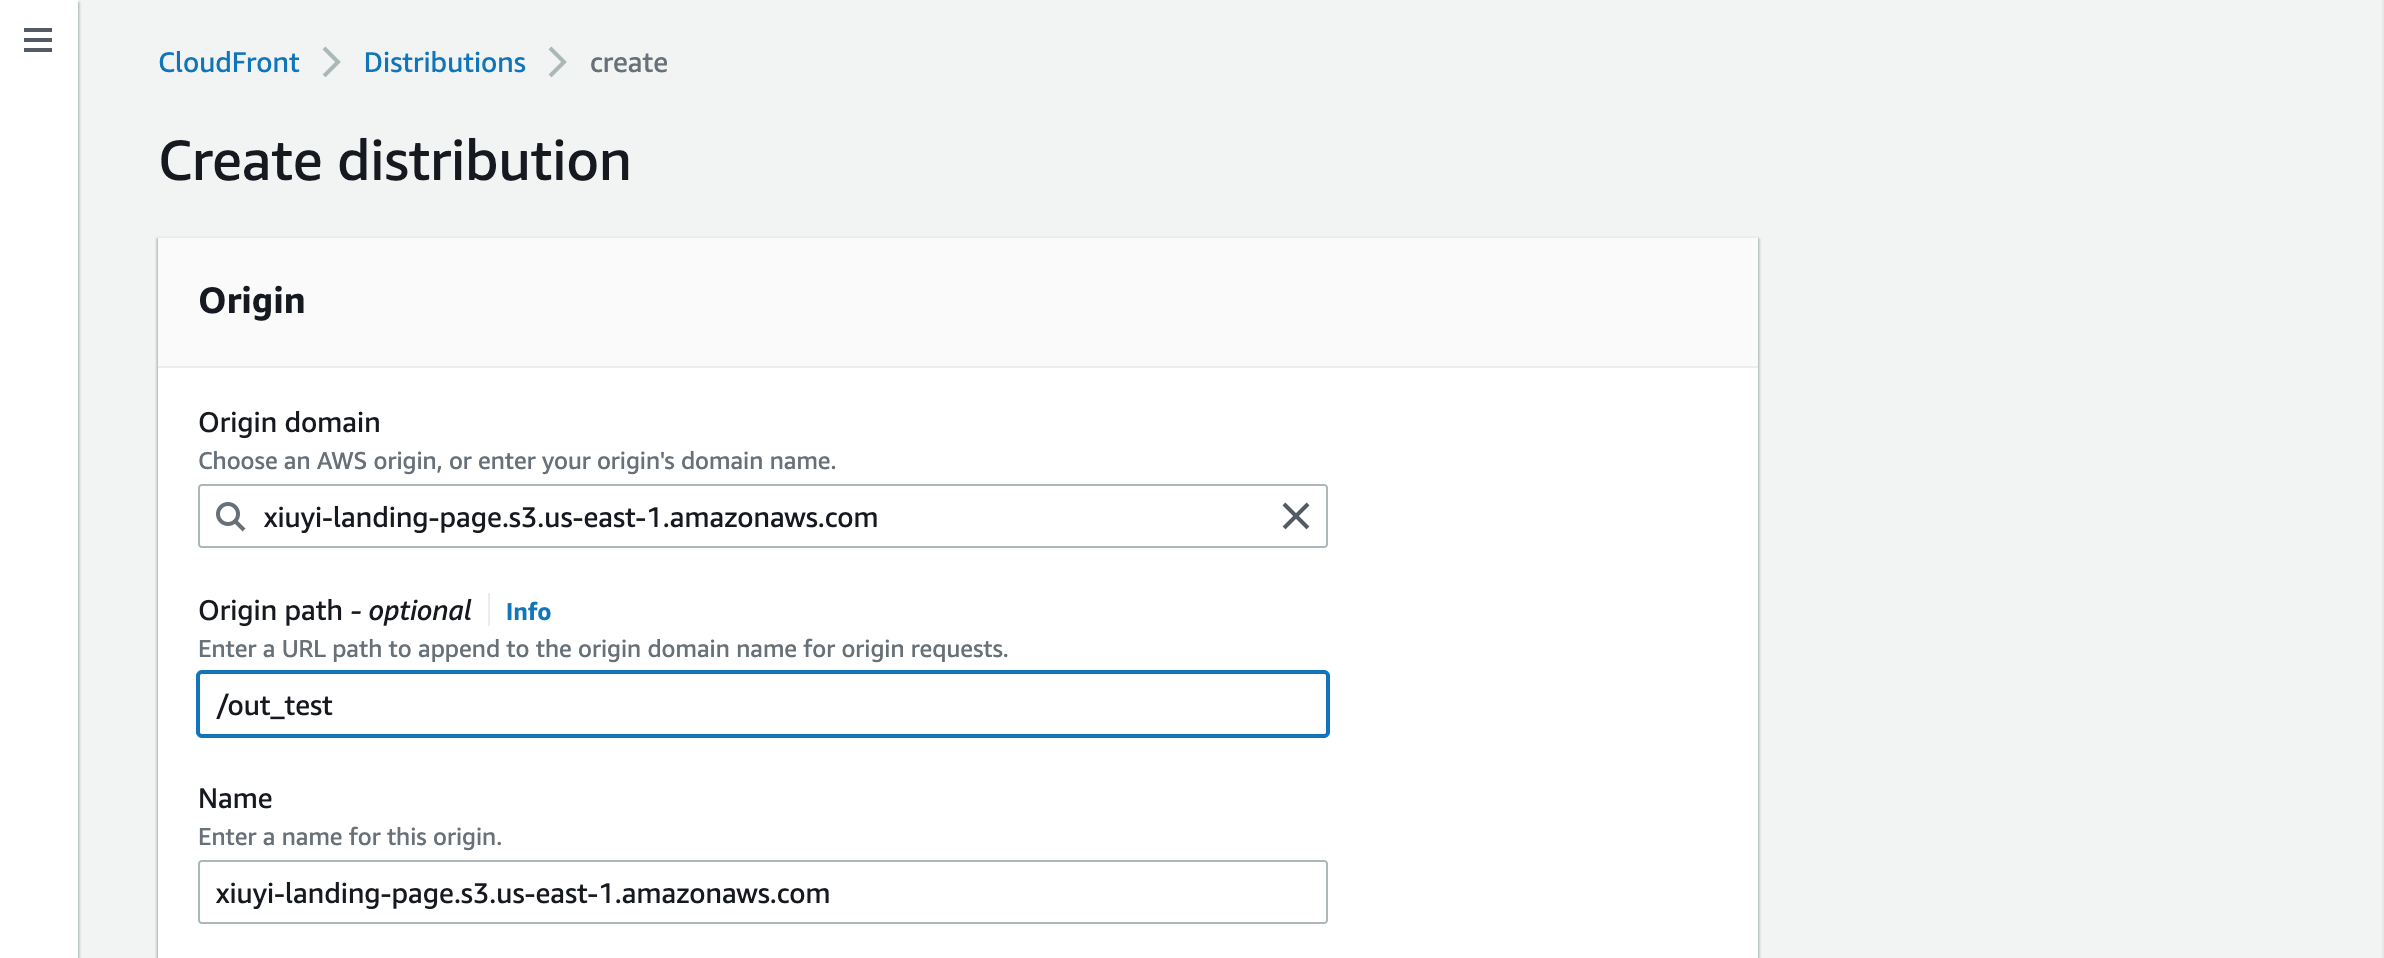
Go to CloudFront in the AWS Console and click Create distribution. Click the Origin domain and search for the S3 bucket name xiuyi-landing-page.

Put /out_test in the Origin path.
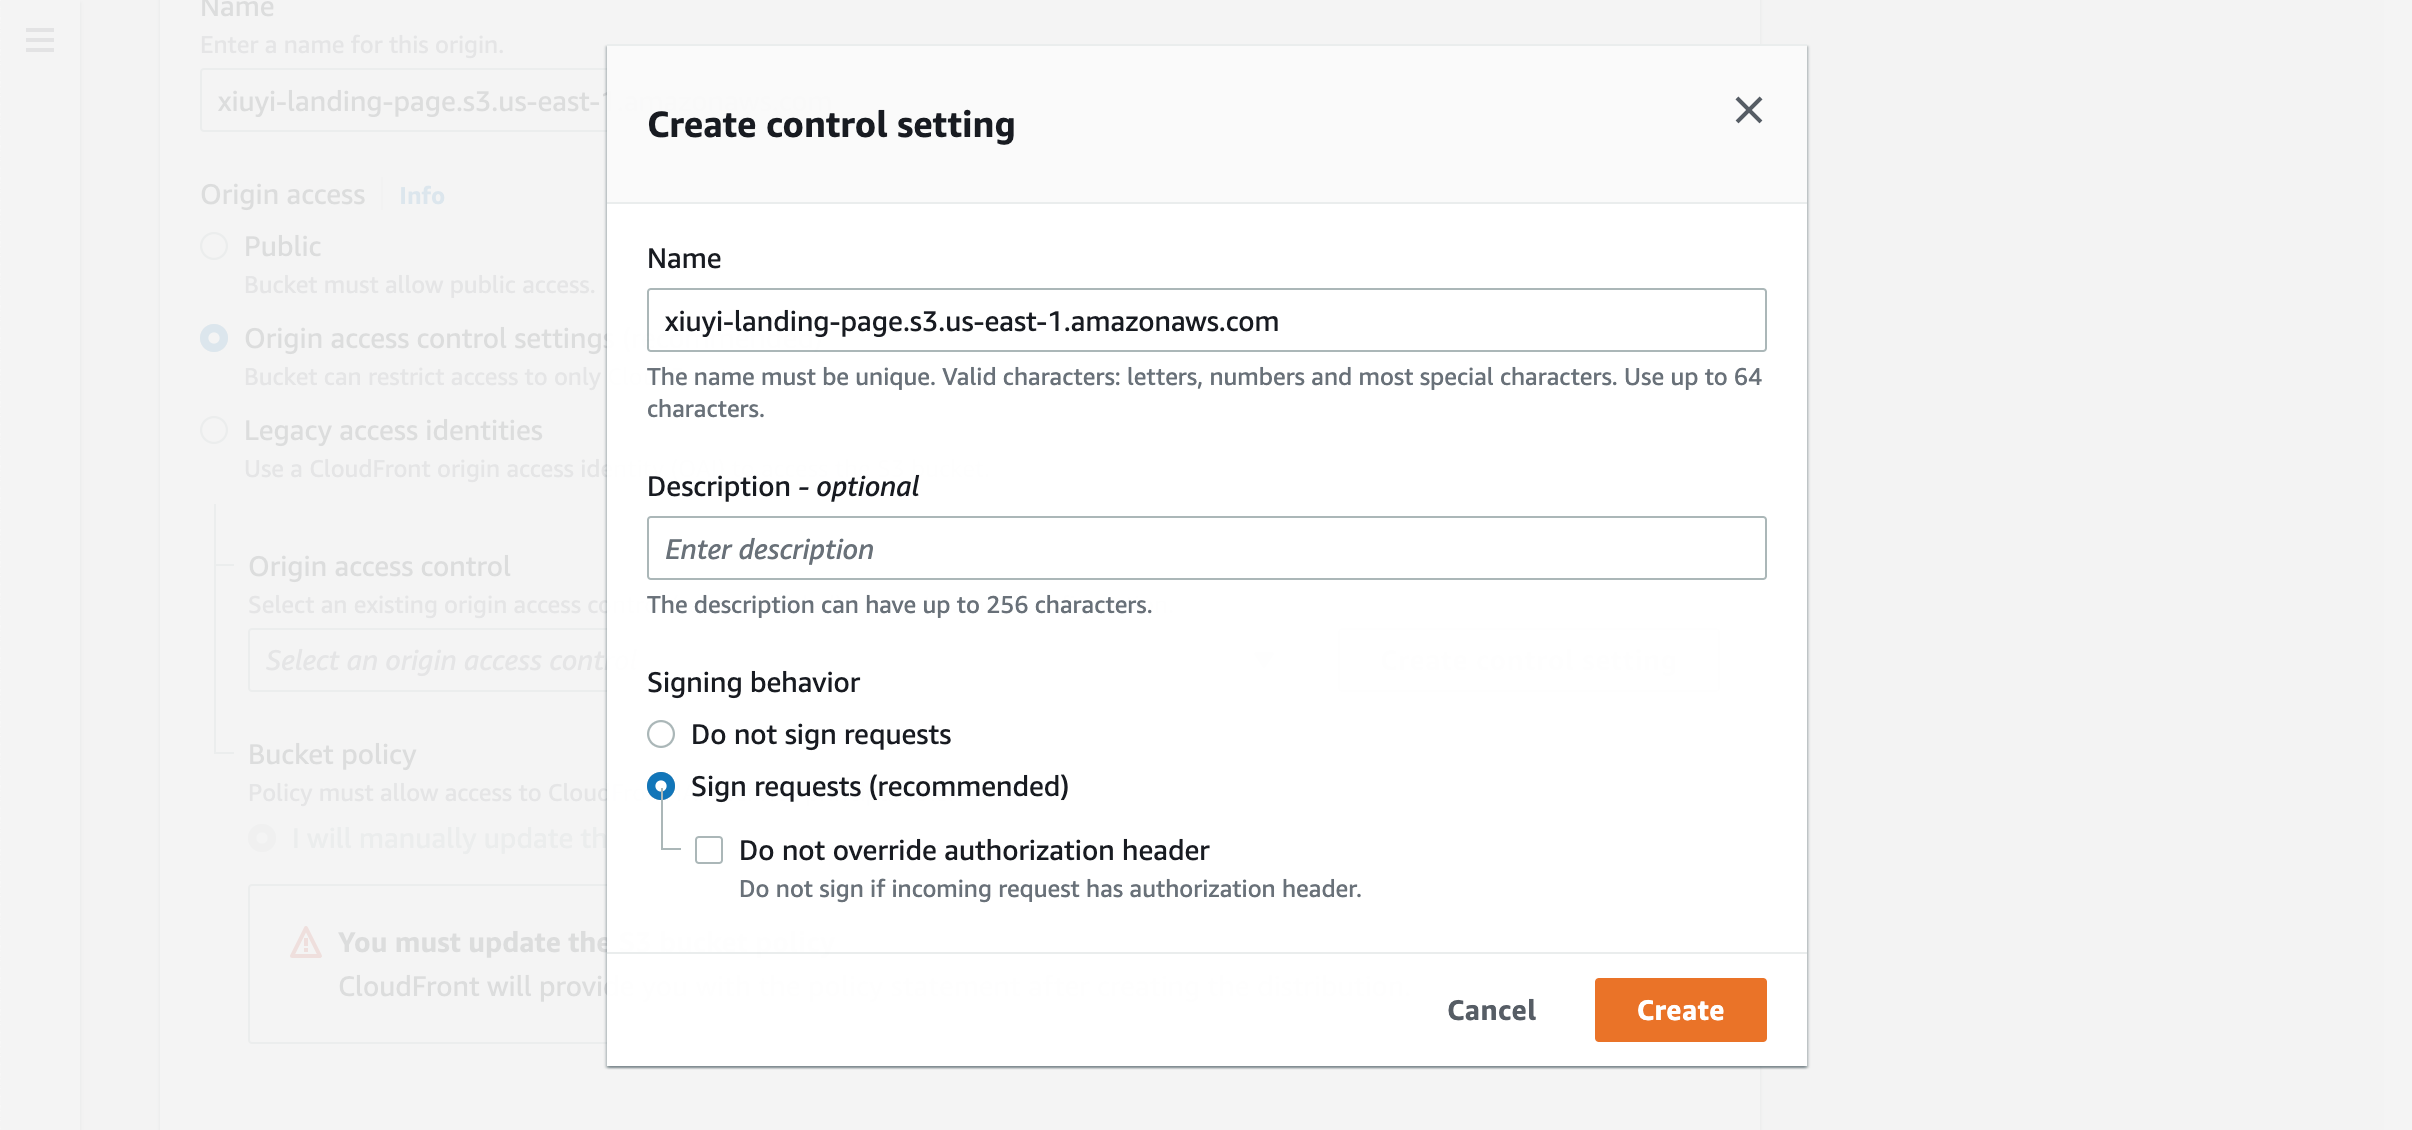
In the Origin access section choose the Origin access control settings (recommended) option. Then click the Create control setting button for creating the origin access control. Name it with the S3 bucket domain. Keep the default Sign request option selected.
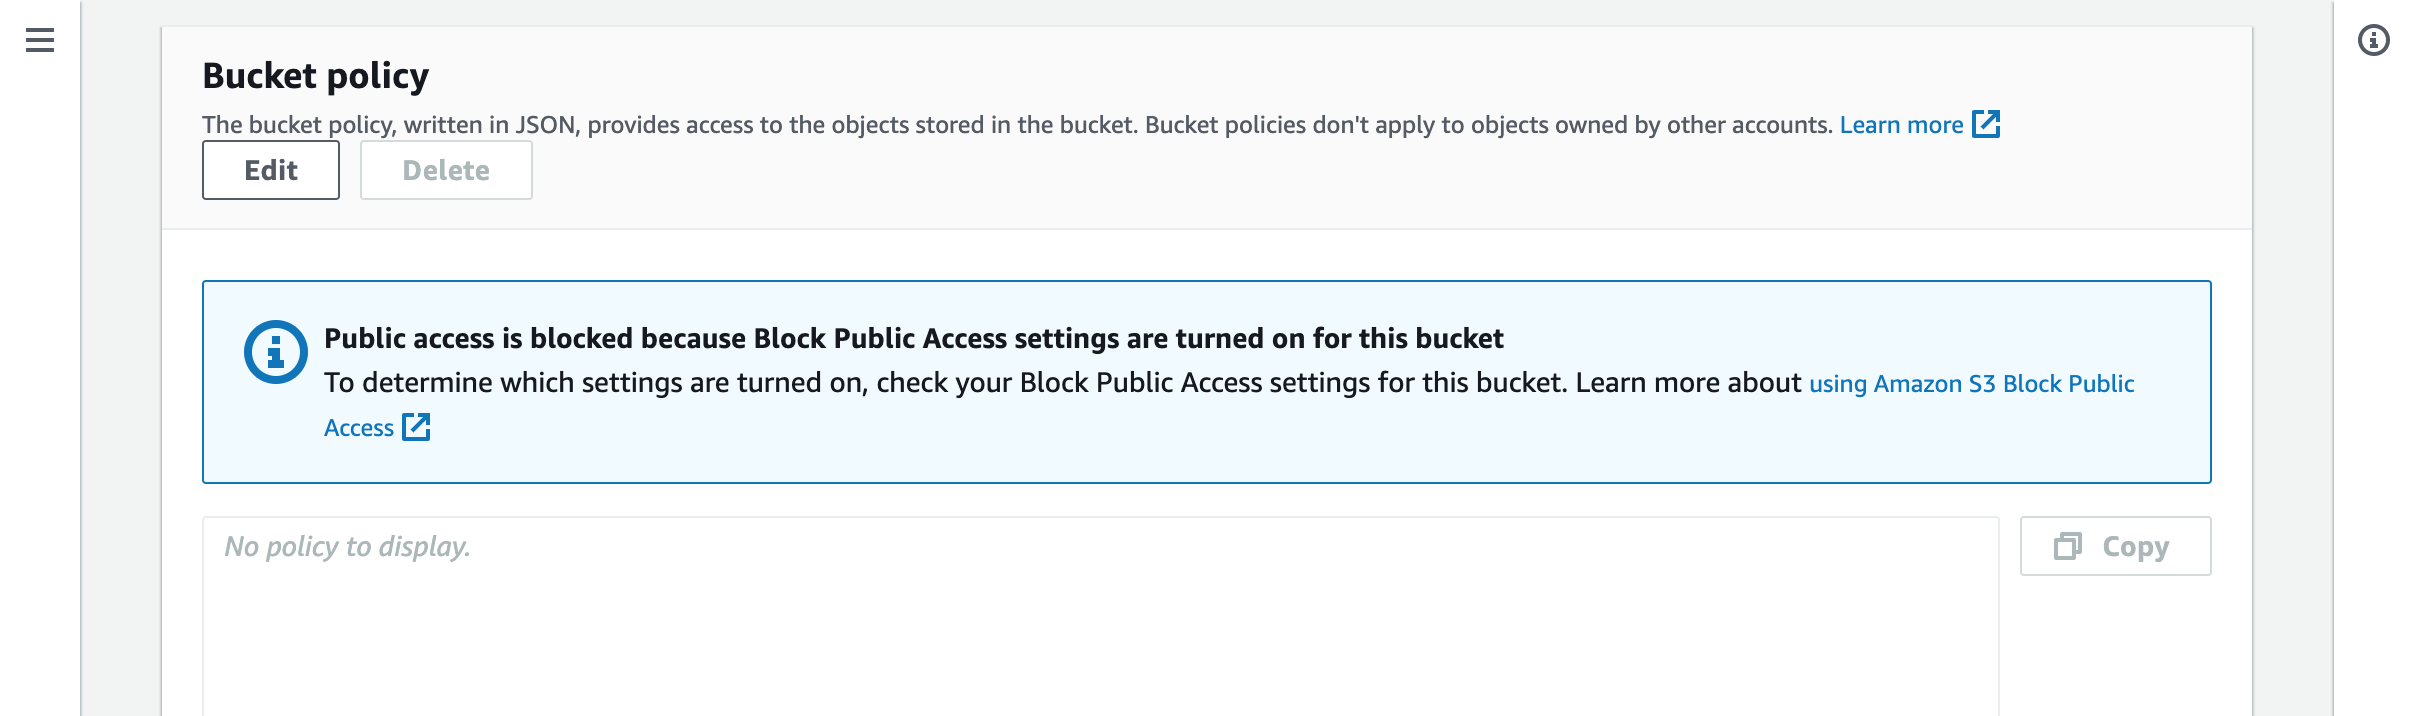
We need to manually update the S3 bucket policy. When we save the distribution the coresponding policy will be provided.
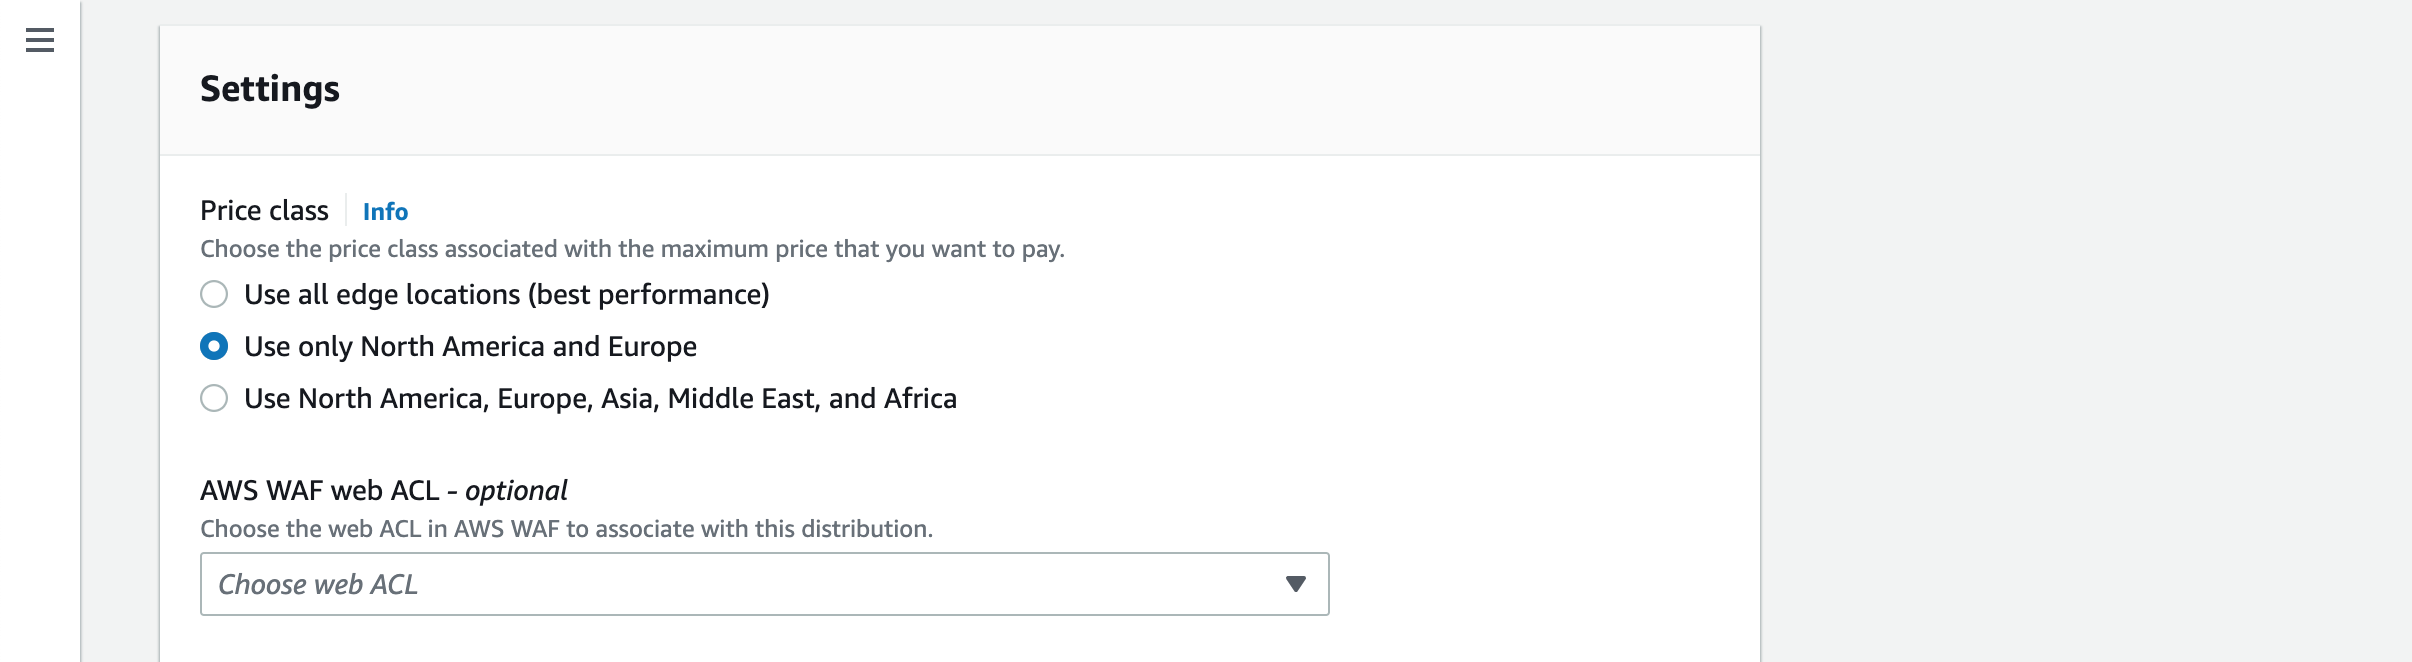
CloudFront distribution has three pricing classes. Choose Use only North America and Europe option for lowest cost.
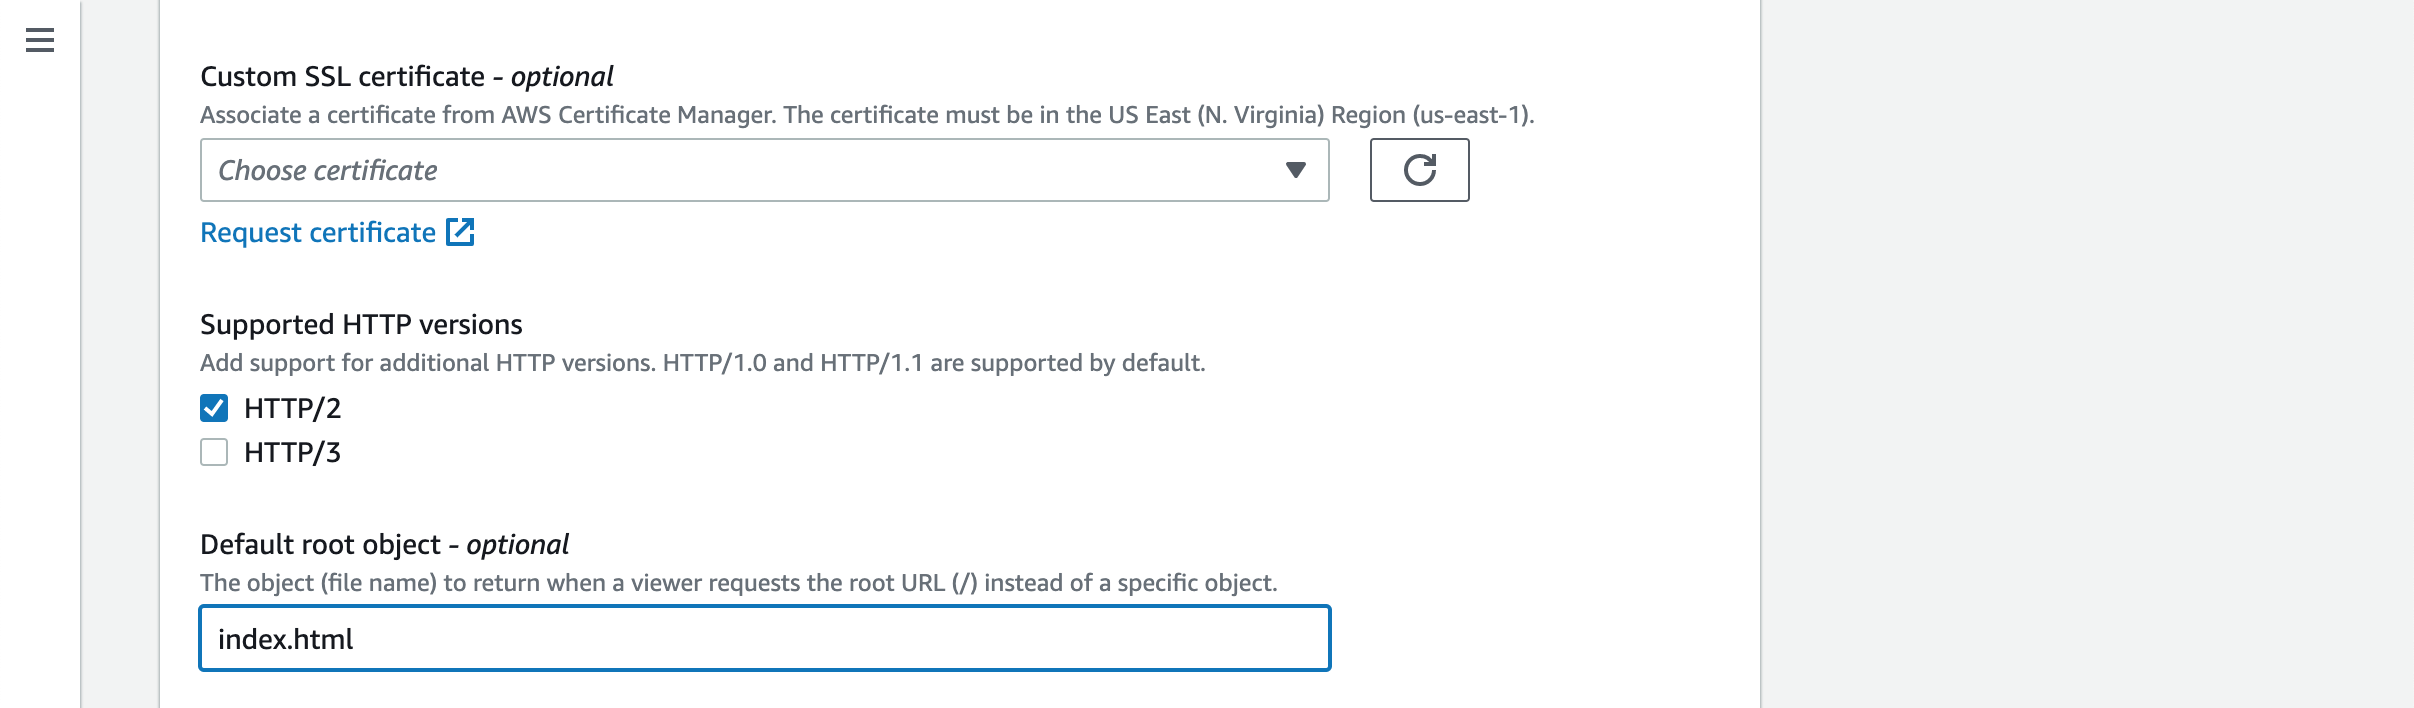
We will come back and setup the custom domain and associated custom SSL certificate later.
Please put index.html in the Default root object field.
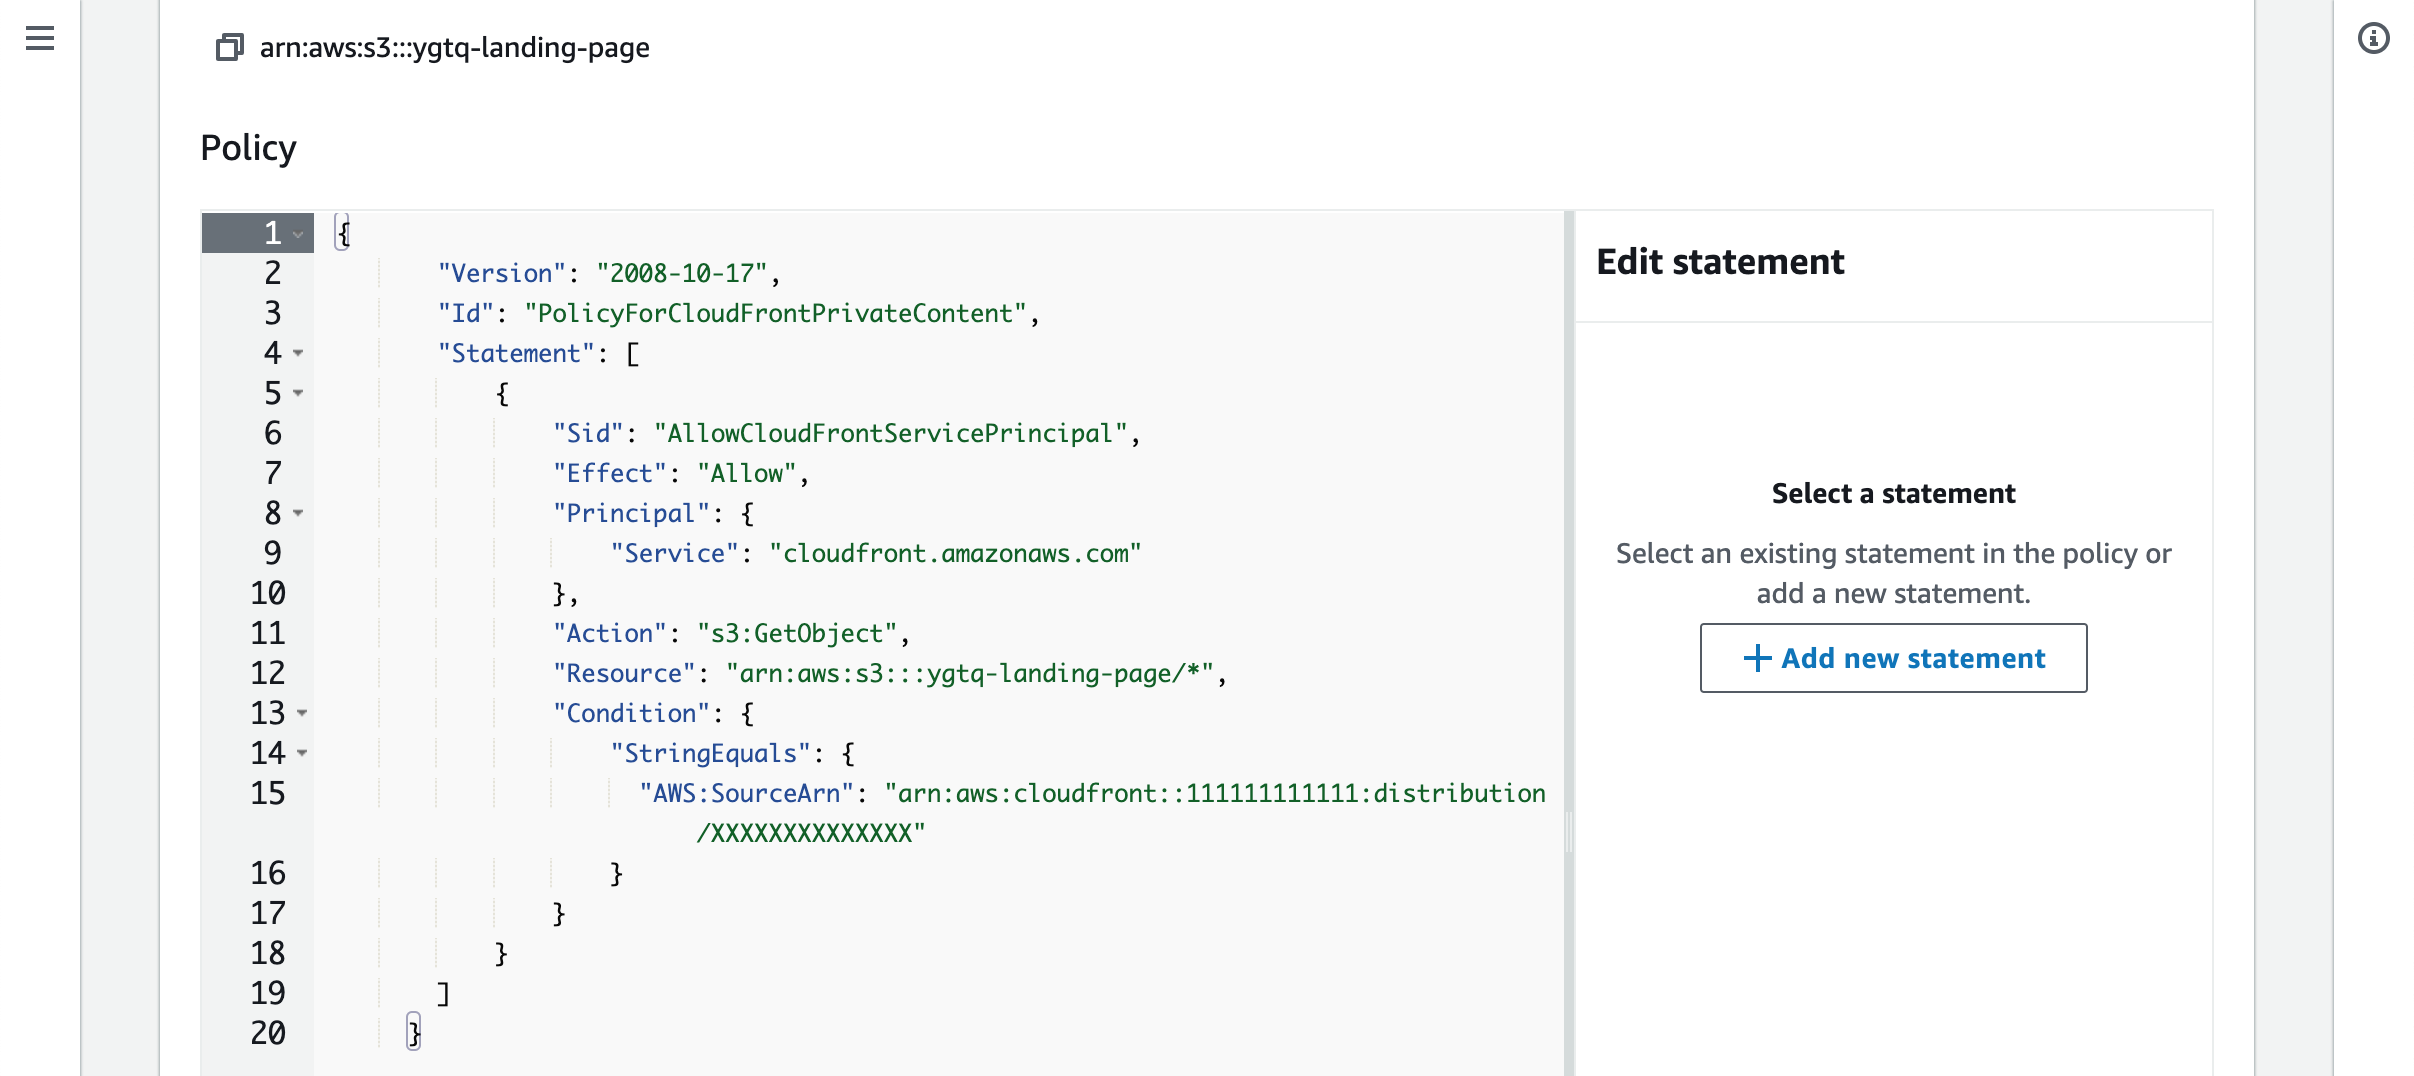
Upon save the new distribution a notification is provided. Click the Copy policy button to keep a copy of the policy. Let’s open the S3 bucket and choose Permissions tab.

Scroll down to the Bucket policy section and click the Edit button. Paste the policy into the text field. In case there’re other policies you will need to manually merge them.
Create Lambda for Password Protection And URL Rewrite #
Open the AWS Lambda console and click Create function. Select the first option Author from scratch.
Name the function passwordProtection. Use the Node.js 16.x as the Runtime.
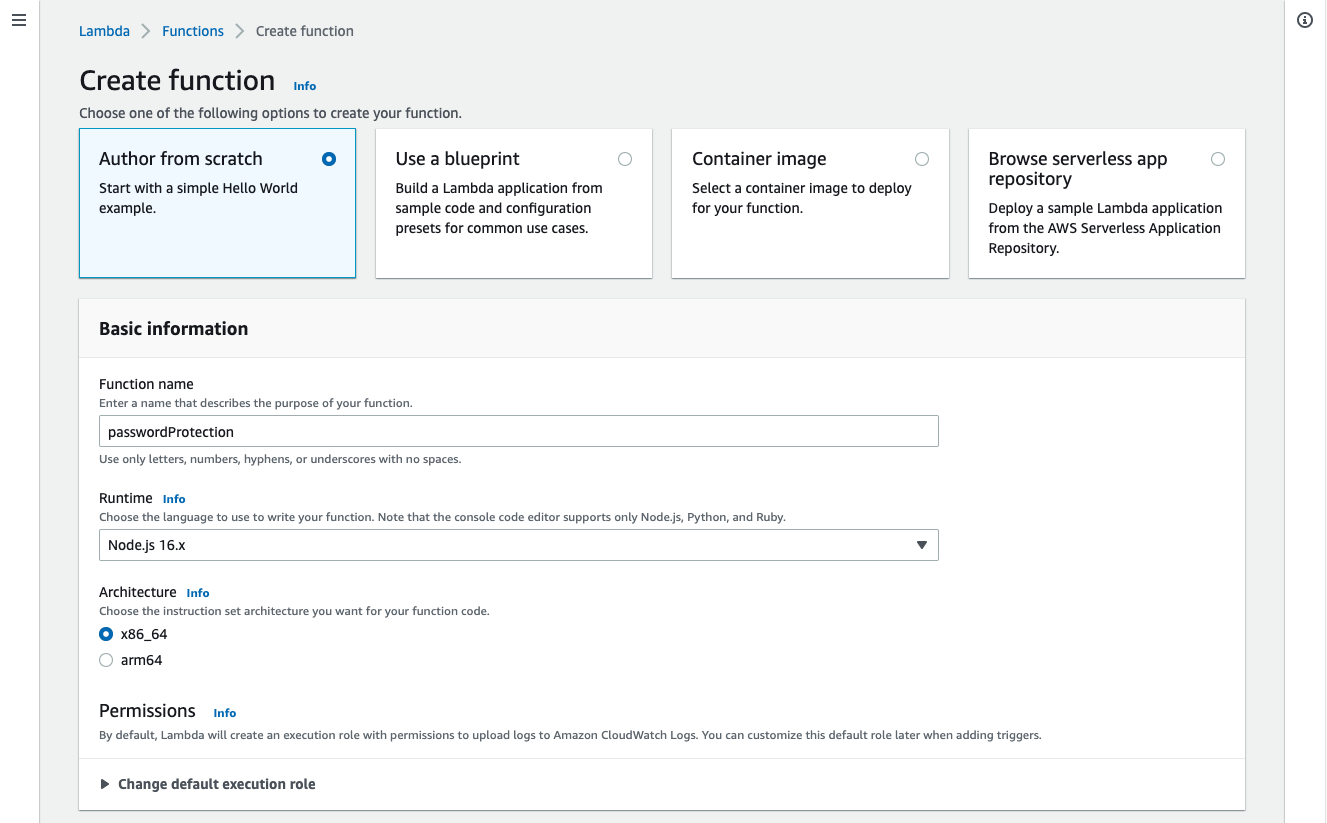
Since we are going to deploy to the Edge let’s use x86_64 for the Architecture. In other cases using “arm64” can be more cost effective. For more information please see Lambda instruction set architectures.
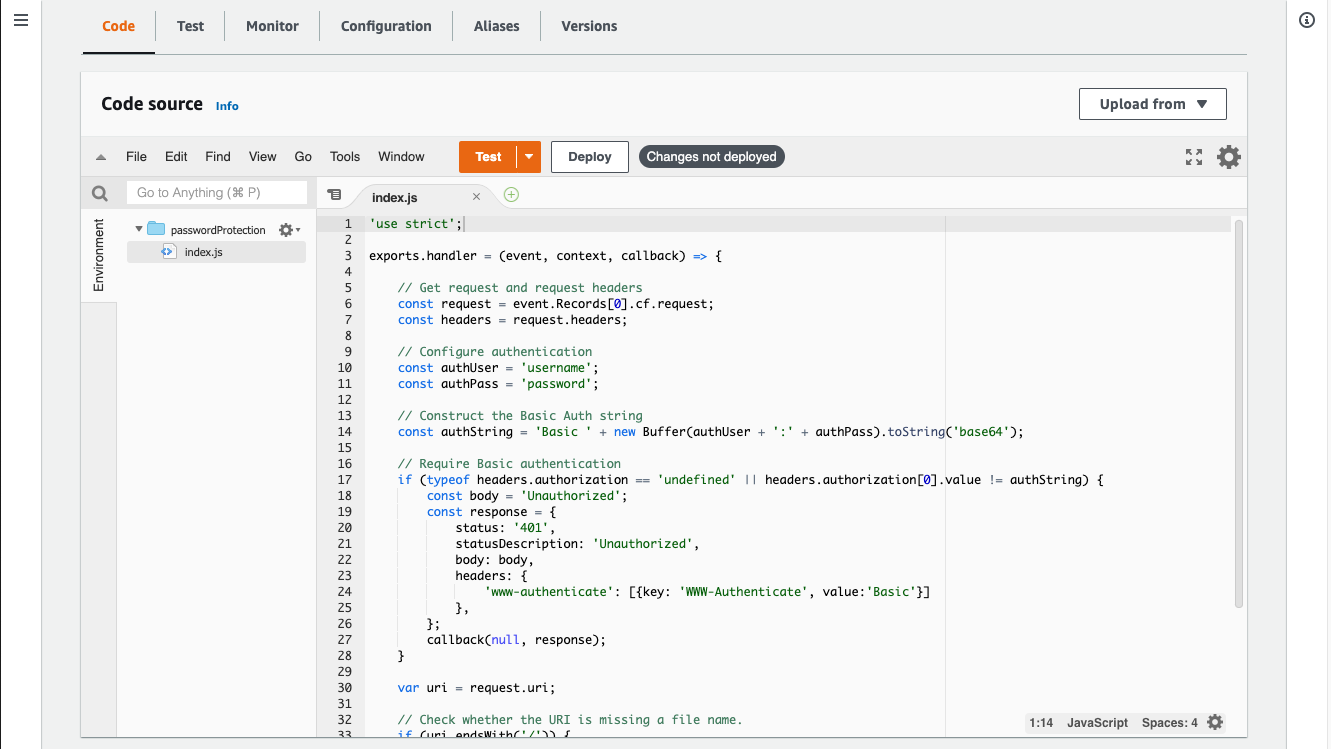
Please add following code to the index.js.
'use strict';

exports.handler = (event, context, callback) => {

    // Get request and request headers
    const request = event.Records[0].cf.request;
    const headers = request.headers;

    // Configure authentication
    const authUser = 'username';
    const authPass = 'password';

    // Construct the Basic Auth string
    const authString = 'Basic ' + new Buffer(authUser + ':' + authPass).toString('base64');

    // Require Basic authentication
    if (typeof headers.authorization == 'undefined' || headers.authorization[0].value != authString) {
        const body = 'Unauthorized';
        const response = {
            status: '401',
            statusDescription: 'Unauthorized',
            body: body,
            headers: {
                'www-authenticate': [{key: 'WWW-Authenticate', value:'Basic'}]
            },
        };
        callback(null, response);
    }

    var uri = request.uri;

    // Check whether the URI is missing a file name.
    if (uri.endsWith('/')) {
        request.uri += 'index.html';
    }
    // Check whether the URI is missing a file extension.
    else if (!uri.includes('.')) {
        request.uri += '/index.html';
    }

    // Continue request processing if authentication passed
    callback(null, request);
};
The above code does two things. First it check if the request includes a basic authentication header made by the combination of “username” and “password” in the form of “username:password”. When this is not satisfied returns a response with status code 401. If the authentication requirement is satisfied the next thing this code does is to write the URL. When the requested URI does not include a file name apped the file name “index.html” to the end.
Execution Role Permission #
Let’s update the execution role permission so that this role can be assumed by two service principals: lambda.amazonaws.com and edgelambda.amazonaws.com. More information can be found in Function execution role for service principals.
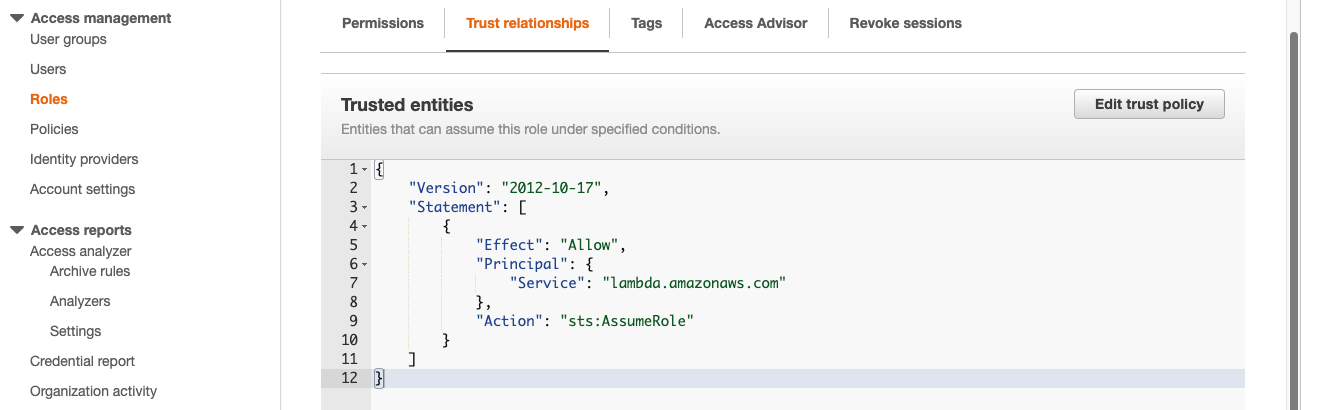
Go to the Configuration tab and then choose Permissions. Click on the role name. This will open the IAM configuration for the execution role.

Go to the Trust relationships tab in the IAM configuration page.
Click on Edit trust policy.
Replace the entire “Service” block with following so that multiple service principals are included.
Before
"Service": "lambda.amazonaws.com"
After
"Service": [
    "lambda.amazonaws.com",
    "edgelambda.amazonaws.com"
]
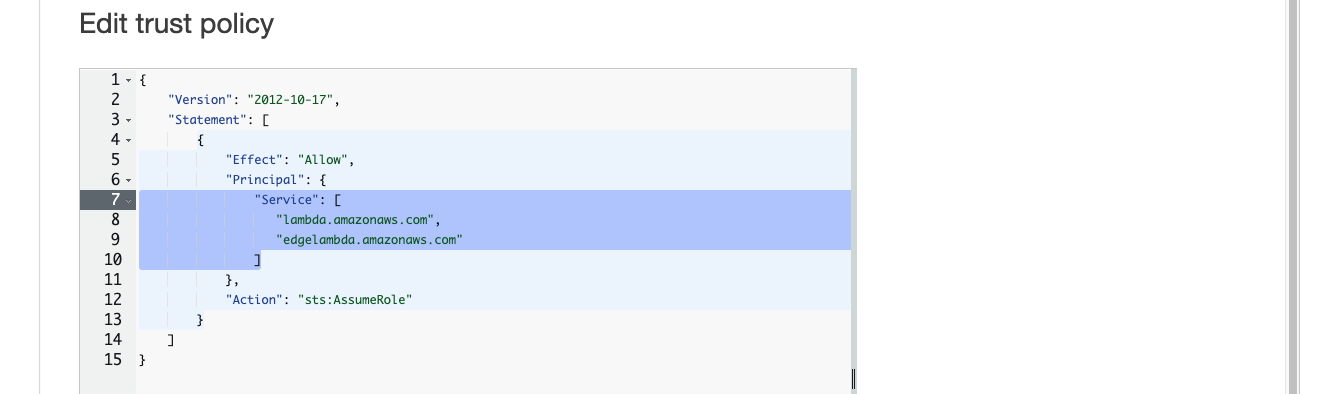
Click on Update policy.
Deploy Lambda To Edge #
Click Deploy to save the Lambda so that we can deploy it to edge.
Scroll back to the top and click Actions.
Then choose Deploy to Lambda@Edge.
Select the Configure new CloudFront trigger.
In the Distribution field select the distribution created for the staging site.
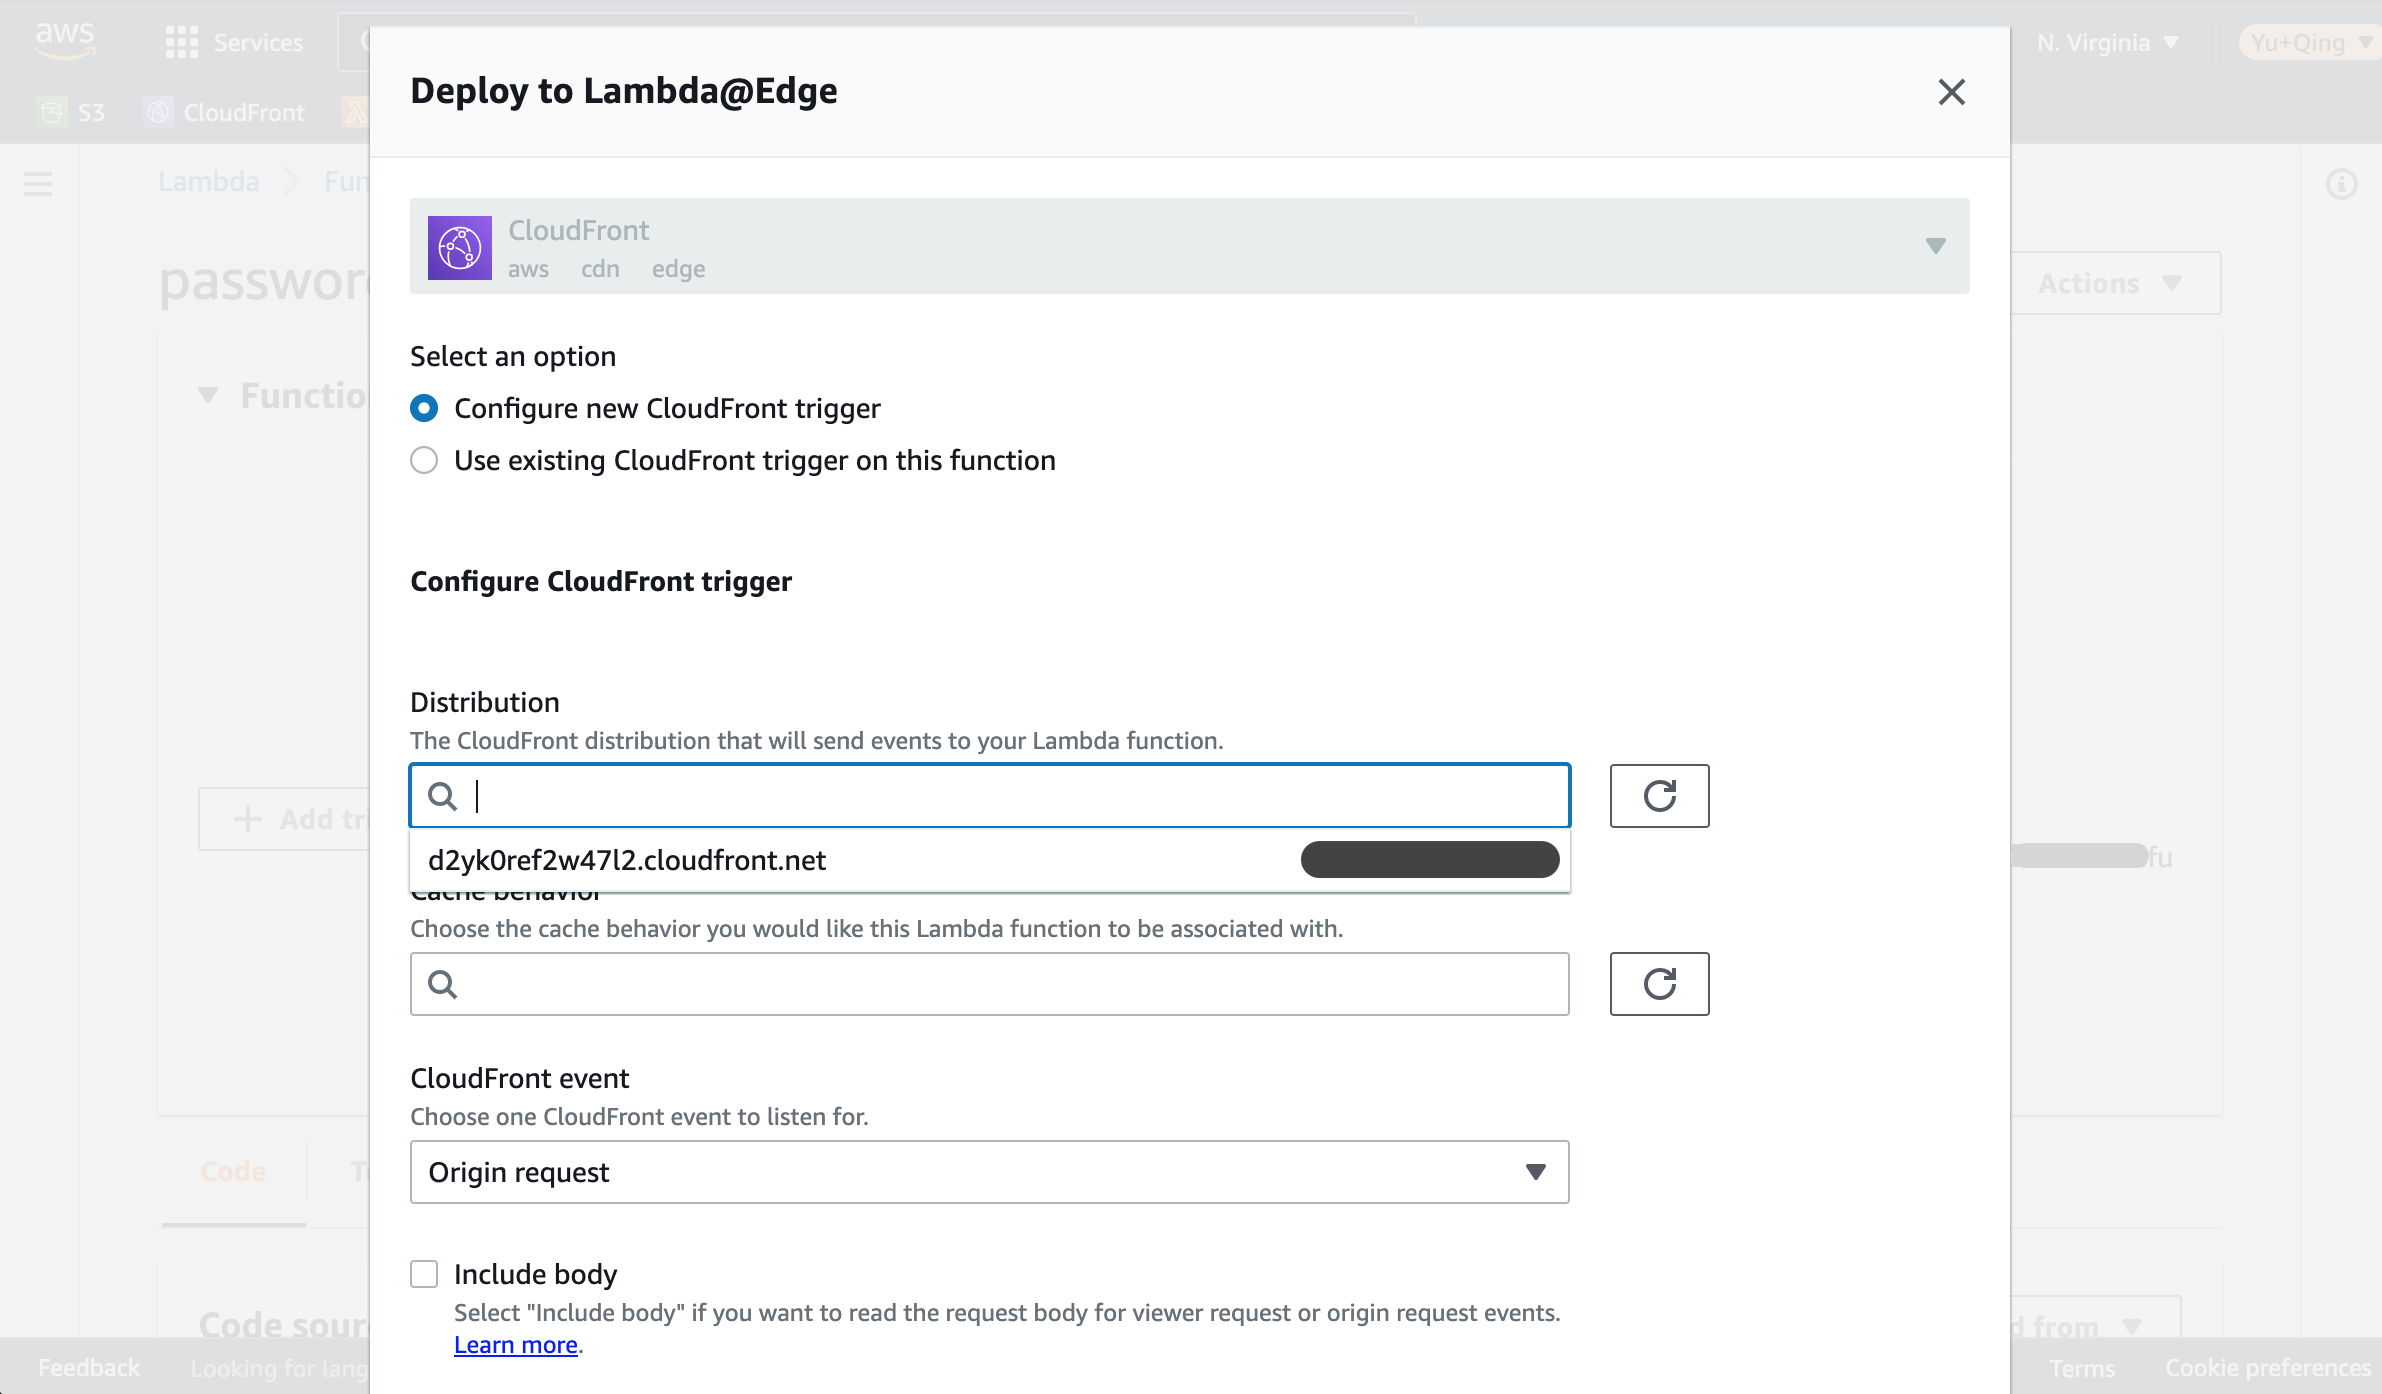
Choose '*' (without the quote) in the Cache behavior. This makes the Lambda being executed for all request going through this distribution. In fact the number of choices here is depend on the number of cache behaviors set for this distribution. For more information about customizing distribution please take a look [].
Let’s choose Viewer request in the CloudFront event setting. For more details about the 4 event types please refer to CloudFront events that can trigger a Lambda@Edge function
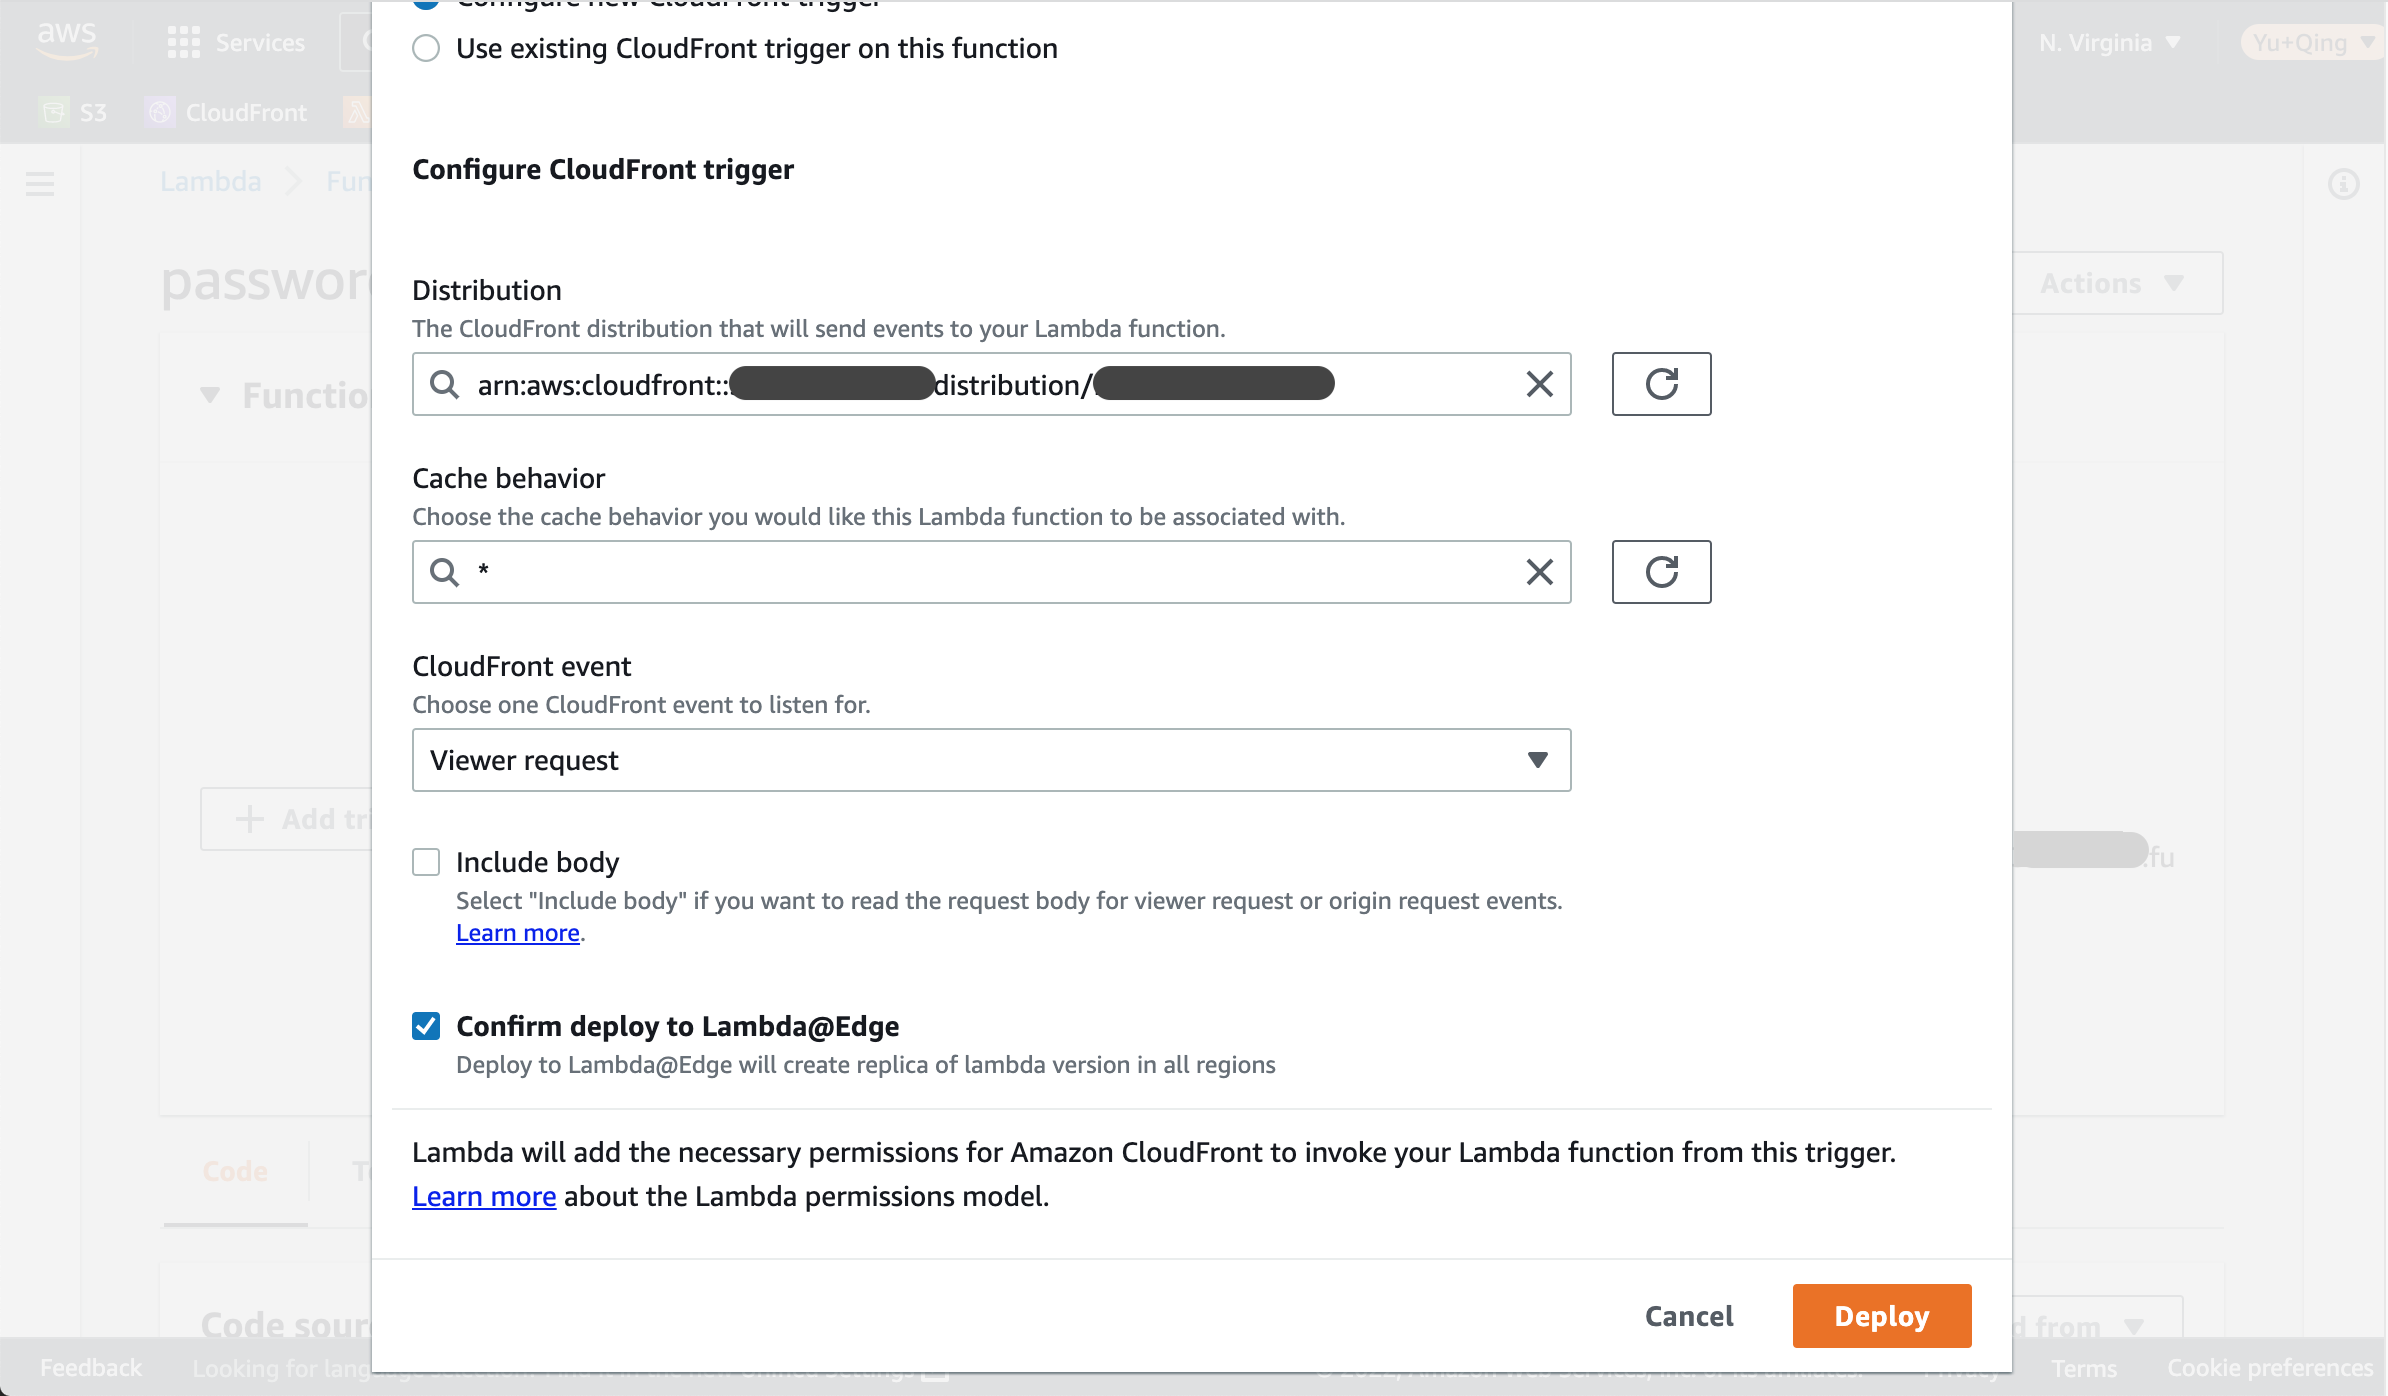
Click Deploy.
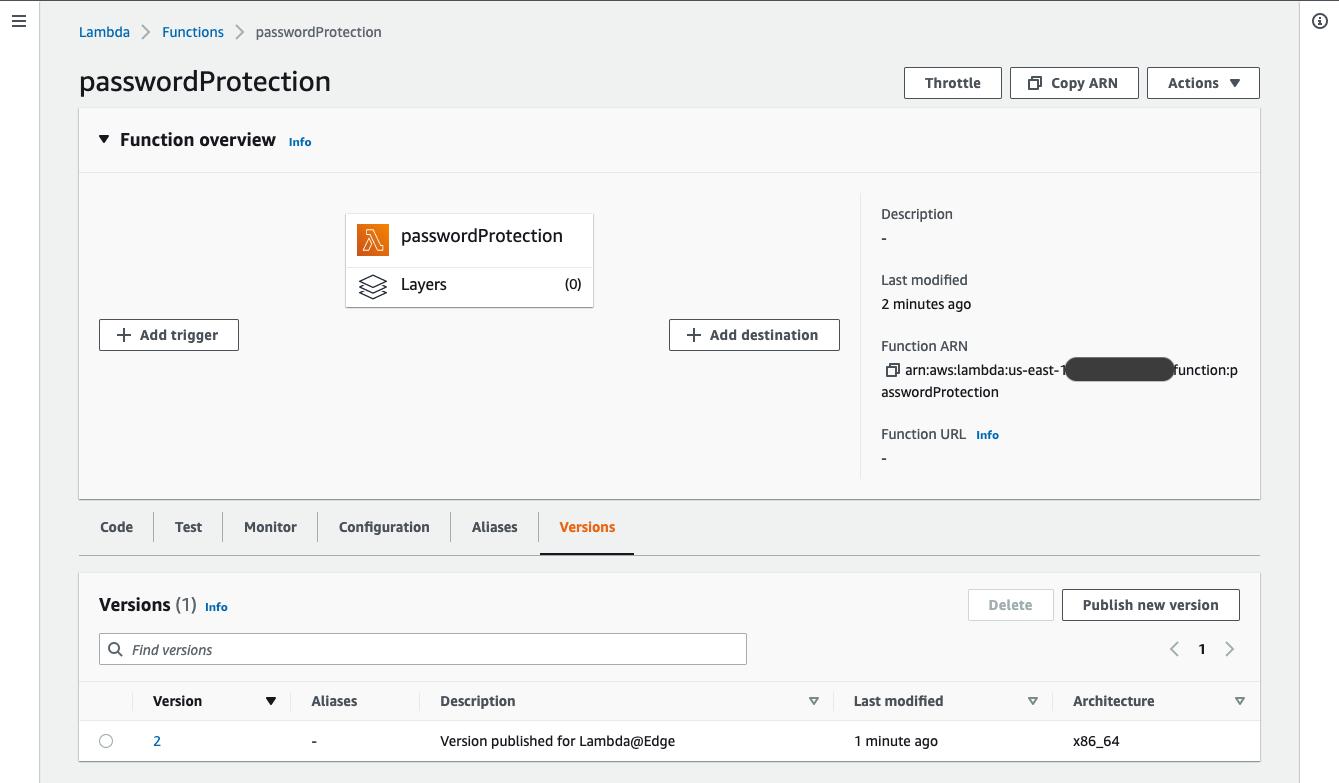
Now your Lambda is being replicated across all regions. The CloudFront trigger is associated with the specific version only. So next time when come back to this Lambda please go to the Versions tab to find the deployed Lambda and associated trigger.
Go to the distribution and copy the Distribution domain name to browser.
CloudFront Alternative Domain #
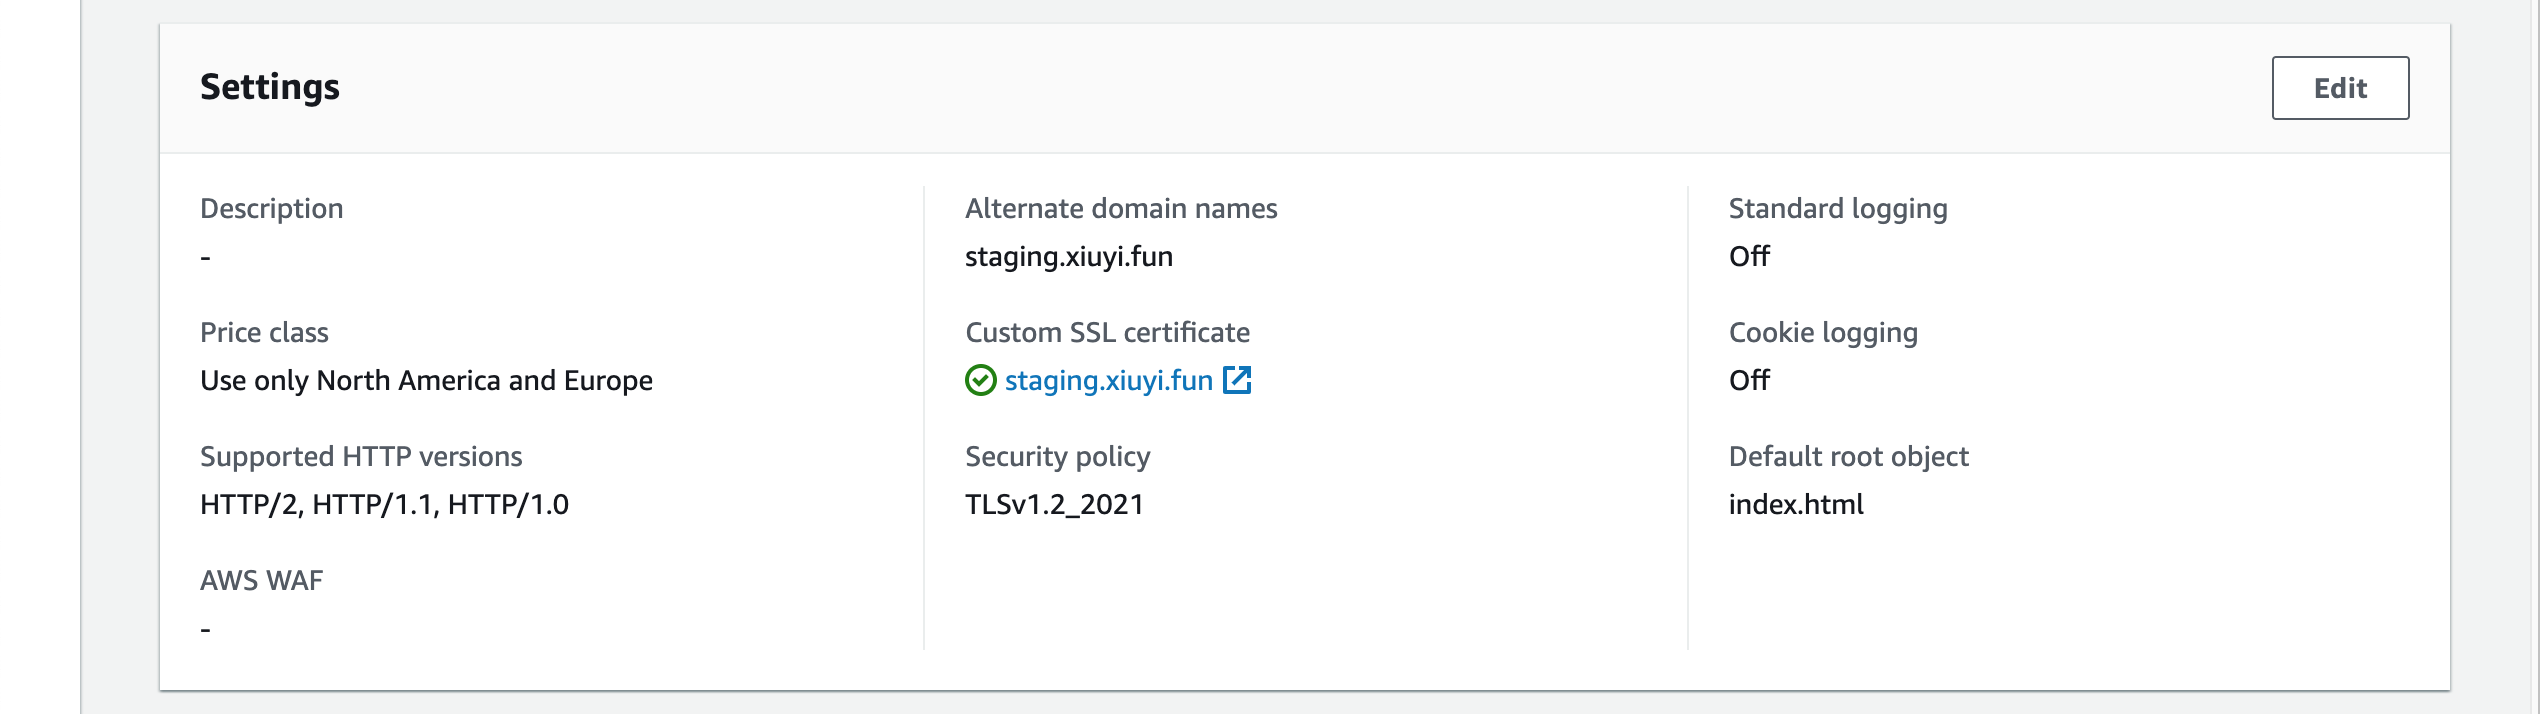
With the success of testing we can add custom domain to this CloudFront distribution.
Go to the settings section of the distribution. Click Edit.
Put staging.<your domain name> into the Alternative domain name (CNAME) field.
You can multiple domains here as long as the SSL certificate have it covered.
In the Custom SSL certificate field choose the one issued by the Certificate Manager.
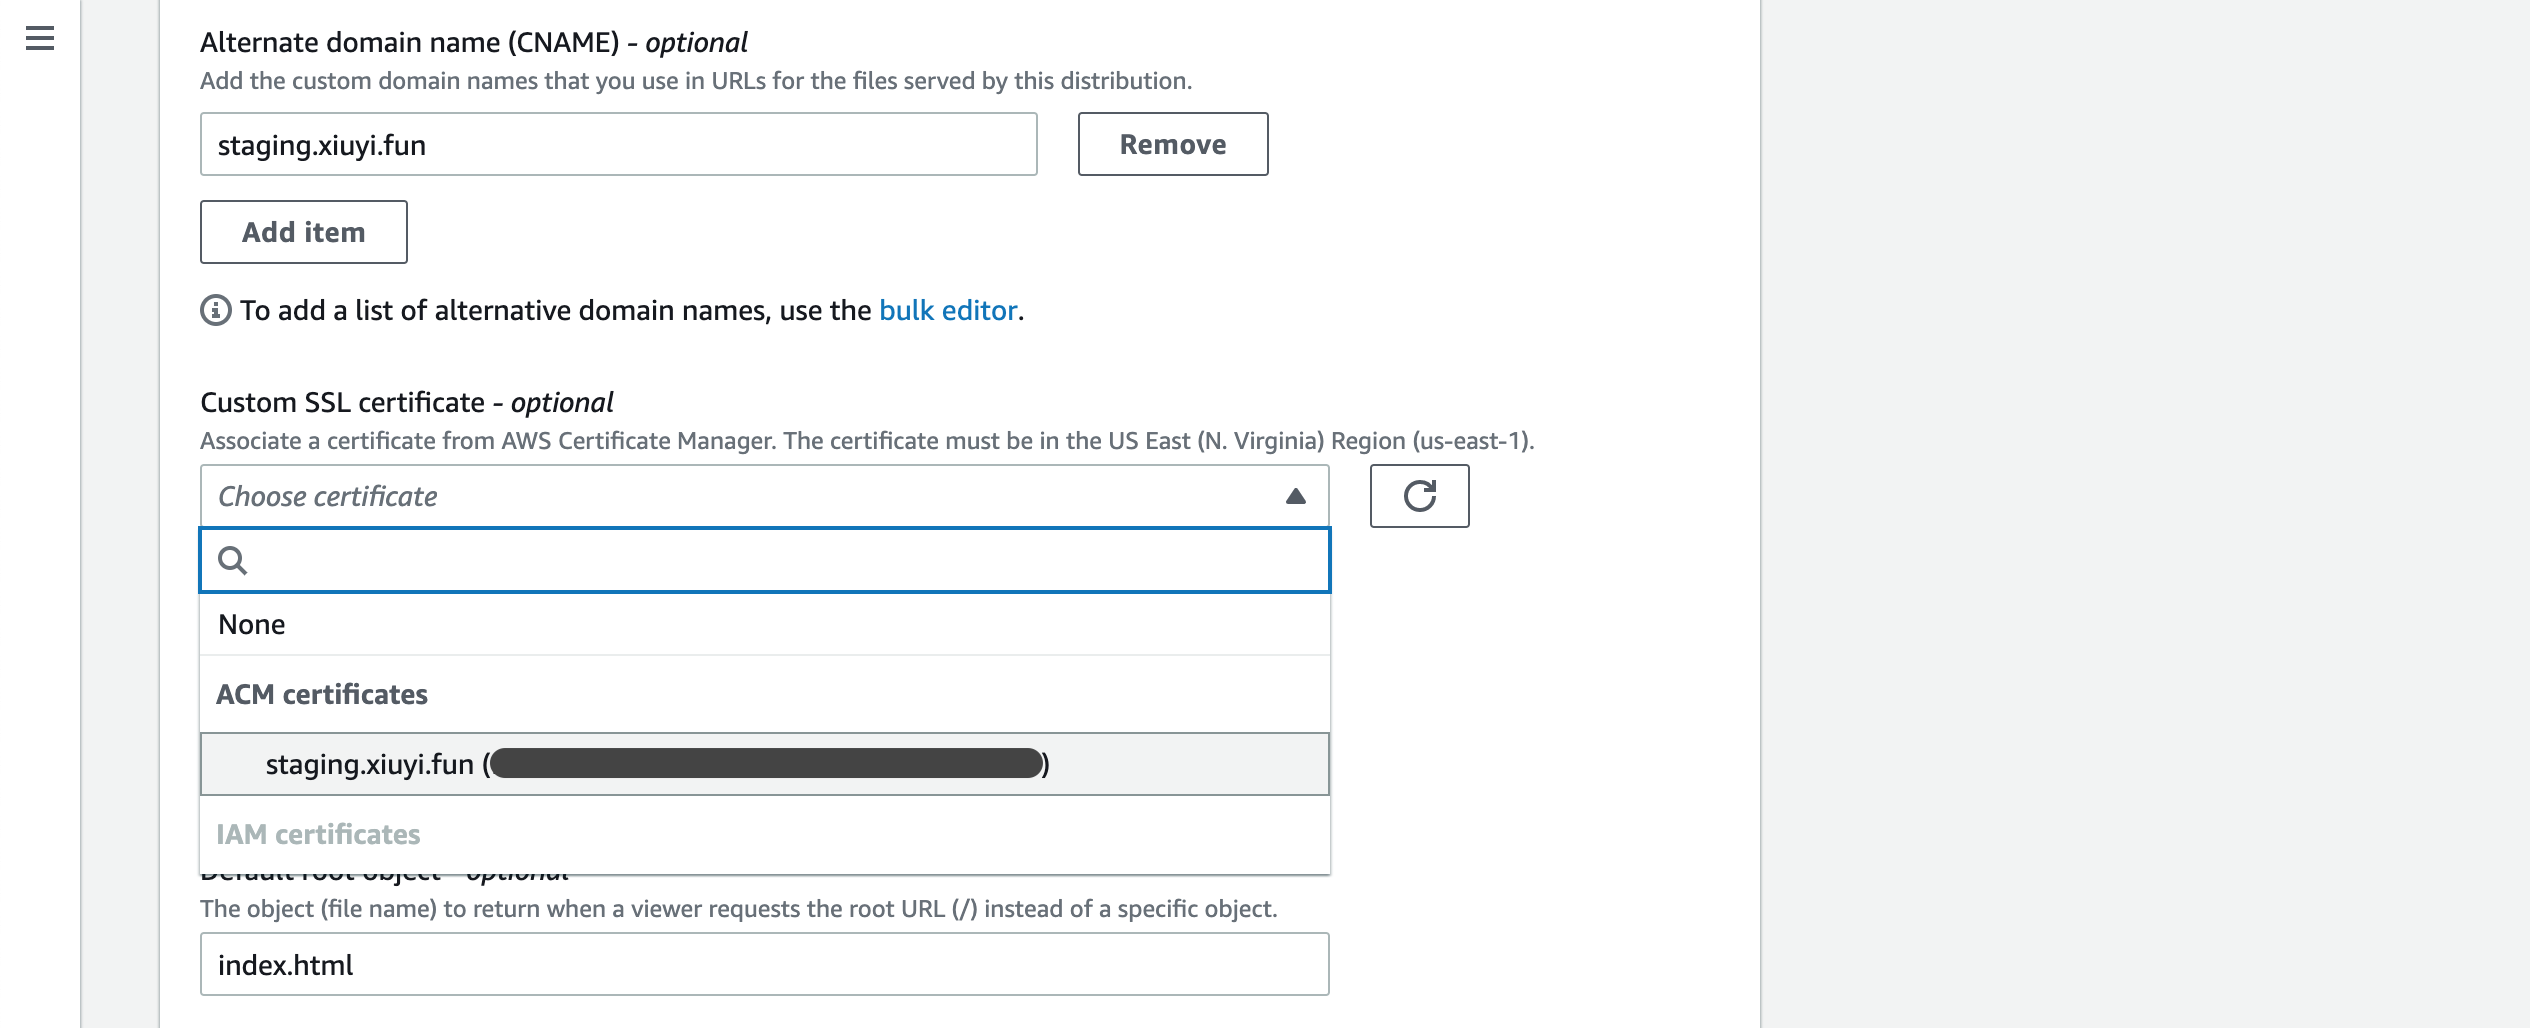
Click Save changes.
Using Alias For CloudFront Alternative Domain #
Go to Route53 and open the hosted zone for the alternative domain. Click Create record.
Leave the Record name empty. Enable Alias in the Route traffic to search and choose Alias to CloudFront distribution.
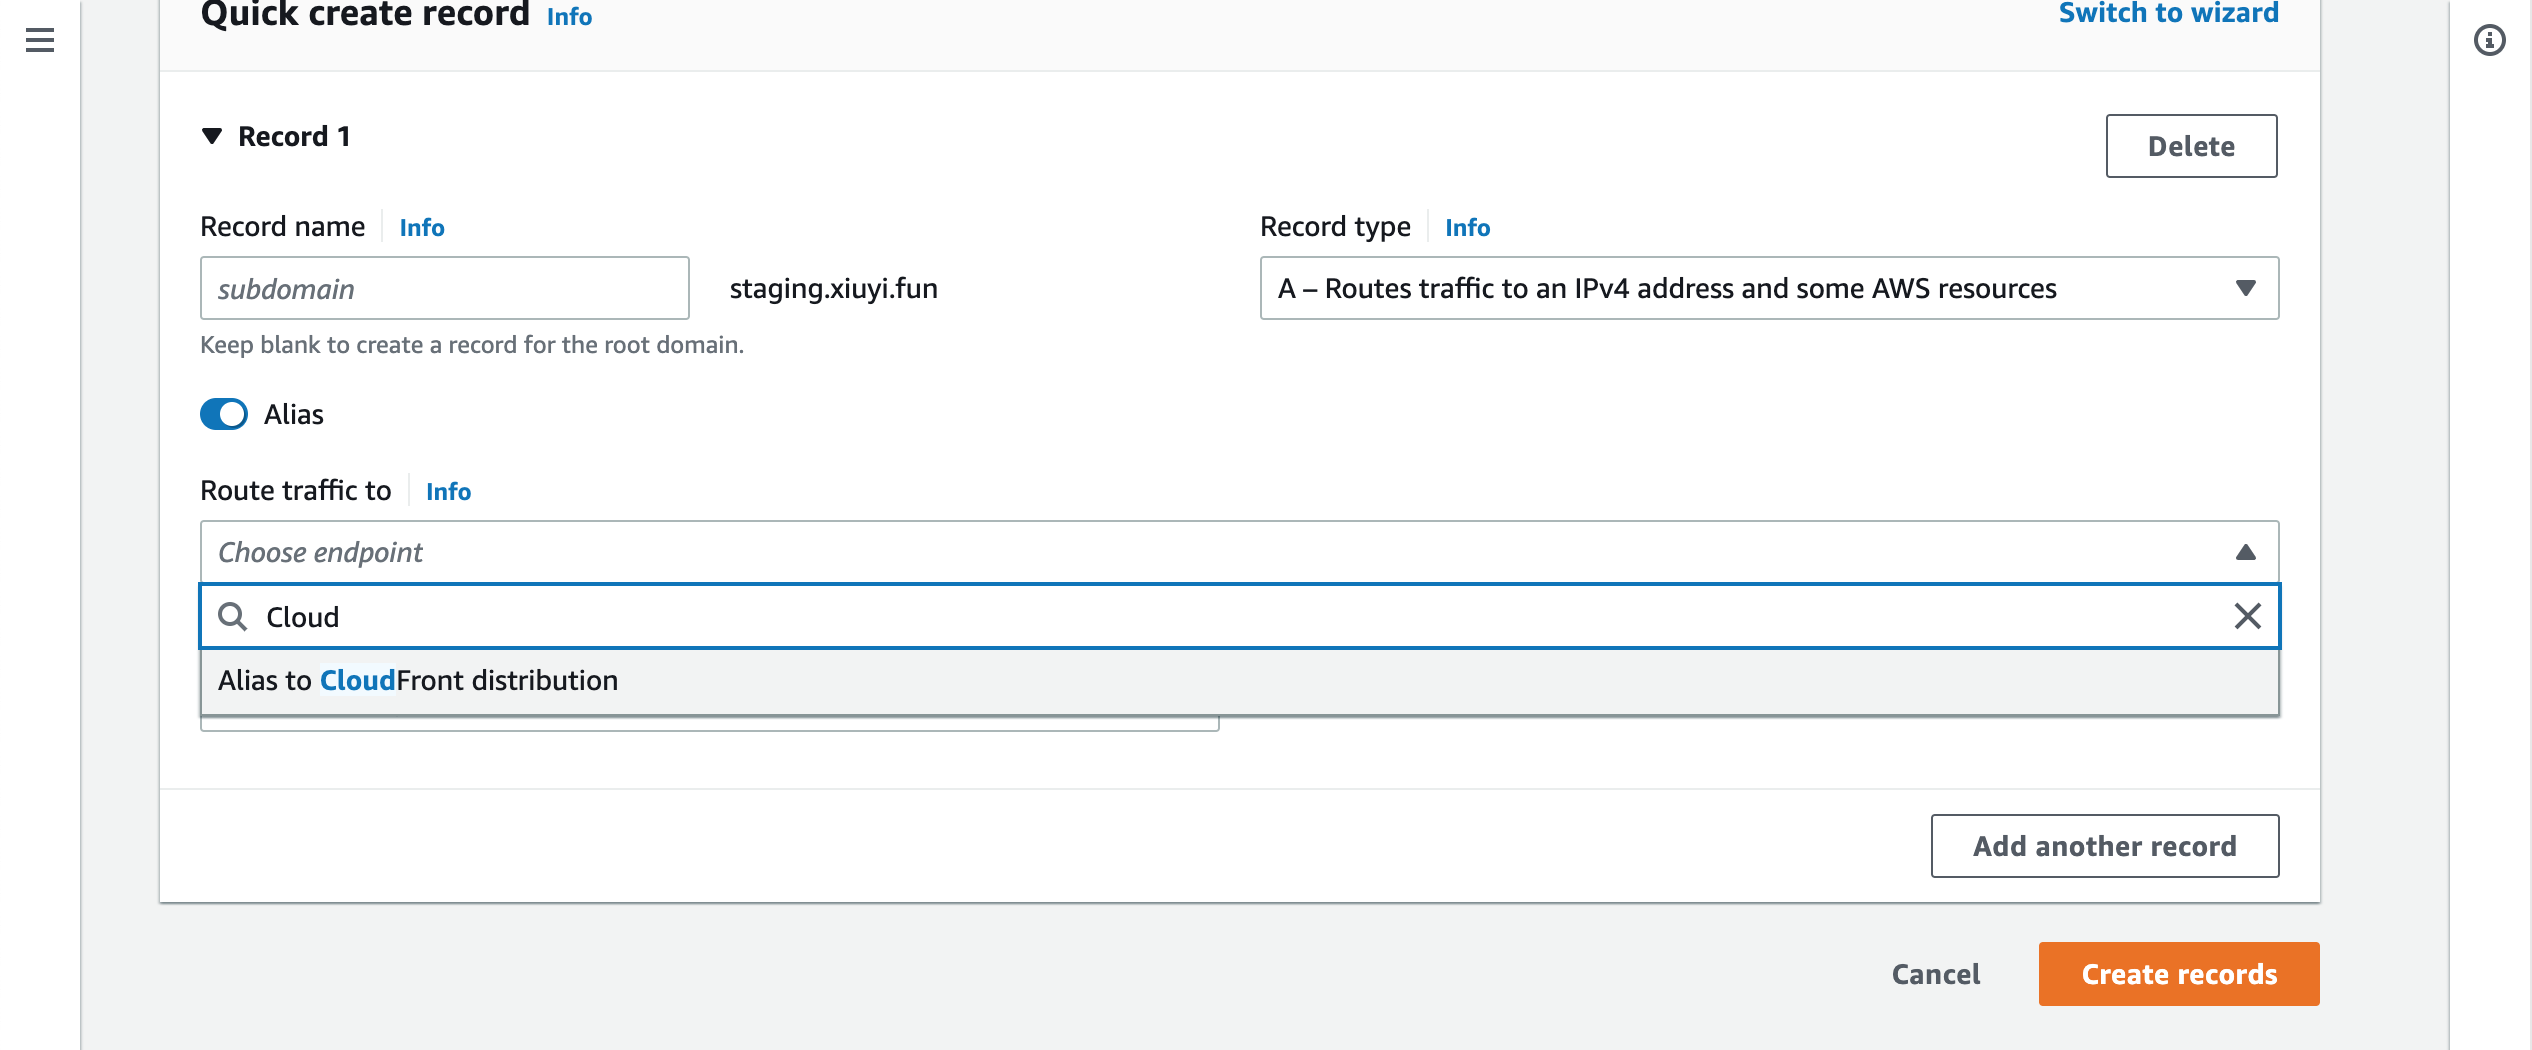
Then choose the distribution that has this alternative domain.
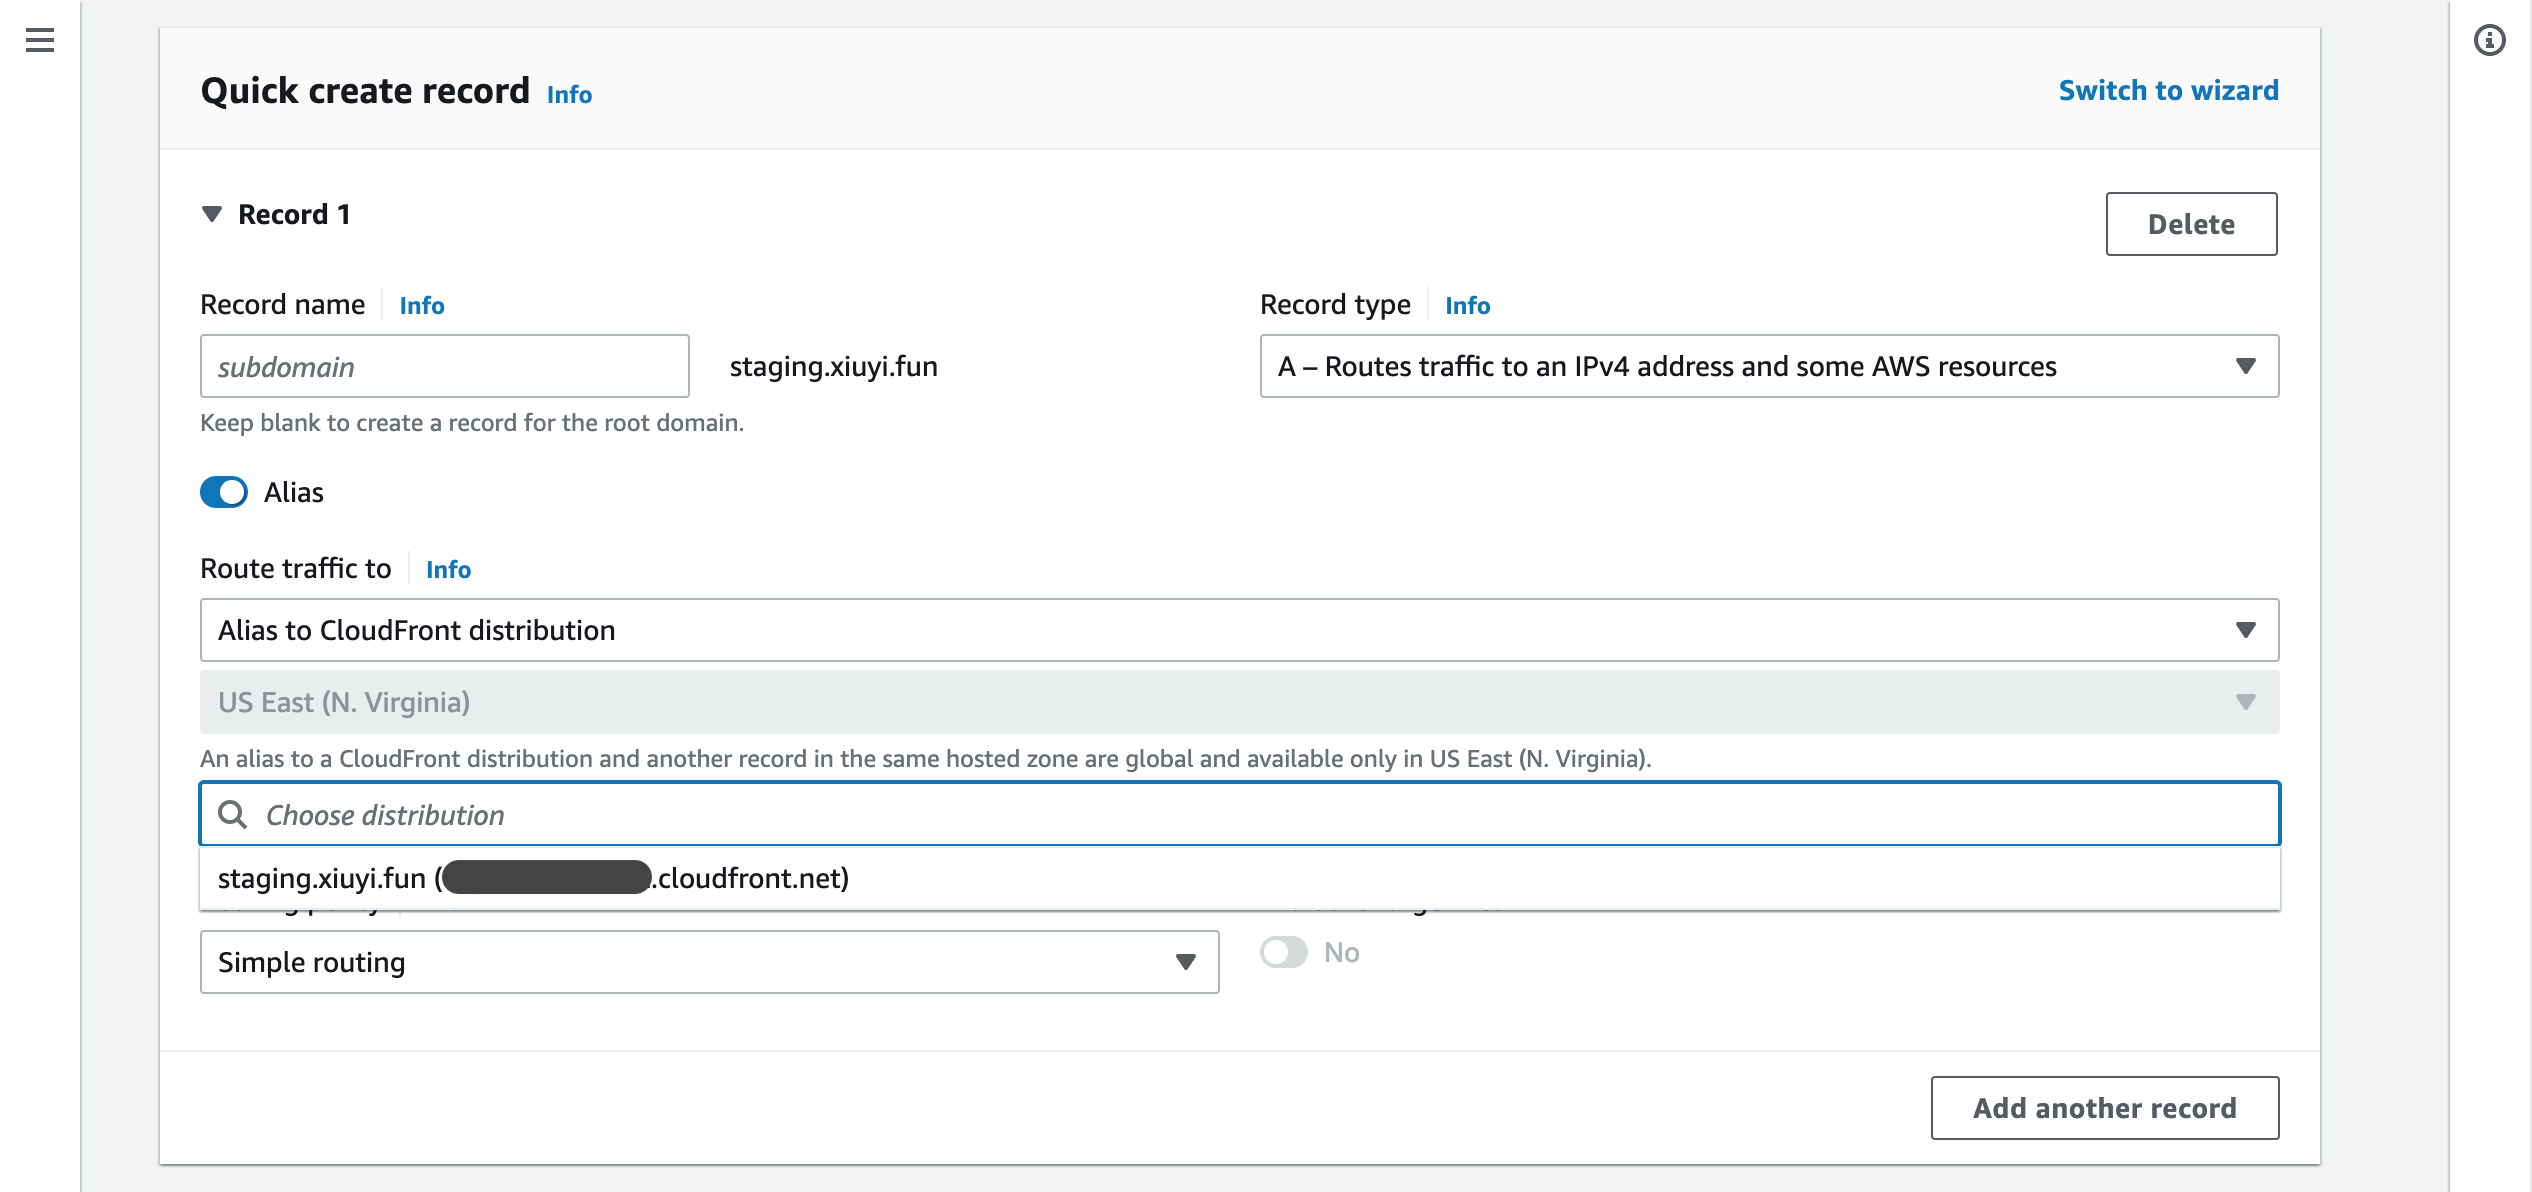
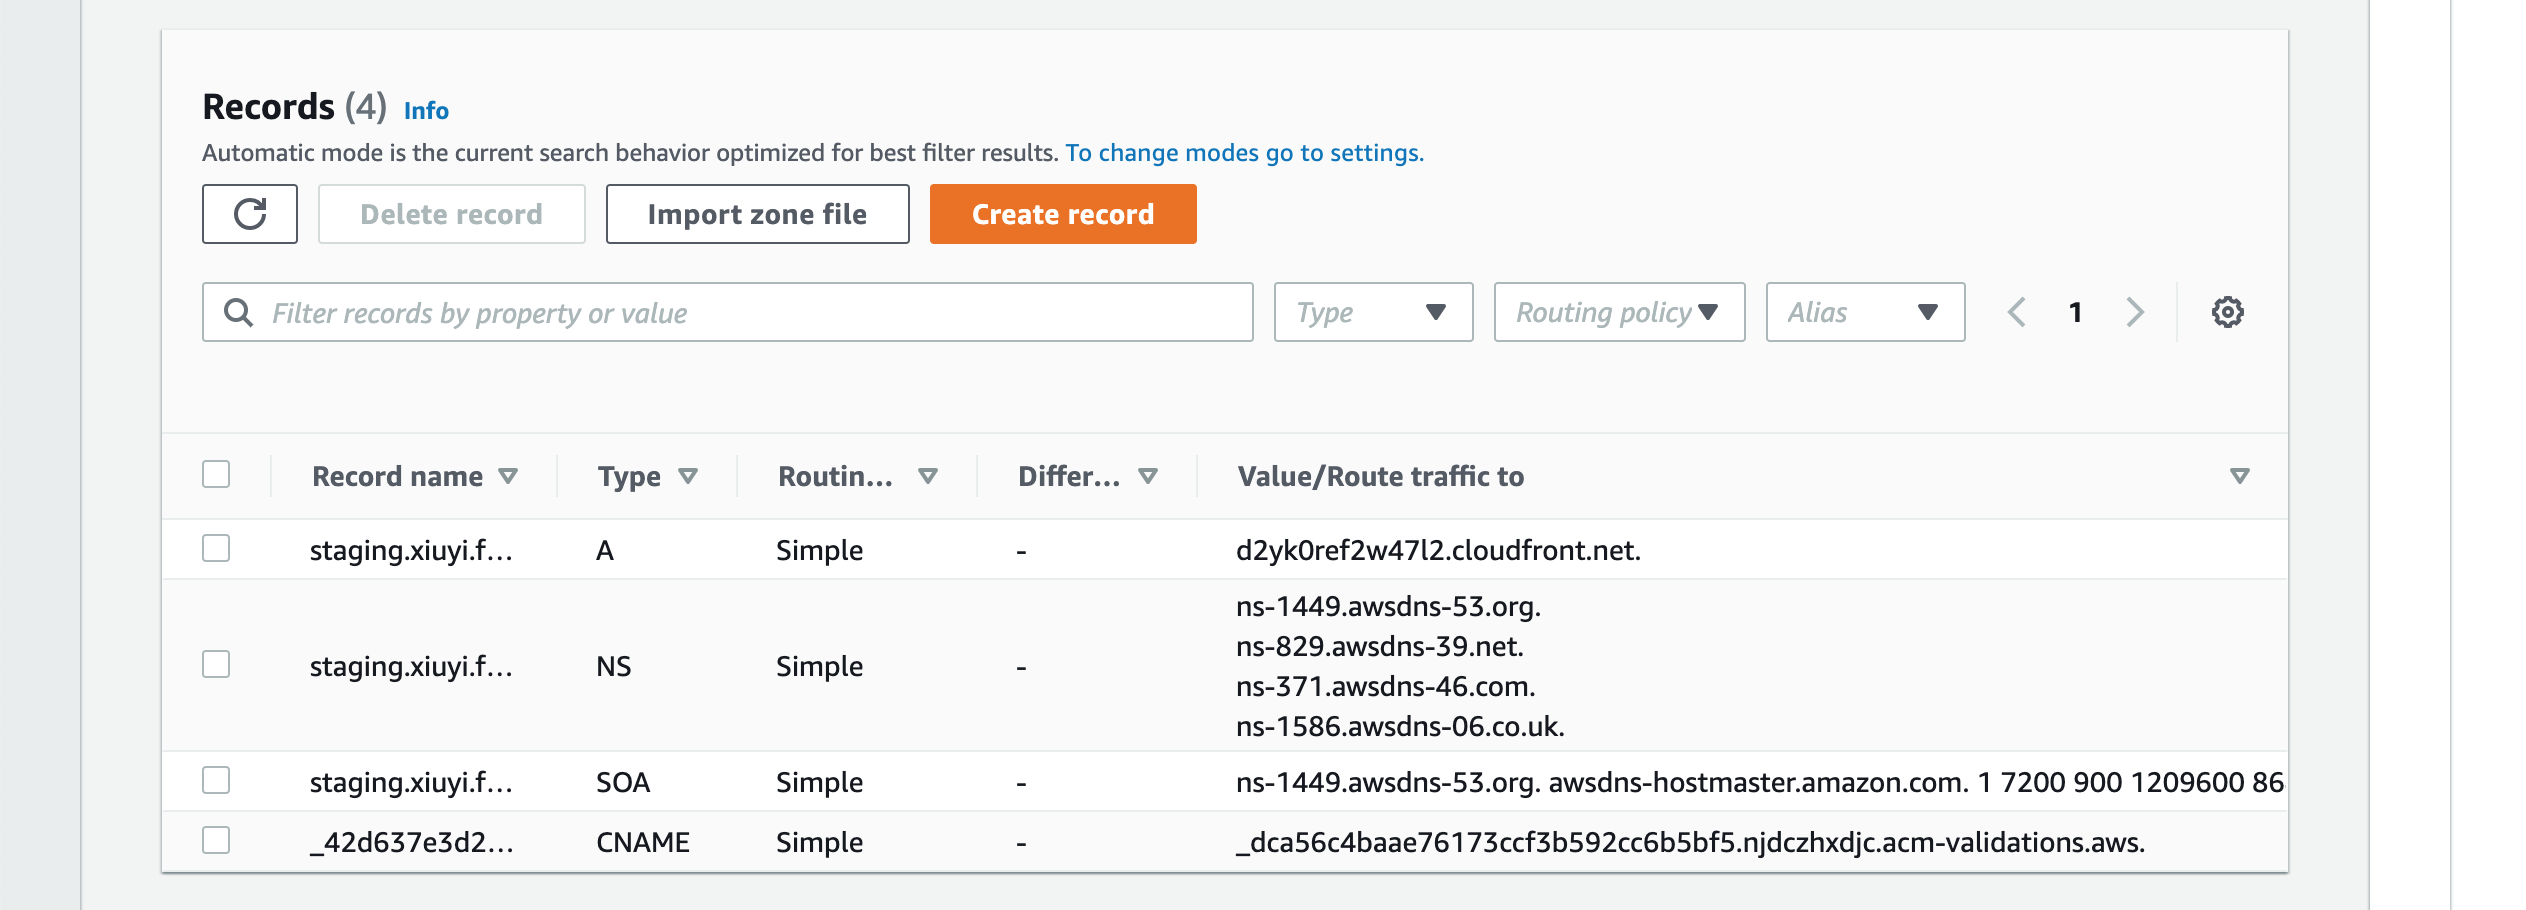
Click Create records. A new A Type record is added.
URL Rewrite With CloudFront Functions for Production #
CloudFront Functions is different from the Lambda@Edge we just used. For a detailed comparison please refer to this Introducing CloudFront Functions – Run Your Code at the Edge with Low Latency at Any Scale
This can be used for your production CloudFront distribution where no password protection is needed.
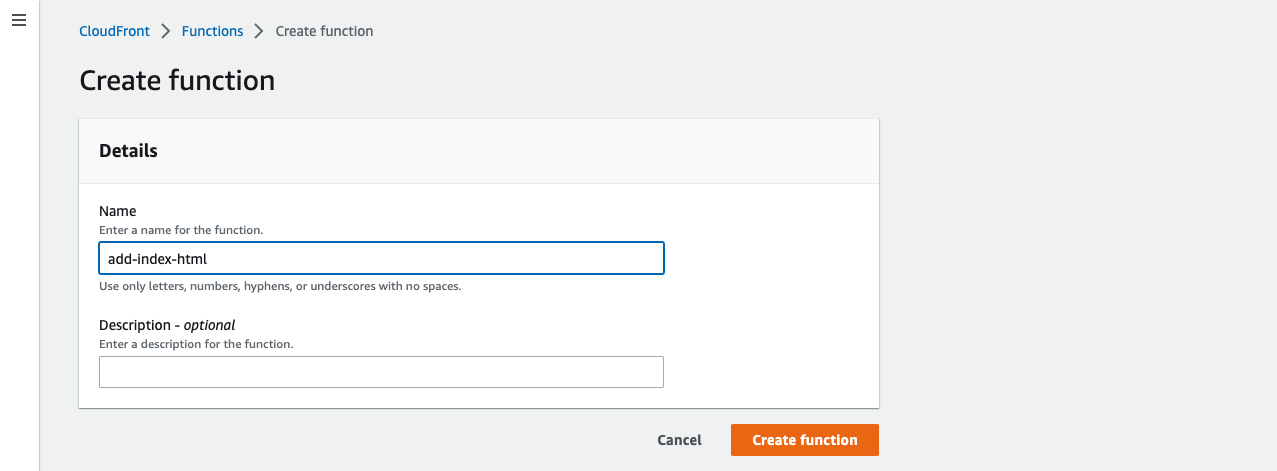
Go to CloudFront and from the side menu on the left choose Functions.
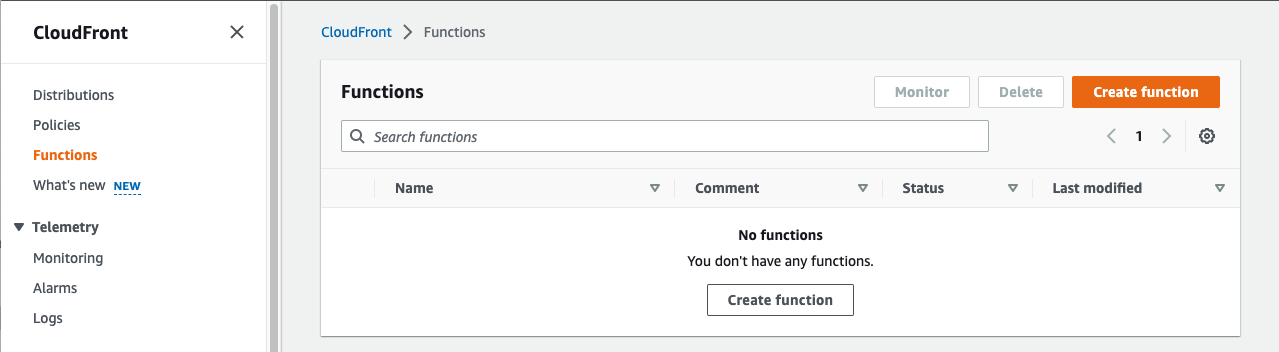
Let’s put add-index-html in the Name field. Then click Create function.
Replace the existing code with the following code into Development tab under the Function code section.
function handler(event) {
    var request = event.request;
    var uri = request.uri;

    // Check whether the URI is missing a file name.
    if (uri.endsWith('/')) {
        request.uri += 'index.html';
    }
    // Check whether the URI is missing a file extension.
    else if (!uri.includes('.')) {
        request.uri += '/index.html';
    }

    return request;
}
Click Save changes.
Go to the Publish tab and click Publish function. Now you can associate this function with a distribution.
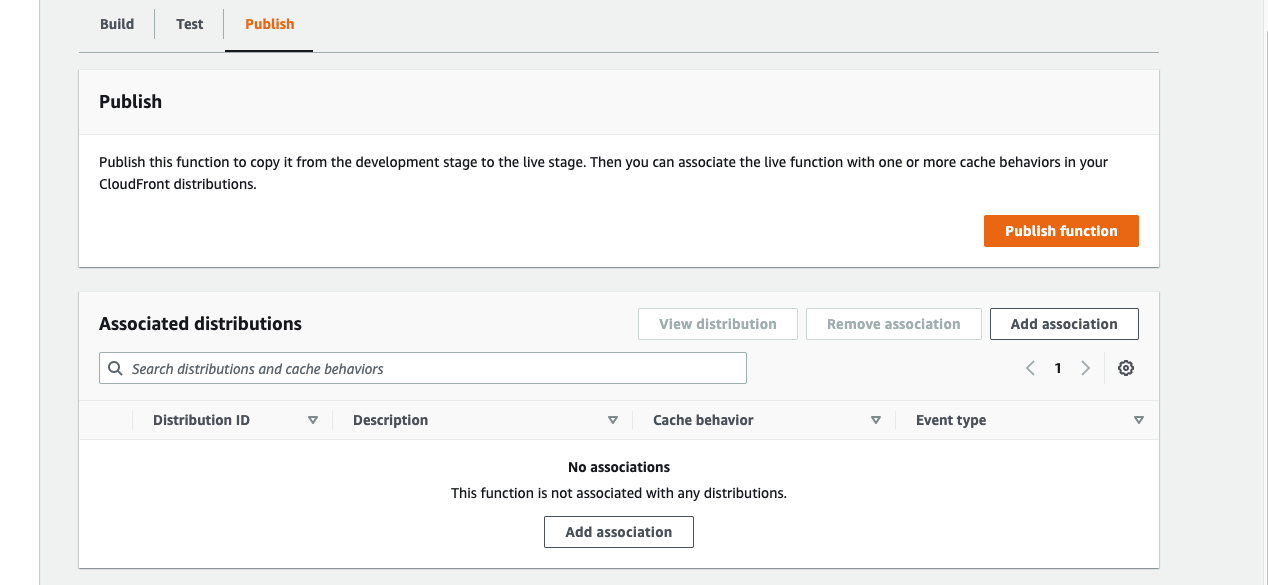
You can also add the association from the distribution by copy the ARN from the Details section of this function.
For small amount of distributions adding associate from the function may just be easier.
Click Add association. Choose the distribution you want to associate. Choose Viewer Request as the Event type.
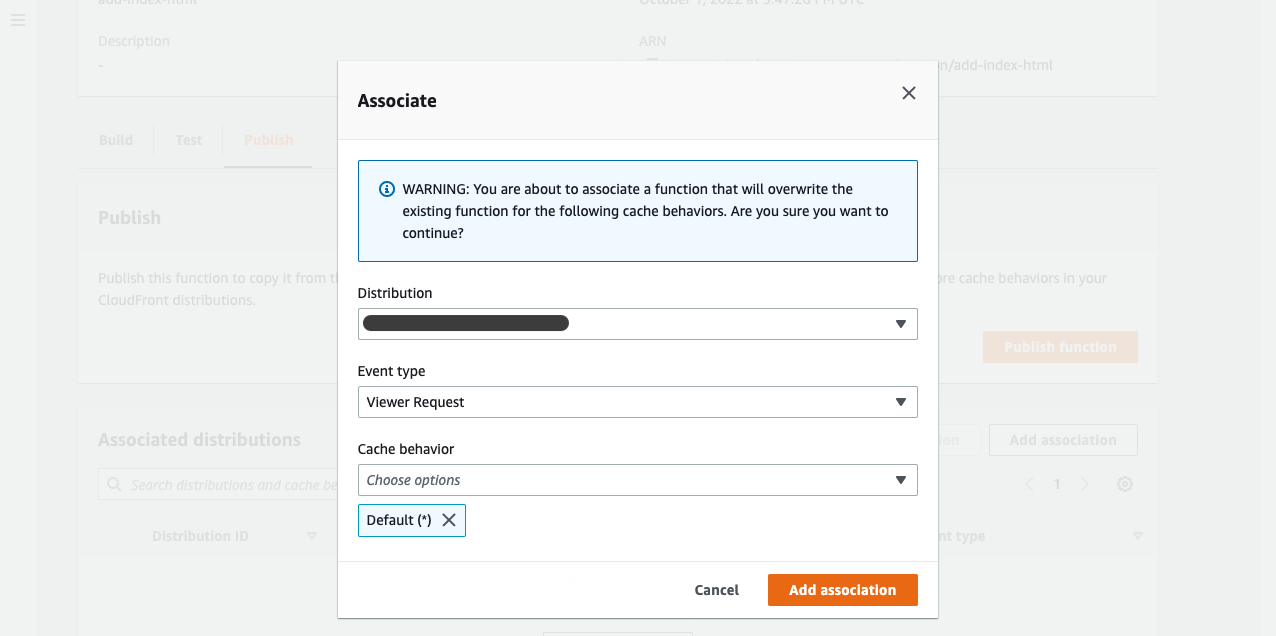
Click Add association.
Analyze CloudFront Access Log Using Athena #
When CloudFront logging is enabled we will be able to see how content is accessed and the reponse time for each item.
Enable CloudFront Logging #
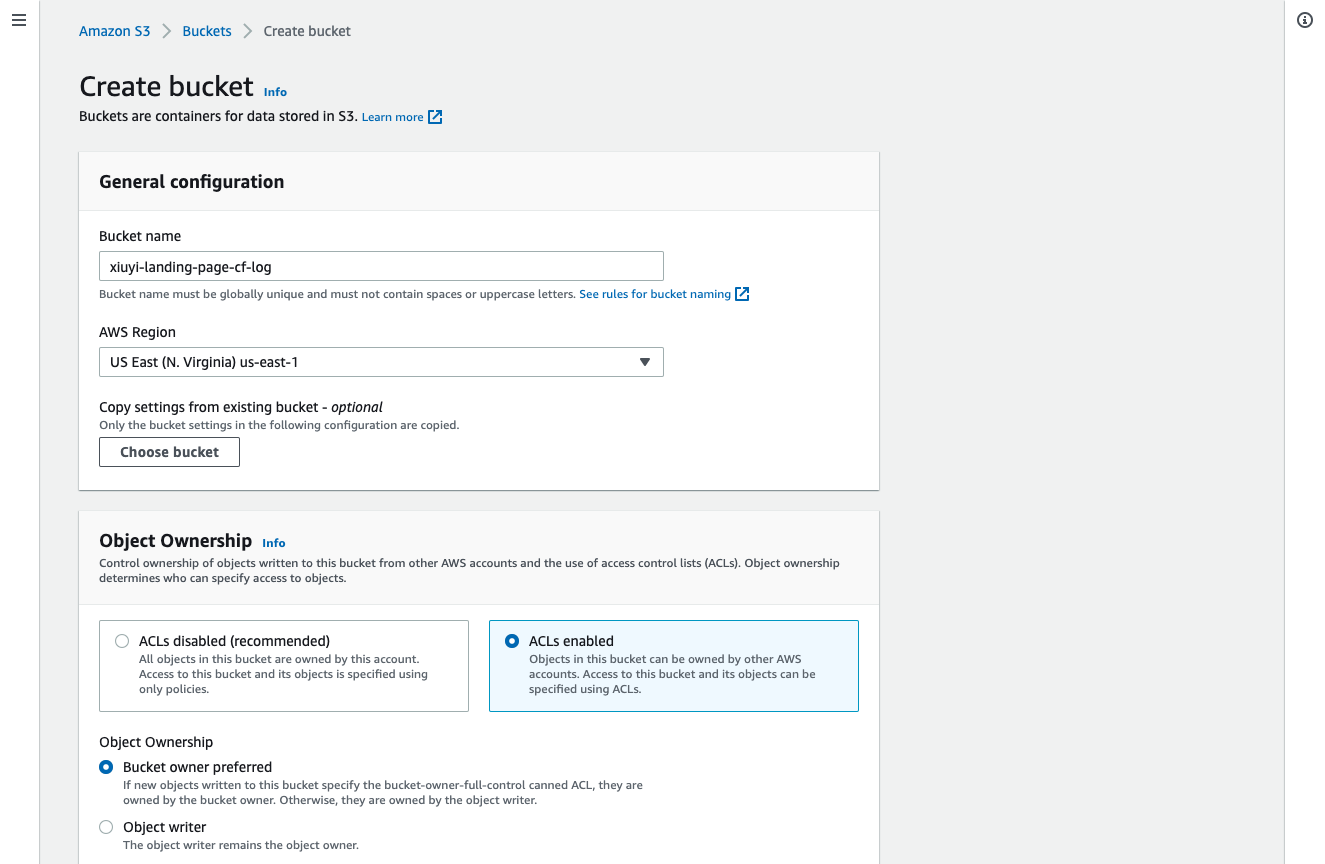
Create a new S3 bucket with name of xiuyi-landing-page-cf-log (💡 Please choose your own name since each S3 bucket name is globally unique). This time we need to use the ACLs enabled option so that Athena can query the logs. We can then leave the rest with the default values.
Open the distribution and in the first tab (i.e. General) Go to the Settings section and click Edit.
Turn on the Standard logging. Then choose the new bucket that is created for CloudFront logging.
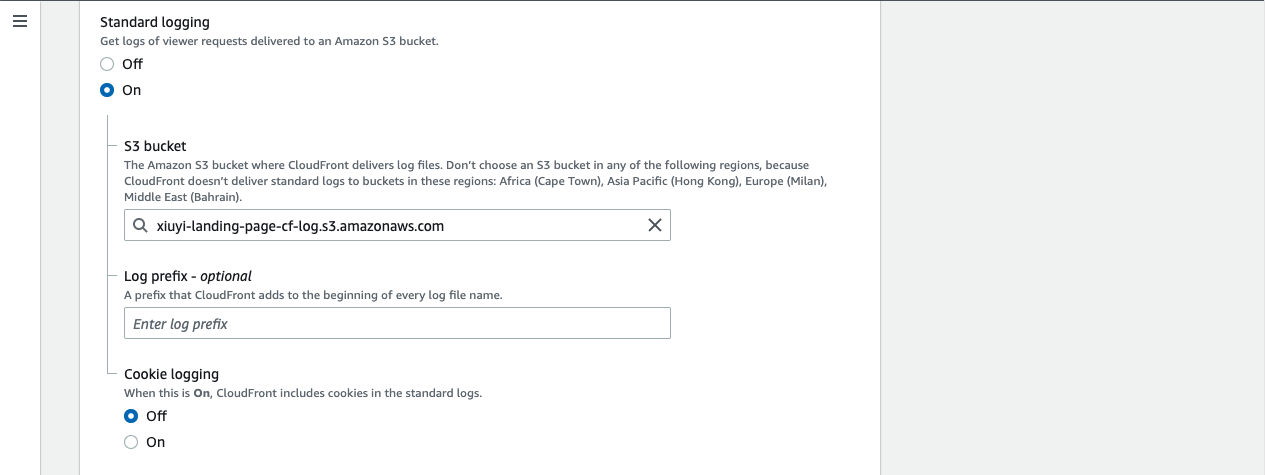
Then Save changes.
SQL Query CloudFront Logs Via Athena #
Every 20 minutes CloudFront saves the access log to a tab delimited gzip file. For more details about the 33 fields please refer to the Standard log file fields.
If it’s the first time using Athena we need to setup an S3 bucket for Athena output please see Specifying a query result location using the Athena console.
Let’s go to Athena and open the Query editor.
Past the following query into the Query editor for creating the table.
CREATE EXTERNAL TABLE IF NOT EXISTS default.xiuyi_landing_page_cf_log (
  `date` DATE,
  time STRING,
  location STRING,
  bytes BIGINT,
  request_ip STRING,
  method STRING,
  host STRING,
  uri STRING,
  status INT,
  referrer STRING,
  user_agent STRING,
  query_string STRING,
  cookie STRING,
  result_type STRING,
  request_id STRING,
  host_header STRING,
  request_protocol STRING,
  request_bytes BIGINT,
  time_taken FLOAT,
  xforwarded_for STRING,
  ssl_protocol STRING,
  ssl_cipher STRING,
  response_result_type STRING,
  http_version STRING,
  fle_status STRING,
  fle_encrypted_fields INT,
  c_port INT,
  time_to_first_byte FLOAT,
  x_edge_detailed_result_type STRING,
  sc_content_type STRING,
  sc_content_len BIGINT,
  sc_range_start BIGINT,
  sc_range_end BIGINT
)
ROW FORMAT DELIMITED
FIELDS TERMINATED BY '\t'
LOCATION 's3://xiuyi-landing-page-cf-log/'
TBLPROPERTIES ( 'skip.header.line.count'='2' )
After running the query a default database and table are created.
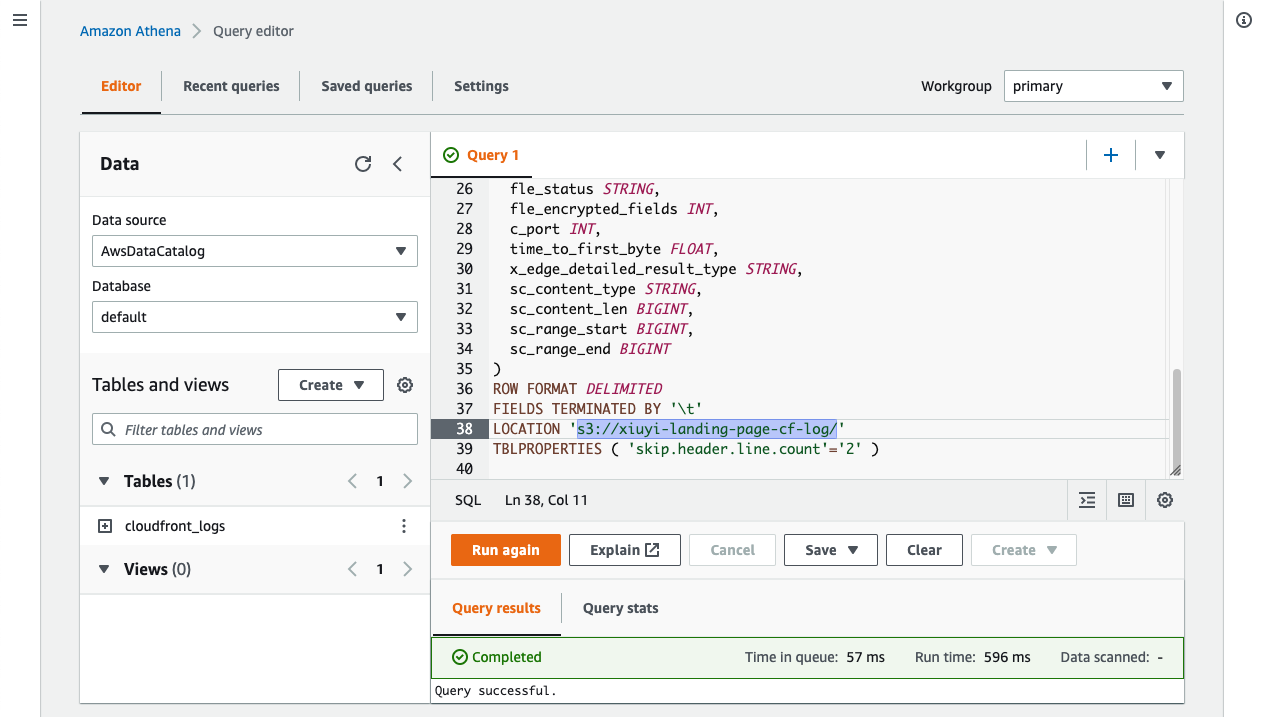
ℹ️ The above query is copied from this documentation: Querying Amazon CloudFront logs.
Use the following query can tell you the total bytes served daily.
SELECT "date", SUM(bytes) AS total_bytes
FROM xiuyi_landing_page_cf_log
GROUP BY "date"
ORDER BY "date" desc
LIMIT 100;
Tuning Cache-Control HTTP Header #
Though CloudFront is a form of cache the TTL settings in CloudFront has no impact on how long content is cached by the browser. This is achieved through the content origin. S3 object Metadata can be used for tuning how content should be cached in browser.
Cache tuning is another complex large topic we are not able to cover in this post. I highly recommend taking a look Cache-Control for Civilians.
Resources #
Please feel free to email your feedback to: editor[at]yuguotianqing.us